

Welcome to the Complexity Limit TL:DR Raid Guide sheet! Below you’ll find brief overviews of the first 9 bosses. These are not comprehensive guides, but only an overview of the important stuff. If you just need to quickly know how a boss fight goes, this should get you what you need. If you want more info, please refer to the full boss guide pages ^.^
Table of Contents
- Shriekwing – TLDR / Full Guide
- Huntsman – TLDR / Full Guide
- Kael’thas – TLDR / Full Guide
- Artificer Xy’mox – TLDR / Full Guide
- Hungering Destroyer – TLDR / Full Guide
- Lady Inerva Darkvein – TLDR / Full Guide
- Sludgefist – TLDR / Full Guide
- Council of Blood – TLDR / Full Guide
- Stone Legion Generals – TLDR / Full Guide
- Denathrius – TLDR (Coming Soon) / Full Guide
Please note – there will not be a Denathrius TL:DR guide until mid-week heroic week. We’d like more data before posting anything we’d call a “guide.”
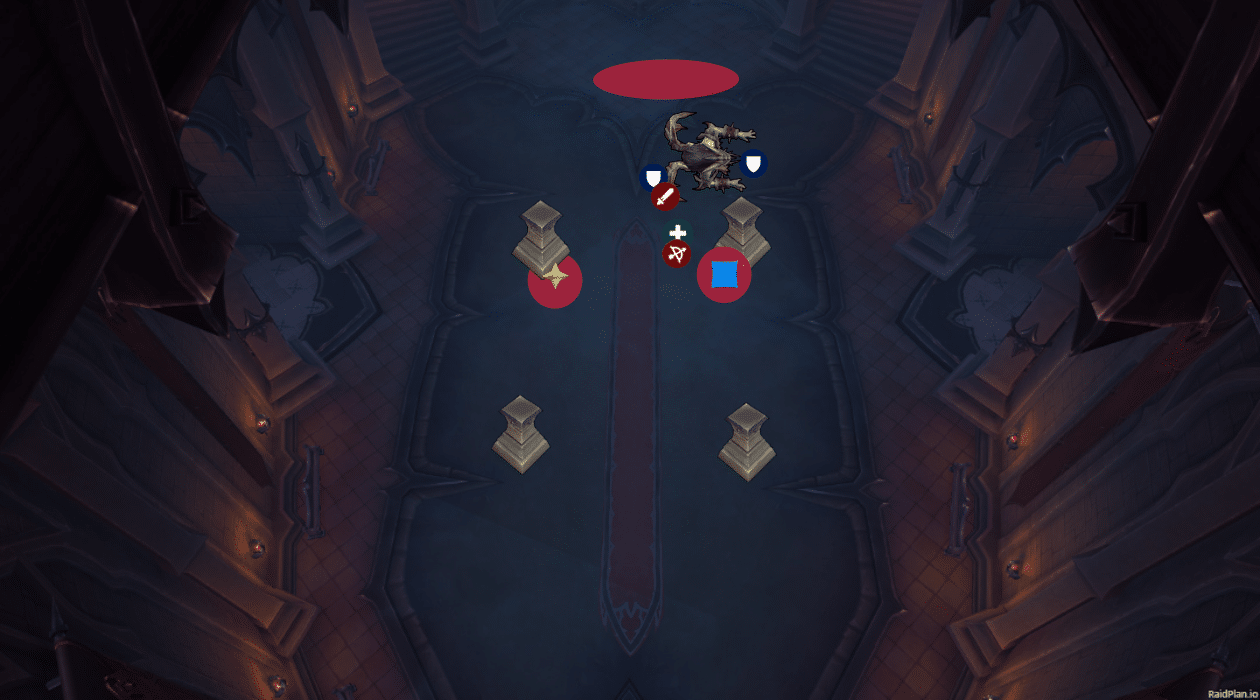
1 – Shriekwing
- Lust on pull
- Tank near a pillar. Raid stays close to boss. Put star marker out of LoS behind your pillar
- Tank swap after every Exsanguinating Bite
- Everyone stacks on Star for Earsplitting Shriek. Don’t fail at stacking pls.
- This drops red puddles. You want to stack the red puddles in the same spot.
- Echolocation target goes to either Star, or the far-north red oval you see in the graphic
- Dodge the little balls from Echoing Screech
- When boss hits 100 energy, you enter Intermission. She is blind, and just moves around the room looking for people
- If she gets within 12 yards of you, you die.
- Hide behind a pillar again for Earsplitting Shriek. Preferably a different pillar than for normal phase.
- Dodge orbs from Echoing Sonar
- After Intermission, change pillars you hang out near if needed due to puddles.

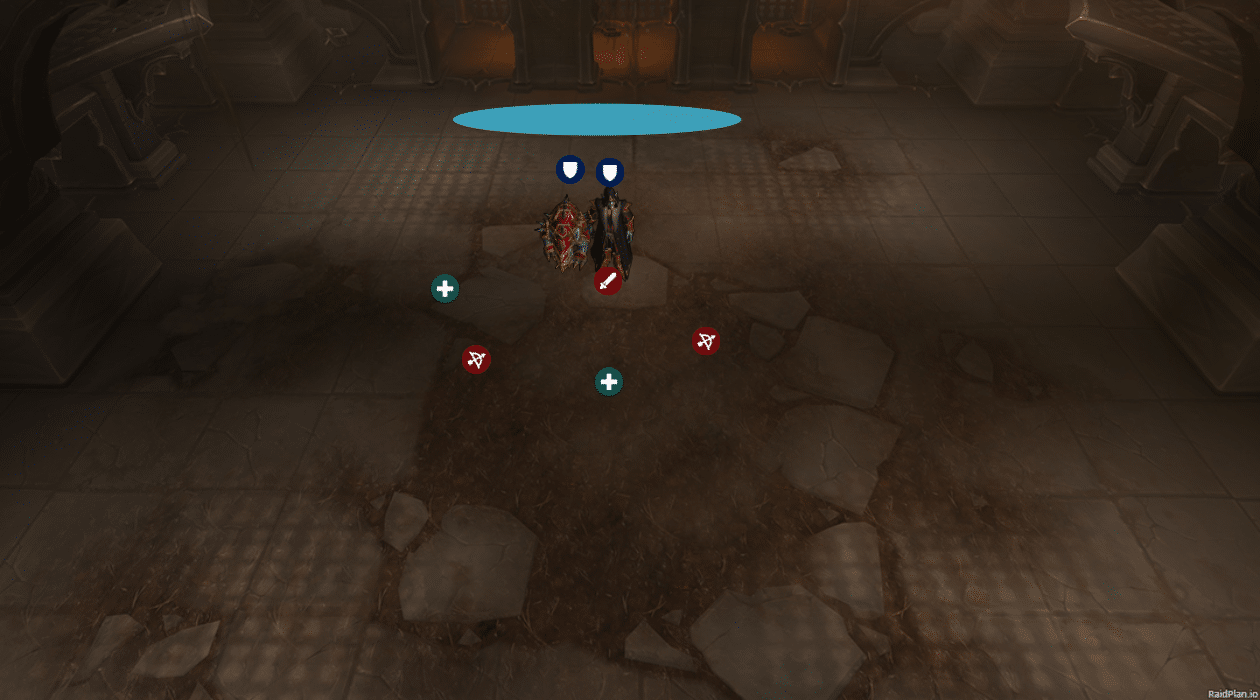
2 – Huntsman
- You fight a hunter and his 3 bears. 1 bear at a time. Each bear lasts 30% of boss’s HP. Last 10% is Huntsman by himself. Boss and active Bear share a healthpool.
- Raid should be loosely spread due to Spreadshot by boss.
- Have markers in northern area of room for Sinseeker. Nobody should stand by those markers except players affected by Sinseeker. See the light blue oval area in the graphics below.
- Bear 1 – Margore – 100% – 70% boss HP
- Stack boss & this bear. Nuke um down
- Tank swap at 2-3 stacks of bear’s Jagged Claws DoT
- If you get a red circle under you, move to melee. It’s a meteor-style mechanic with split damage. Use your melee to split damage with you.
- Bear 2 – Bargast – 70%-40% boss HP
- Bear casts Rip Soul and Shades of Bargast. When either cast is less than 5 seconds from happening, move the bear to the far north-western corner of the room
- Rip Soul creates a green soul. Must be healed to full ASAP. Healing required based on tank’s HP when ability is cast.
- Shades of Bargast must be CC’d until they are at 60-70 energy. At that point, all DPS hardswap and blow them up. If not CC’d, they’ll chaincast a nasty AoE and you’ll wipe.
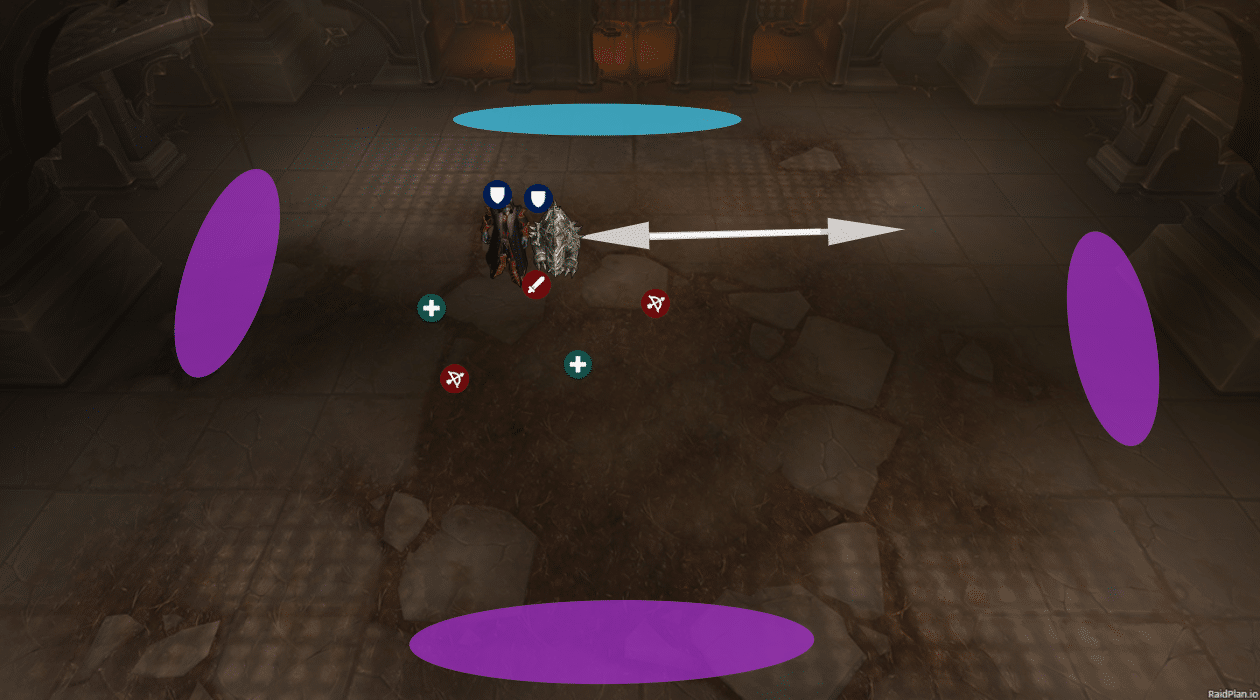
- Bear 3 – Hecutis – 40%-10% Boss HP
- When bear reaches 5-6 stacks, the tank holding him yeets outta the group. Just kinda wait for him to get back to you. This deals big raidwide AoE, healers should pop a CD
- Players with circles for Petrifying Howl need to get to sides of the room. See the purple ovals in the P3 graphic below.
- After bear 3 dies, finish off boss.
- P1 positioning
- P2 positioning

- P3 positioning
3 – Kael’thas
- Inverse fight. Heal Kael’thas from 10% to 100% to win.
- Adds spawn regularly throughout the fight. Kill them.
- Big add dude at start you need to spread out for.
- Fiends explode when they die. Don’t nuke yourself.
- Assassins jump behind people and do a frontal cleave. Just stay spread out
- Occulists just do a couple casts. Kill them.
- Vanquishers need to be tanked.
- Soul Infusers are #1 add kill priority. They drain HP from boss
- Soul Pedestal – 4 of these in the front. Click it to channel your own HP into Kael’thas. Do this anytime you can.
- Essence Font – lamp kinda thing dropped by Occulists. Healers need to heal the Font to full, it’ll give Kael’thas a chunk of HP
- Infuser’s Orb – dropped by Infusers. 50% Healing done increase for 14s.
- When Kael reaches 45% and 90%, a Shade of Kael’thas spawns.
- Kill the shade.
- Summons Phoenixes that fixate on people. Kite them & kill them.
- Don’t stand in fire pools.
- Ember Blast is a meteor ability. Bring to melee range to split damage
- Blazing Surge is a massive cone ability. Spread around the Shade so not many people get hit.
- You deal 10% HP damage to Shade to make it disappear. When the second Shade hits 0% HP, you win!
4 – Artificer Xy’mox
- Sick fight. 3 phases. Each phase has a special ability tied to it
- Dimensional Tear – debuff on 2 people. When it expires it creates white wormhole where the players are standing. Run through one wormhole, appear at the other!
- Dodge the white lines from Rift Blast. Ezpz.
- Tank with Glyph of Destruction needs to run away from group. Other tank needs to taunt.
- Stasis Traps on the ground need to be triggered, then killed.
- Hyperlight Spark jumps from person to person, just heal through it nbd.
- Phase 1 & 2 – drop wormholes on far-east and far-west sides of room
- Phase 1
- If you get a Fleeting Spirit chasing you, use the wormhole to port away from it. Keep going back and forth between wormholes till the Spirit despawns
- Phase 2
- 8 blue seeds around the room. Assign 1 player to grab each seed, bring to far-east side of room.
- Drop seeds right next to wormhole on that east side, then take the wormhole to the west side
- Seeds then explode, and you’re all safely on the west ^.^
- Phase 3
- Drop wormholes in center and far-east side of room. When big suck mechanic happens, use wormhole in the center of the room to port back out to the wall.
- Do this at the last second before the circles explode!
- Kill boss, ggs =)
- Phase 1 position. Star & Circle are wormholes.

Phase 2 – blue circles are Seed locations
Phase 3. Star and circle are wormhole locations

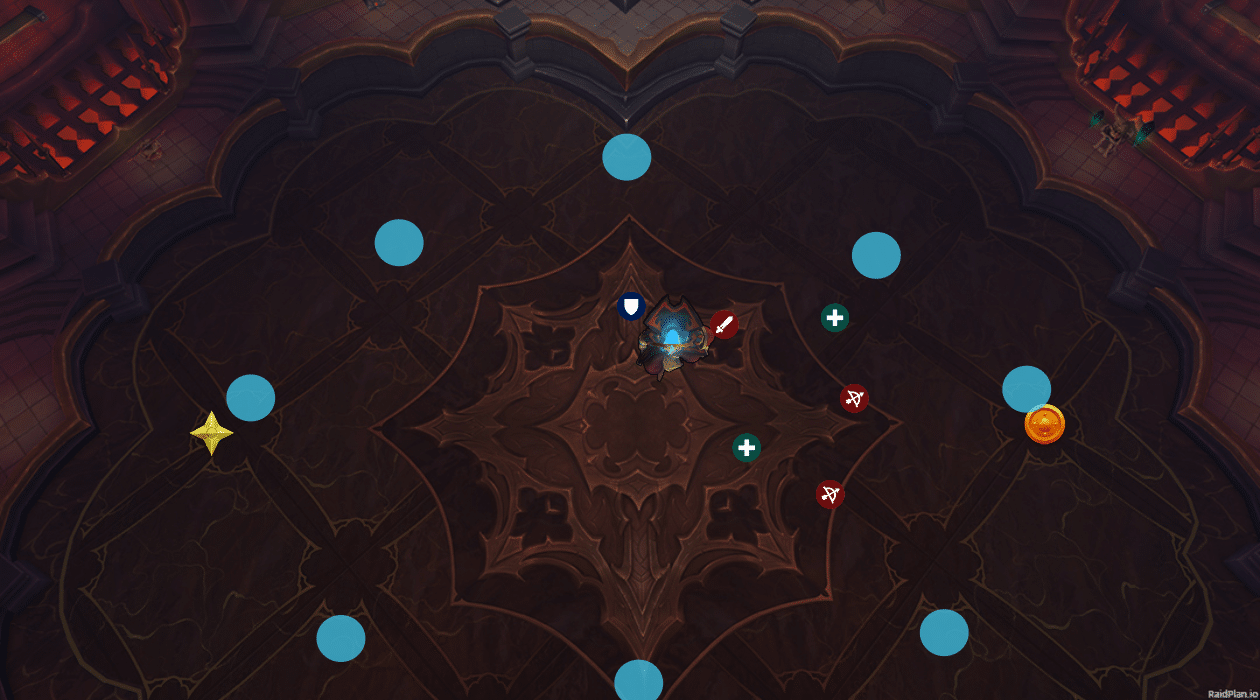
5 – Hungering Destroyer
- Single phase fight with a 100 energy mechanic
- Keep boss just off-of-center, a bit towards the wall. See graphic below
- Everyone should stay relatively close to the boss
- Put 3 markers on the side of the boss, between him and the wall you’re nearest
- These are for Volatile Ejection. If you get targeted by the ability, go to the markers
- Put 2 other markers on the other side of boss. These are for Gluttonous Miasma.
- Afflicted players cannot be healed, but can leech HP from people within their circle
- Those afflicted players should stand on the markers
- Have 1 person assigned to each marker to be the “feeder,” having health leeched
- When Expunge goes out, everyone should spread. After circles explode, go back to the boss.
- Tanks taunt anywhere from 5-8 stacks of Hungering Strikes. This tank effect won’t kill you, but it makes the boss leech HP from you. Lower stacks = less boss healing.
- When boss reaches 90% energy, move him to the wall. At 100%, he casts Consume. Big suck ability. Everyone needs to run to opposite side of room. Use movement abilities.
- Normal Positioning below – X, Star, Circle for Volatile Ejection. Triangle and Diamond for Gluttonous Miasma

- Consume positioning. Book it away from the boss!

6 – Lady Inerva Darkvein
- 4 Containers around the room. They all fill slowly. She’ll “Focus” 1 container at a time, filling it much more quickly.
- Inerva has 1 ability from each container.
- At 33% filled, that container’s ability is modified and made harder
- At 66%, it’s modified again.
- Order of focused is Exposed Desires > Bottled Anima > Sins & Suffering > Concentrated Anima
- Exposed Desires is a tank DoT. At Level 2, the damage on the tank is copied to another player. At Level 3, when the DoT expires the tank explodes. Tank just needs to run away from group when the DoT is expiring.
- Bottled Anima makes soak circles on the ground. If one doesn’t get soaked, deals 22k raidwide damage. Bad time. Soak them all.
- Level 2, the soak circles now leave a puddle behind
- Level 3, soak circles now bounce and appear a second time
- Just soak the damn things, don’t stand in bad
- Sins & Suffering puts 3 orbs down around the room, and marks 3 players. Marked players have lines connecting them.
- Marked players need to run to the orbs, and get all 3 orbs inside the triangle formed by their lines. Failure to do this results in massive explosion.
- Level 2, the orbs also have lines between them called Anima Web. Running through the web freaking hurts, don’t do it
- Level 3, the orbs, and therefore the webs, freaking spin. This shit is horrifying. Marked players need to clear the orbs ASAP
- Concentrated Anima
- 3 players get a red circle around them. After a few seconds, circles explode, spawn adds.
- 1 Scepter, 2 Manifestations
- Scepter needs to be tanked, or it’ll chaincast a bad AoE
- Manifestations chaincast a bad AoE, but can be interrupted
- Kill adds ASAP. At level 1 you can bring the circles near the boss, so the adds are close for cleave
- Level 2, players with circles are rooted. Cannot move.
- Level 3, the circles exploding now also throw balls in several directions. Play dodgeball.
- Levels 2 and 3, need to kill the adds one at a time, ASAP. Keep the Manifestations interrupted or you’ll wipe.
- 3 players get a red circle around them. After a few seconds, circles explode, spawn adds.
- You can click Canisters that are NOT focused to reduce how filled they are. On heroic, you can literally just go click the canister as soon as the focus on it ends. This’ll reduce how frequently you deal with Level 3 mechanics, which is a good thing
- Clicking a canister does some raid-wide AoE damage, so probably don’t click 2 at the same time.
- Highly, highly recommend clicking the Sins & Suffering canister as soon as it’s no longer focused. Level 3 of that is just scary. You don’t wanna deal with spinning lazers of death.
- Positioning: Spread around the room. Circle marker below is where Concentrated Anima people should go, until that canister is focused. Star is a drop point for tanks with Level 3 Exposed Desires debuff when it expires. The canister with Skull on it is the Sin & Suffering one, make sure you drain that shit.

- When the 4th canister is focused, you can move the boss around to the three adds for cleave, as shown below.

7 – Council of Blood
- Council fight against 3 bosses. When 1 dies, the remaining 2 are healed to full and gain new abilities. When a second dies, the final boss is healed to full again, and gains multiple new abilities.
- Kill Frieda first, Niklaus second, Stavros third.

- When a boss hits 50%, you do a dance intermission. Follow the lil green dudes. If you do it correctly, you get a haste buff. Fail, and you get a DoT and lose your haste buff
- Frieda casts Drain Essence, needs to be healed through
- Also casts Dreadbolt Volley. Interrupt this.

- Niklaus does a tank DoT, and spawns an add called Dutiful Attendant. Kill this add ASAP, it shields the lowest-HP boss.
- Stavros does a 20 yard charge. The Stavros tank should move him away from the group, so nobody other than that tank gets hit. Tank swap when Frieda dies.Stavros also pairs people up with
- Dark Recital. Stay next to your partner, and don’t stop moving. Swirlies appear under you then explode. Don’t get exploded on.
- When Frieda dies, Niklaus starts spawning Dredger Servants that throw food at random people. Just kill the adds
- Stavros will also start summoning Waltzing Venthyrs. Do not get hit by these dudes. You can see them in the picture to the side.
- Nuke into Niklaus, do the 50% HP dance intermission, then go and finish him off.
- When Niklaus dies, bring Stavros back to the group, middle of the room. Swap which tank is holding him.
- Moving now applies a debuff that reduces movement speed. Standing still reduces your stacks.
- Stavros periodically calls a whole horde of Waltzing Venthyr. They’ll be spread around the room. Find the opening where there is no Venthyr.

- After a few seconds, they’ll make giant red swirlies underneath themselves, then explode.
- If you’re in a swirlie, you die. Safe spot = you don’t die.
- Nuke down Stavros, collect your loot, move on to better bosses.
- Positioning when Frieda or Niklaus are still alive, see below. Keep Stavros out in Australia so his charge doesn’t hit anyone but the tank.

- When Stavros is last dude left, bring him to the middle.

8 – Sludgefist
- Big giant dude. Kinda cool fight.
- His melee attacks hit a 2nd target, so tanks need to stack on each other
- He’ll randomly Chain Link 2 people together. If they get further than 12 yards away, both people take lethal damage. Means you found yourself a friend for the next 56 seconds!
- Chain Slam – red circle on a player. After 4s, drags that player, and anyone within circle, to the boss. Deals heavy damage, split between everyone hit.
- Chain Slam is immediately followed by Destructive Stomp, giant circle around boss. Stand in circle when it explodes = you dead. Also destroys any pillars within the circle.
- Get the hell out of the circle.
- Don’t stand in swirlies on the ground caused by Falling Rubble. This’ll then leave a puddle of falling rock. Don’t stand in it.
- Dude does a Colossal Roar periodically, mild AoE damage and a knockback.
- At 100 energy, casts Hateful Gaze at a random player. Charges at them after 6s, dealing lethal damage to anyone hit.
- He keeps charging in a line until he hits a pillar or a wall. Wall = wipe. Pillar = broken pillar. Make him hit a pillar. Target of Hateful Gaze needs to go hide behind a Pillar.
- After boss hits pillar, he’s stunned for 12s and takes double damage. Blow CDs into him.
- Lust one of the times he’s stunned. Recommend pillar #3, as that should line up with 3 minute CDs.
- You only get 4 pillars, so this is a bit of a DPS check boss. If you run out of pillars and he does Hateful Gaze again, you’re likely going to wipe.
- At 20% HP, boss “enrages” dealing 20% more damage and 20% faster attack speed.
- You’ll want to move him around the room to wherever the most recent pillar was destroyed. See below


9 – Stone Legion Generals
- 3 phase fight. 2 bosses. You’ll fight them individually in Phases 1 and 2, together in P3
- When Crystalize happens, affected player should run to the assigned spot. ALL players with any bleed effects should run into the circle for Crystalize
- After that explodes, a meteor falls. You’ll want 4-6 people to soak the meteor. Healers should prob use a CD, soakers should use a defensive
- Ranged + healers should be loosely spread. A Goliath add spawns periodically, and these fellas jump on random people. Spreading reduces how many people get hit.
- When a Goliath hits 20% HP, hardswap.
- Phase 1
- P1 you fight Kaal. She does a frontal cone at the tank with a DoT. She also puts out debuffs on random people, weak DoT. When that debuff expires, it morphs into a much stronger DoT for 6s. Healers need to keep these people up.
- Players targeted by Wicked Blade should run to the assigned markers. See graphic below.
- Phase 2
- You fight Grashal. He does Reverberating Eruption, targeted at random players. After it hits the player, leaves puddle on floor. Drop these on the edges of the room
- Tanks swap at 3 stacks of Stone First.
- When Seismic Upheaval is cast, keep moving. Don’t stand in swirlies.
- In Phases 1 and 2, when whatever boss you’re fighting hits 50% HP, they take 95% less damage. You’ll need to feed Anima to Prince Renathal in the back of the room to restore his mana to move into the next phase
- Anima orbs drop from any adds you’ve killed
- Goliath’s drop Massive Anima orb, Commandos, which only spawn after boss hits 50%, drop smaller ones. Massive give 30% mana, smaller ones give 10% mana
- Orbs only last 15s from when they spawn. Running over an orbs picks it up, unlimited duration. Don’t let any orbs despawn.
- Get Renathal’s mana to 100%
- When that happens, there’s a knockback. Don’t be near edge of platform.
- While you’re dealing with trying to fill Renathal’s mana, the abilities for your current phase keep happening.
- After you’ve gone through P1, filled Renathal’s mana, done P2, and filled Renathal’s mana a second time, you enter P3.
- Both bosses fight you simultaneously, with all their abilities from P1 and P2
- Lust when Phase 3 starts
- Have bosses stacked, but facing slightly different directions due to Kaal’s frontal cone ability
- Tank swap at 3 stacks of Stone Fists from Grashal
- Crystalize, Wicked Blade, Reverberating Eruptions keep happening like they had been, keep using the same markers to handle these
- Seismic Upheaval, Stone Fists, Heart Rend, Serrated Swipe all keep happening as well. No difference in how they work.
- This phase hectic as hell, lots going on. Take it piece by piece, handle each ability.
- Kill the bosses at the same time.
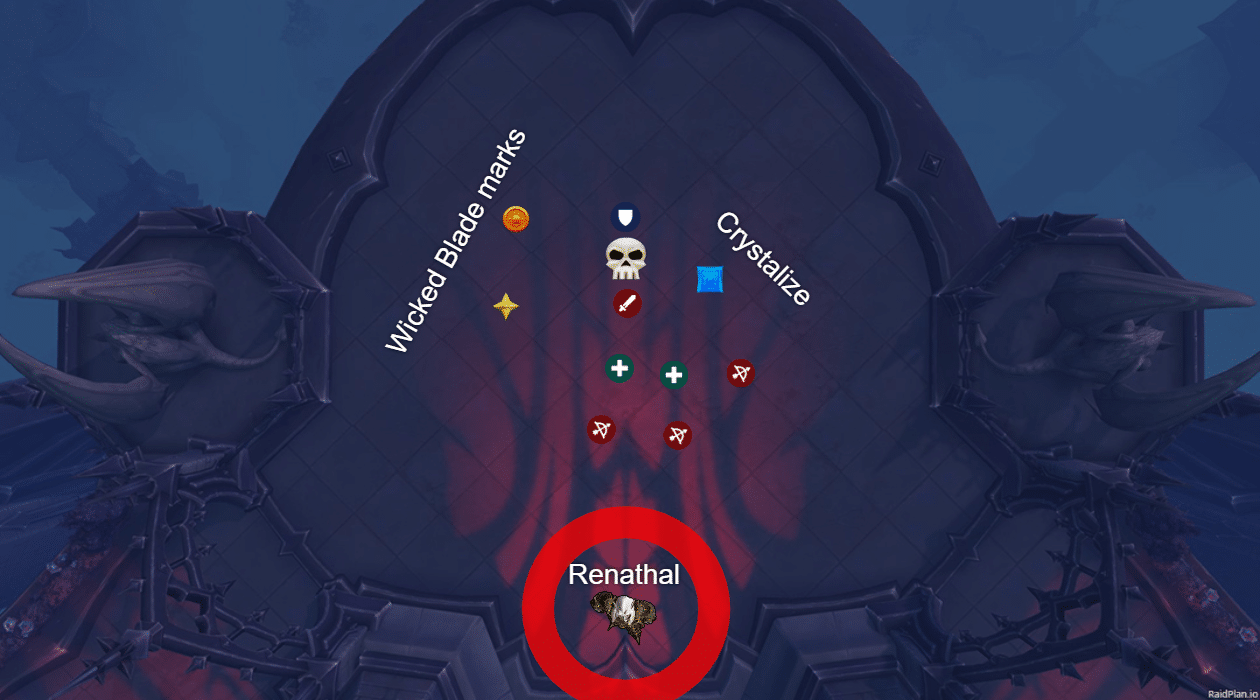
- Positioning, Phase 1 and Phase 2. Star and Circle are marks for Wicked Blade, Square is for Crystalize. You can see where Renathal is in the back.
- Positioning, Phase 3. Same idea as p1 and p2, but the tanks should NOT be stacked. The bosses should for cleave, the tanks needs to be apart for Serrated Swipe
