Heroic Artificer Xy’mox Boss Guide
BY Andrew Miesner / December 3, 2020
Artificer Xy’mox
This is a 3 phase encounter, with remarkable visual effects. Honestly, it’s fantastic. The overarching theme of the fight is proper placement of literal wormholes.
Encounter-Wide Mechanics
- Dimensional Tear
- Debuffs 2 players for 8s
- When the debuff ends, the afflicted players explode for 6200 Arcane within 6 yards
- A wormhole also appears at the affected players’ locations
- Running over a wormhole plops you out at the other
- You’ll use this for various mechanics
- Exact placement will vary by phase
- Glyph of Destruction
- 4s debuff on tank
- When it expires, explodes for 35k Arcane to the whole raid
- Damage is reduced based on distance. In testing, it was a 45 yard falloff distance. However, the debuff’s duration has been reduced, so the range for falloff has likely also been reduced
- Also applies Arcane Vulnerability to the tank, increases Arcane damage taken by 50% for 45s
- Rift Blast
- White lines on ground, just don’t stand in them
- Deal 15k Arcane damage if you get hit
- Stasis Trap
- Xy’mox creates a set of traps at the feet of several players
- Traps arm after 4s, persist until triggered
- When a player runs over the trap, that person gets stunned and the trap gets a healthpool. Stun breaks when the trap is killed
- Stunned player also takes 6200 Arcane/2s
- Hyperlight Spark
- Spark that jumps from player to player
- The player receiving the spark takes 9300 Arcane damage\
- Sire Denathrius’ Private Collection
- Collection of 3 artifacts. Each phase, 1 artifact will be active.
- Active artifact creates multiple mechanics for the phase
P1 100-70%
- Crystal of Phantasms
- Fleeting Spirit
- Several spirits spawn, each one fixating a random person. Last 12 seconds
- If they reach you, you get MC’d
- They get progressively faster later into their duration
- To keep them from reaching you, you’ll need to use the wormholes
- Soul Singe
- Random AoE during the phase, deals 2300 Shadow damage to several players
P2 70-40%
- Root of Extinction
- 8 seeds spawn in set locations
- After 20s, the seeds explode for 62k Nature damage to anyone within 50 yards
- Extra action button to drop them
- Withering Roots
- Random DoT on 1 person
- In testing, there was a slight overlap between one expiring and a new one
- Deals 6700 Nature damage every 1.5s for 21s
P3 40-0
- Edge of Annihilation
- Puts a giant suck circle directly in the middle of the room, grows over time
- Power of suck increases as it grows
- When it reaches max size, it’ll explode, dealing 155k Shadow damage to all players within 25 yards of the center
- Aura of Dread
- Constant ticking damage throughout this phase
- Deals 1900 Shadow damage to all players every 3s
Strategy
- General Stuff
- For starters, keep the boss near where he starts for Phase 1
- The tank affected by Glyph of Destruction needs to yeet the hell outta the group. Go to a far side of the room so you don’t blow up the raid
- As soon as the Glyph is applied, other tank should taunt
- Don’t stand in Rift Blasts. They appear as these white lines on the floor. Really cool looking, but don’t let that fool you. They hurt.
- Hyperlight Spark just needs to be healed through, not really anything you can do about it
- You’ll want to have your RL call out when to trigger Statis Traps.
- Ideally, do this in between whatever the phase-specific mechanic is.
- This way, your DPS can focus on just blowing them up ASAP
- Phase 1
- You’ll need to place your wormholes from Dimensional Tears 50-60 yards away in this phase. Best option is far-east and far-west. See positioning graphic below.
- Put markers down in each wormhole location
- The raid should be positioned between the boss and the far-east wormhole
- When the Fleeting Spirits spawn, the affected players need to use these wormholes to keep away from the SPirits
- If you get targeted, run next to the wormhole you’re closest to
- As the Spirit gets close, run over the wormhole
- Wait for the Spirit to run across the room and get close to you again
- As soon as the Spirit gets close to you again, run into the wormhole
- Repeat until the Spirits despawn
- You’ll want to trigger Stasis Traps no later than 10s before the Spirits spawn
- Phase 2
- You’ll want the wormholes in the same places, with the same general raid positioning as P1
- When the seeds spawn, you’ll need to move ALL 8 of them to the same spot
- They can be picked up by interacting with them
- Have people pre-assigned for each individual seed
- Pick up your assigned seed, run it near the far-east wormhole, drop the seed, take the wormhole to the other side
- Anyone NOT assigned to get a seed should run to the far-east wormhole
- In testing, this phase was by far the hardest to heal
- The people with Withering Roots likely need to use a defensive. Help keep yourself alive
- Like in P1, you’ll want to trigger Stasis Traps with at least 10s before the Seeds spawn
- Phase 3
- Lust as soon as you enter P3
- You’ll need a wormhole near the center of the room, with the other as close to a wall as possible. Very far-east worked well, but you can do far-west if you want.
- Tank the boss between the two wormhole locations
- When the Edge of Annihilation spawns, it’ll start sucking you to the center. Let it.
- You’ll see the big while circle, and a smaller blue circle. The blue circle grows larger, when it reaches the outer white circle that’s when it explodes
- You can hang out inside the blue circle until the last second, then take your wormhole out
- When you take the wormhole, make sure you turn and run TOWARDS the wall
- This turns into almost a dance. You’ll learn the rhythm of the suck after a couple times, and figure out the timing of when exactly to run into the wormhole
- Trigger Stasis Traps in between Edge spawns, again with at least 10s to nuke them down.
- Survive a few Edge of Annihilations, and go collect your purples!
Positioning
Phase 1
Idea here is to have the Dimensional Tears on opposite ends of the room, and use them to stay away from the Fleeting Spirits. Keep the boss near the middle of the room

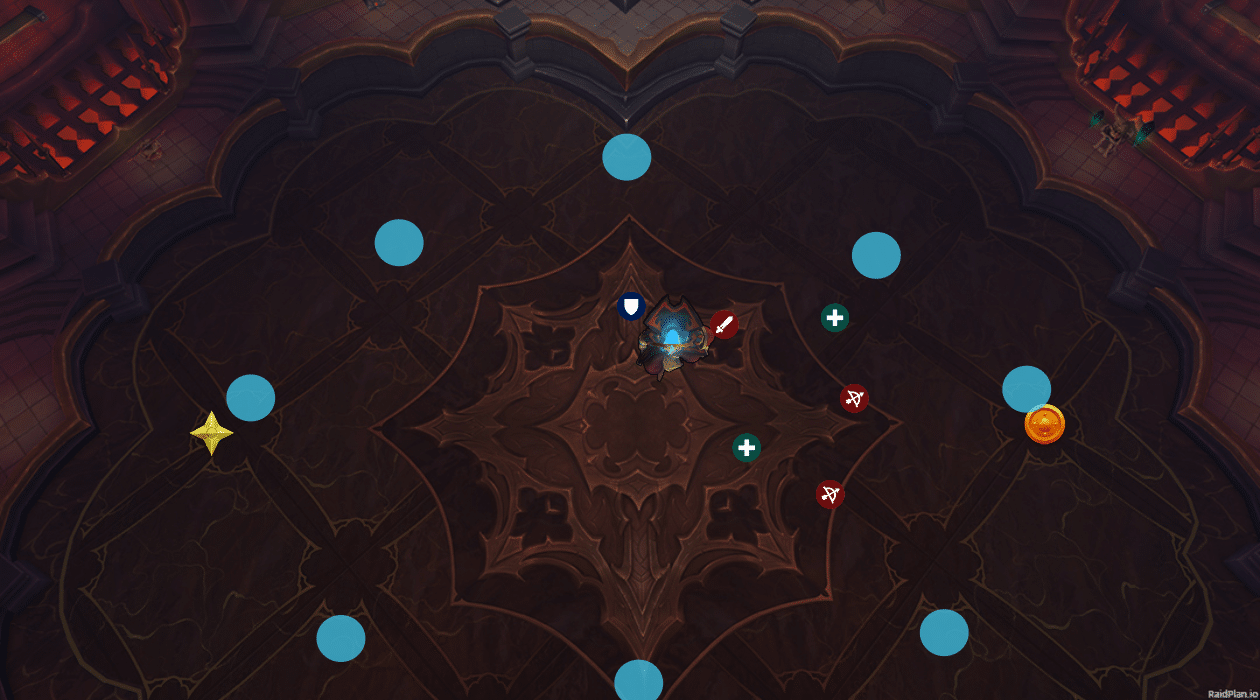
Phase 2
You’ll want the same positioning for the Dimensional Tears and the boss. The light blue circles represent where the Seeds spawn. They should all be moved to the ORANGE marker, and the whole raid should move to the YELLOW marker. Remember, you can use the Tears to bounce back and forth and get to the proper side!
Phase 3
You’ll want to shift the boss here towards the eastern wall. Place one wormhole right at the wall, the other in the middle of the room. This will allow you to use the wormhole to escape when you get sucked in by the Edge of Annihilation.


