Heroic Shriekwing Boss Guide
BY Andrew Miesner / December 3, 2020
Shriekwing
Giant bat, big room, 4 pillars in the middle of room. 2 phase fight, has a Main phase and an Intermission phase
Main Phase
- Sanguine Ichor
- Small pool of blood on the floor. Standing in the pool deals 4600 Shadow every 1s
- Caused by several mechanics during the fight
- During testing, these disappeared at the beginning of every Intermission Phase
- Exsanguinating Bite
- Tank smack. Deals 37k physical damage & applies 10 stacks of Exsanguinated
- Permanent DoT, deals light damage per stack. Also increases Physical damage taken by 5% per stack, reduces healing taken by 10% per stack
- 1 stack falls off every 1.5s
- Blind Swipe
- Frontal cleave by the boss, deals 15k physical to anyone hit
- Cast at a random player, so watch where you’re standing
- Wave of Blood
- Deals 7800 shadow damage to everyone in the raid, plus applies a DoT
- DoT deals 2300 shadow / 2 seconds for 12s
- Echolocation
- Puts circle around a player, then casts Descent at the player after 8s
- Descent
- Deals 11k Shadow damage to anyone hit, 5 yard radius
- Drops a puddle of Sanguine Ichor at the spot she lands
- Earsplitting Shriek
- Big aoe, deals 15,500 Sonic damage to anyone hit
- Also applies a DoT dealing 3100 Sonic damage every 2s / 12s
- CAN be LoS’d to avoid damage
- Any player who does NOT LoS also drops a Sanguine Ichor
- Echoing Screech
- Sends out little circles, getting hit deals 11k Sonic damage, horrifying you for 3s, and causes the boss to cast Descent at the location you got hit after 6s
- Just like with Echolocation, this deals 11k shadow within a 5 yard radius and leaves a pool of Sanguine Ichor
- In testing, the Descent happened during the duration of the horrify, meaning there was no way to avoid the Descent. This seems to have changed, and should now be possible to dodge the Descent.
- At 100 energy, she enters the Intermission Phase
Intermission Phase
- Boss goes to the middle of the room at the start of the Intermission
- Casts Blood Shroud, becomes blind and just walks around the room
- If you come within 12 yards of her, she kills you instantly
- Need to move around the room & run from her
- Earsplitting Shriek
- She casts this periodically in the Intermission Phase as well. Need to LoS this, as you did in the Main Phase
- Echoing Sonar
- Works just like Echoing Screech from the Main Phase
- Cast once at the beginning of the intermission, the orbs persist until intermission ends
- Deals 11k damage, Horrifies you for 3s, Descent cast at your location after 6s, anyone within LoS when boss completes this cast is jumped on
- Boss takes 0 damage during the Intermission Phase
Strategy
Main Phase
- Lust on pull
- Tank the boss in the very front of the room
- The tank not holding threat should stand behind her, with the melee DPS

- Tanks should swap after every cast of Exsanguinating Bite
- Remember to move behind the boss when you aren’t tanking
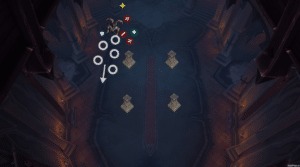
- The player targeted by Echolocation needs to move to an edge of the room. 2 options, based on where you’re currently standing. Refer to the large red ovals in the image below – they’re the safe drop points.

- Have a marker down behind the corner of the staircase. Refer to the STAR in the image above.
- This marker will be the stack point for Earsplitting Shriek
- Everyone in the raid should move and stack on this point during the Shriek. If you properly LoS, this means no puddles will be created and this spot can continue being used

- When the boss casts Echoing Screech, everyone should move a bit away from the boss, and focus on dodging these.
- She will turn and cast this in a direction at people. Seems to favor melee, which is why the graphics show melee on the side of the boss. Ideally, bait them down the edge of the room

- Wave of Blood just needs to be healed through
- Puddles persist the entire encounter, so proper management of them is important.
- We were able to re-use the positioning at the front of the room for a total of 2 occurrences of Phase 1. After that, we were forced to move.
- We chose to move the boss to the southern end of the room after the 2nd Intermission, where the room was clean

Intermission Phase
- Boss is immune to damage during the intermission.
- The absolutely most important thing about the Intermission Phase is to NOT GET NEAR HER
- That 12 yard range comes up quick. If she gets that close, you die.
- You’ll see the visual red circle around her.
- Duck behind a pillar to avoid damage from Earsplitting Shriek
- Outside of Earsplitting Shriek casts, you do not need to be LoS, giving you a lot of freedom to move around and be safe. You’ll need this to dodge the circles.
- Do not get hit by the circles from Echoing Sonar. These can get out of hand extremely quickly in this phase
- She can also get within 12 yards of you during your 3s Horrify, which’ll kill you
- Again, DO NOT GET HIT
- This intermission is all about avoiding the mechanics. Everything in this phase that can kill you is avoidable, so move out of the bad stuff
- See images below. Move away from boss, hide during Shriek, do what’s necessary to dodge orbs otherwise.


