When the Membrane breaks, it can now trigger either a Fragment of Sanity OR Shard of Sanity
Fragment works exactly the same as in Heroic
Shard of Sanity puts down a larger orb and restores 10 sanity to all players within 20 yards. Triggers once when someone runs into it
Growth-Covered Tentacles have new set formations they spawn in
First set is 4 Tendies, arranged in 2 groups of 2
Second set is 2 Tendies, diagonally towards the back of the room
Can NOT cross through Tendies, need to kill them
Using the Legendary Cloak ability can still fly you through the Tendies
Phase 2
Players no longer have their extra action button nor access to Wrathion to restore Sanity
Mycelial Cysts gain a new ability – Reactive Mass
10 second cast, begins immediately when a Cyst takes damage
After the cast ends, the Cyst is untargetable for 20s
When this effect expires, the Cyst is healed to full Health and deals massive damage to anyone within 15 yards
Synthesis Growths
When these die, they now spawn 2 Nightmare Antigen, the little adds from P1
When all Growths are killed, Fury of N’zoth no longer engages the raid. It instead retreats and immediately starts Phase 3
Phase 3
Boss now summons lines of Mycelial Cysts, in addition to all previous P3 abilities
Happens at the beginning of P3, then every 2 minutes
Strategy
We recommend going in with 2 tanks, 4 healers, and 14 DPS
Adaptive Membrane
On Mythic, this drops 2 different size orbs. Little orbs work just like Heroic, Big Blue orbs restore 10 sanity to everyone within 20 yards
Which orbs you get is predictable
If the Membrane is on the Boss, a Synthesis Growth, or a player, it’ll generate a Big Blue orb when the Membrane breaks
If the Membrane is on anything else and breaks, it’ll drop some small yellow orbs, same ones as Heroic
Phase 1
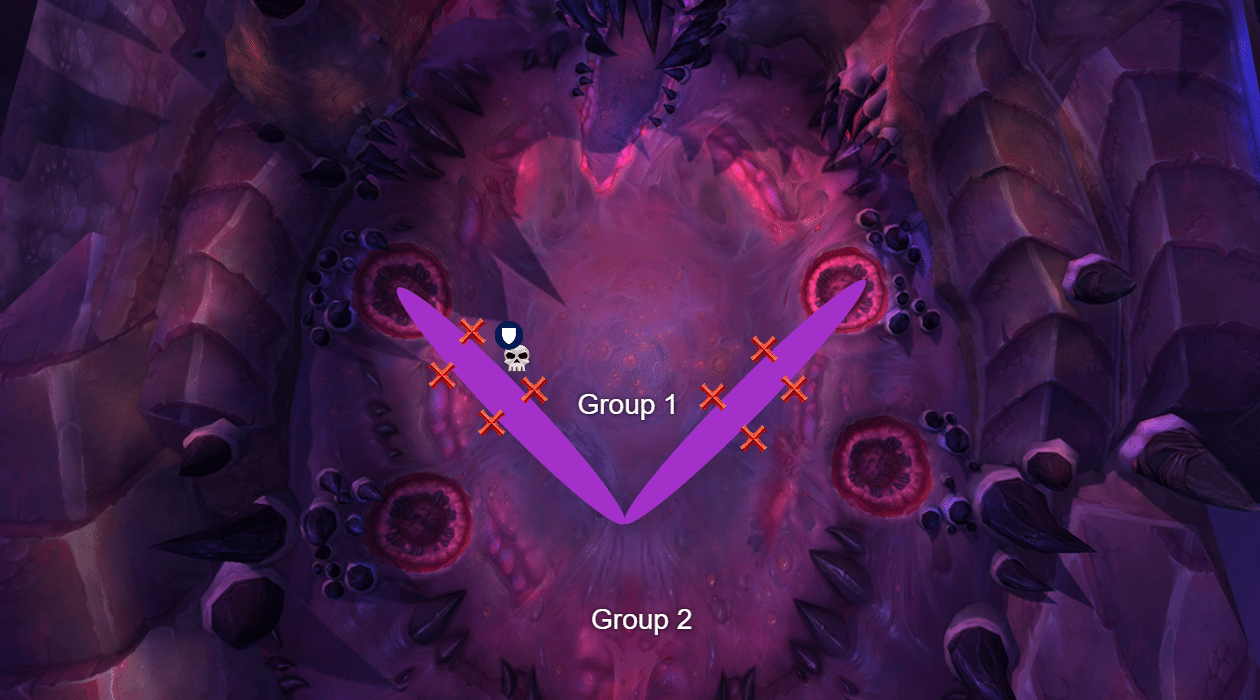
You’ll want to pre-assign groups for the two sets of Growth-Covered Tentacles
The pattern of these tendies is pre-set on Mythic, as is the location of the Hemorrhages
For Set 1, you’ll want 3 groups, for Set 2 you’ll want 2 groups
Set 1 shadows appear at about 0:32, the tendies slam down at 0:39
Set 2 shadows appear at about 1:35, and slam down at 1:43
Just like in Heroic, the Tentacles themselves serve as a Line of Sight blocker. The different groups being in different areas allows the raid to simultaneously be damaging Hemorrhages on different tendies around the room
Set 1
Group 1 should be your melee players, Group 2 should be your ranged, Group 3 should consist of 2-3 ranged DPS, preferably Warlocks. Group 2 should focus on the northern Tentacle first, the one separating Group 2 from Group 1
Once the northern tendies are cleared, Groups 1 and 2 work on the southern tendies
Group 3 should be able to take out the southern-most tendie by themselves by the time the other 3 are cleared
Groups 1 and 2 should each have 2 healers and 1 tank
Group 3 needs to sustain themselves
At 0:43, 2 Gaze of Madness adds will spawn, killing this is a higher priority than killing the Hemorrhages
These will likely be in different groups, so whatever groups can reach each Gaze need to kill it
Set 2
You’ll want all melee DPS and most of your ranged DPS in Group 1. Put 2 DPS in Group 2, again preferably Warlocks. Once the four Hemorrhages Group 1 can hit die, everyone in Group 1 should use their Legendary Cloak button, flying back to Wrathion
Get full Sanity, then kill off the remaining Hemorrhages
You’ll again get spawns of 2 Gaze of Madness adds at 1:47. Gaze adds again are higher kill priority than the Hemorrhages
Adaptive Membrane now goes out in pairs of 2 casts
The first cast in the pair goes out at 0:16, then every 32 seconds
The second cast goes out 10 seconds after the first in the pair
The first cast goes on either the boss or adds, the second cast goes on 3 random players
Madness Bomb is cast at 0:10, then every 25s, and is applied to 3 people
Affected players just need to move away from the raid so they don’t explode on anyone
Mental Decay is applied at 0:08, then every roughly 21 seconds for the rest of the phase
6 people get affected per application, and it lasts 20 seconds
Drains 20 sanity from the affected players immediately, and deals 41k Shadow damage per second for the duration
Mandible Slam is cast at 0:09 then every 16 seconds throughout the phase
Tanks should swap every 2 stacks
The sets of Gaze of Madness adds only spawn at the points listed above when the Growth-Covered Tentacles are up
At 50%, you’ll enter Phase 2
Phase 2
Like in Heroic, the beginning of P2 is the boss running through the tunnel and Wrathion blowing a hole in the wall to let you follow
The whole raid has their Sanity reset to 100 at the beginning of the phase
However, Wrathion NO LONGER helps you in p2
You will no longer have access to using your Legendary Cloak to port to Wrathion and restore Sanity
You’ll want your raid to split into 2 groups. 9 people should be assigned to go left, 11 should go right
Each group gets 1 tank and 2 healers
You’ll want classes with better 3 target stacked cleave to go to the right, especially things like Fire Mages, Havoc DHs, even Frost DK are great here
Classes that are better at spread damage should go left. Single-target focused specs are also good on the left
The left-side has 7 Growths, the Right side has 9
On the right, near the top of the platform, are two sets of 3 growths very close together, which is why strong cleave specs excel on this side
You’ll want to kill off the Synthesis Growths as you reach them, and work your way towards the back of the platforms
While moving through the platforms, be careful about damaging the Mycelial Cysts
From the moment a Cyst first takes damage, it’ll become un-targetable 10 seconds later
After 20 seconds, it’ll explode in a 15 yard radius, dealing heavy damage to anyone hit, and restoring the Cyst’s HP to full
The danger here is the AoE, as there’s not much room to move away from it
As such, you want to limit hitting these Cysts as much as possible, to try and prevent explosions from happening
This’ll put pressure on the healers though, as standing in the gunk around the Cysts deals 14k damage per second
During this phase, the boss continues casting Adaptive Membrane, Mental Decay and Madness Bomb
Membrane works just like before, but is now just cast every 10 seconds
Each cast alternates between being targeted at Synthesis Growths and players
When this is applied to Growths, DPS should focus down specific ones to make sure you actually pop the Membrane. Any padding damage on extra Growths that don’t have the Membrane killed is wasted, so don’t bother
You can have the RL/Officers mark specific Growths to target for each Membrane
When a Membrane is broken off a Growth, it’ll drop a Big Blue Sanity ball
Players should make sure they’re within 20 yards of the ball before someone runs over it and causes the Sanity restore to occur
This is your only way to gain Sanity during this phase, so coordinate using the balls properly
Madness Bomb is a bit harder to deal with in P2
Affected players need to be careful to move just far enough away nobody else gets hit by their circle
These players also need to be careful not to block people from getting access to the Growths currently being killed
The boss also casts Eternal Darkness, and just like on Heroic this deals heavy damage to everyone in the raid and drains 10 Sanity
Once all the Synthesis Growths have been killed, the boss immediately transitions into Phase 3
Phase 3
After following the boss down the tunnel to start p3, everyone’s Sanity will be reset to 100 again
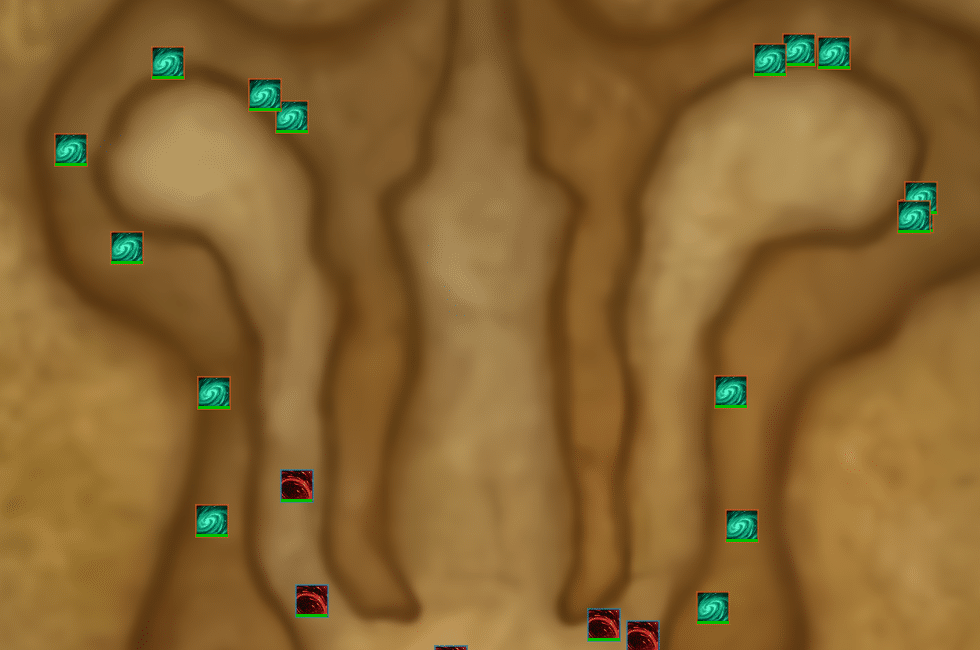
As the boss begins P3, he’ll throw down lines of Mycelial Cysts around the platform in set locations around the room. Refer to the graphic we have a few lines below here, the Cysts are the red lines
2 minutes after you enter Phase 3, he’ll put a second set of Cysts down. These are placed immediately counter-clockwise of the existing cysts, and just expand the area covered
Important note, Infinite Darkness is cast at the location of a group of players. This means you can fairly easily bait where it’ll be dropped, and should do so regularly
You can and should also use Warlock’s Gateways for certain Infinite Darkness casts to quickly move across the covered area, as well as the Mycelial Cysts
You’ll want to spend the majority of this phase grouped up near melee range, except for when Insanity Bombs are going out forcing you to spread
When the Big Blue Sanity Orbs drop from Membranes, having the raid stacked together will make sure everyone gains Sanity for each orb
When a PLAYER is affected by Membrane, they’ll need to intentionally take damage to break it
The easiest ways to do this are stepping in Infinite Darkness goop, or Mycelial Cyst gunk
Definitely do this, as you’ll need all the Sanity orbs you can get
Outside of the Cysts, and of course the Membranes being cast in the same pattern as Phase 1 and being applied to players, this phase remains the same mechanically as Heroic
This phase is actually scripted to a T, so we figured the most effective way to communicate the strategy was a timeline. We’ll list each ability and movement, showing timings represented both as “time since phase started” and full fight timers, based on our World First kill
We’ve also prepared a graphic, showing where to go for each movement, where Infinite Darknesses should be dropped, and where the original lines of Cysts are. The timeline is below the graphic, and refers back to it regularly
Phase 3 Timeline
0:00 (4:38) Beginning of P3, initial cast of Cysts. Start on X
0:09 (4:47) First Infinite Darkness
Everyone should stack tight on X to bait this. As soon as the cast completes, click a Warlock Gateway moving you towards Circle
0:11 (4:49) First Adaptive Membrane, cast on the boss
0:12 (4:50) Tendy Shadows appear
0:18 (4:56) Tendies slam down
0:21 (4:59) Second Adaptive Membrane, cast on 3 players
0:28 (5:06) Insanity Bomb Applied
Everyone spreads for the explosions
0:32 (5:10) Tendy Shadows appear
0:38 (5:16) Tendies slam down
0:40 (5:18) Insanity Bombs explode
Everyone collapse in on the boss and AoE down the adds
0:52 (5:30) Tendy Shadows appear
0:58 (5:36) Tendies slam down
1:01 (5:39) Second Infinite Darkness cast
Stand on Circle to bait this one, then use movement speed abilities to get out and towards Star as fast as possible
Things like Stampeding Roar and Wind Rush Totem are great here
You’ll also want a couple Ranged DPS to hit one or two Cysts right before the Infinite Darkness is cast, to try and leave a gap in the gunk, since the gunk slows you
1:05 (5:43) Third Adaptive Membrane, cast on the boss
1:12 (5:50) Tendy Shadows appear
1:18 (5:56) Tendies slam down
1:15 (5:53) Fourth Adaptive Membrane, cast on 3 players
1:32 (6:10) Tendy Shadows appear
1:35 (6:13) Insanity Bomb Applied
Wait for the Tendies to slam, then quickly spread out
The tank who has the boss should move him to the next marker (Moon) BEFORE this set of Bombs explodes. Start moving as soon as the Tendies finish slamming.
Infinite Darkness is cast on the group, not on the tank, so to give everyone more room, move the boss early
1:38 (6:16) Tendies slam down
1:47 (6:25) Insanity Bombs explode
Stack tight on the Star marker to group up the adds, and blast them down
You want to be very tightly stacked on the marker, with the exception of the tank who moved the boss away
1:52 (6:30) Tendy Shadows appear
1:53 (6:31) Third Infinite Darkness cast
This Darkness is extremely dangerous, as you only have a few seconds to move across Tendy shadows after baiting.
To help make sure your raid makes it, we recommend using either another Stampeding Roar or Wind Rush Totem. If you don’t have access to a second ability like this, we STRONGLY recommend everyone in the raid use a Lightfoot Potion to sprint across faster
You’ll likely still have the little adds left over chasing your raid here, that’s fine. It’s more important to get this bait correct than worry about adds
1:58 (6:36) Tendies slam down
1:59 (6:37) Fifth Adaptive Membrane
This one’s applied to both the boss and any adds still alive
2:01 (6:39) Cyst Genesis – Boss creates the second set of Cysts
This widens the existing gunk-covered areas
2:09 (6:47) Sixth Adaptive Membrane
Applied to 3 players
2:12 (6:50) Tendy Shadows appear
2:18 (6:56) Tendies slam down
2:32 (7:10) Tendy Shadows appear
2:38 (7:16) Tendies slam down
2:42 (7:20) Insanity Bomb applied
Spread for explosions
2:45 (7:23) Fourth Infinite Darkness cast
For this cast, everyone will have the Insanity Bomb debuff on them
Use a Warlock Gateway for this cast, clicking the Gateway immediately when the cast completes
From the moment you click the Gateway, you’ll have about 6 seconds until the Insanity Bombs explode
As soon as you land from the Gateway, everyone needs to spread as quickly as possible so you don’t overlap Bombs
This is the most dangerous Infinite Darkness in the fight
2:50 (7:28) USE BLOODLUST HERE
2:52 (7:30) Tendy Shadows appear
2:53 (7:31) Seventh Adaptive Membrane
On boss and the adds that spawn while this Membrane is casting
2:54 (7:32) Insanity Bombs Explode
As soon as these explode, everyone needs to collapse back under the boss and AoE down the adds. Several adds will have the Membrane on them, make sure they die
2:58 (7:36) Tendies slam down
As a note, these tendies will likely miss you, as they’ll be targeted where you were as you clicked gateway
3:03 (7:41) Eighth Adaptive Membrane
Cast on 3 players
3:12 (7:50) Tendy Shadows appear
3:18 (7:56) Tendies slam down
3:32 (8:10) Tendy Shadows appear
3:37 (8:15) 5th Infinite Darkness
Ideally, you want to kill the boss before this Darkness is cast. If you aren’t able to, treat it the same as Darkness #1, but using movement abilities instead of a Gateway
3:38 (8:16) Tendies slam down
These will slam before the 5th Infinite Darkness cast actually completes, so they shouldn’t actually interfere much with being able to get out for Darkness