FamilyMWR to Kick Off 12-Week Esports Tournament

June 23rd, 2020

Complexity Gaming, one of North America’s most elite esports organizations, and the U.S. Army’s Family and Morale, Welfare and Recreation, part of the Installation Management Command, are joining forces to conduct a worldwide 12-week online esports tournament starting July 4th.

The Better Opportunities for Single Soldiers program will be hosting the tournaments at the garrisons.

“We understand the challenges with social distancing and the closure of certain facilities due to the COVID-19 pandemic,” said the Department of the Army’s BOSS Representative, Staff Sgt. Adrian Mooney. “We wanted to bring a form of entertainment that would be easily accessible to Soldiers. It is a form of entertainment that most Soldiers already have the resources for in the comfort of their barracks or homes.”

There will be multiple game titles for Soldiers to compete in at their garrisons throughout the 12 weeks. The first game will be Madden NFL 20. Signups for the tournaments will open every Wednesday, four days before the Saturdays they are held.

Complexity is organizing the tournaments, which are sponsored by the Army National Guard.

“We’re proud of our continued work with the Army and the Army National Guard,” said Complexity Gaming’s founder and CEO, Jason Lake. “During these unprecedented times, this program will allow Soldiers to stay connected through competition and continue to build comradery.”

The top three players will win a trip to Complexity’s headquarters, the GameStop Performance Center, in Frisco, Texas, to experience a day in the life of a professional gamer.

“Esports can challenge a Soldier cognitively as well as physically,” said Mooney. “It provides a constructive platform for Soldiers to release stress, connect socially, and engage in tactics. The cognitive and constructive aspect also mirrors what some of our Soldiers have as resources for training in their particular military occupational specialty code.”

The tournament is open to all Army service members including the National Guard and Reserves and Soldiers can sign up at www.armymwr.com/esports.

About the U.S. Army Installation Management Command:

We are “the Army’s home.”  Army installations require the same types of programs and services found in any small city. IMCOM manages the day-to-day operations of our Army communities such as emergency response teams, housing, utilities and maintenance, parks and recreation and childcare. Our professional workforce strives to deliver on the commitment to honor the sacrifice and service of military Families, while enabling readiness for a self-reliant and globally responsive all-volunteer Army.

To learn more, visit www.army.mil/imcom.

About Complexity Gaming

Complexity Gaming is one of North America’s longest standing and most successful esports organizations, now owned by Jerry Jones of the Dallas Cowboys and investor John Goff. The esports organization is led by Founder and CEO Jason Lake, considered by many to be one of the founding fathers of esports in North America. Complexity’s esports teams have won more than 140 championships in nearly 30 game titles over its 15+ year history. Staunchly committed to passion, professionalism, and a player-first mentality, Complexity has been continuously recognized as a global leader in modern esports. For more information on Complexity, visit http://Complexity.gg and follow the organization on Twitter, Instagram, YouTube, TikTok and Facebook.

Complexity Gaming and We Are Nations Launch ‘The Lab’, a First-of-its-Kind Innovation Initiative to Develop Products for Esports Athletes

June 23rd, 2020

 Partnership Will Leverage Complexity’s Extensive Player-First Infrastructure to Research, Test, and Validate New Designs 

FRISCO, Texas – June 23, 2020 – Complexity Gaming, one of North America’s most elite and longest-standing esports organizations, today announced a partnership with We Are Nations, the world’s largest esportswear company, to launch The Lab, an innovation pipeline for the research and development of esports products. Together, the two organizations will help to enhance the pre-game, in-game, and post-game performance of professional esports athletes and casual gamers across the entire gaming industry.

“Our mission is to help the entire industry reframe the conversation and focus on holistic player well-being,” said Jason Lake, Founder and CEO, Complexity Gaming. “We Are Nations is the ideal partner to help us create next-generation products that stem from actionable insights and data that will drive the professionalization of esports.”

Through direct access to Complexity players and controlled testing environments within Complexity’s headquarters, the GameStop Performance Center (GSPC), the two organizations will measure the impact that new training materials, like haptic technology, have on cognitive and physical performance. Part of that intake will also include monitoring biometric data, comfort, function, and the mobility of Complexity athletes. Complexity and We Are Nations will facilitate structured research and testing throughout specified areas within the GSPC, including:

  • Cognitive Lab: Using the Cognitive Lab, Complexity will evaluate the ongoing progress of athletes’ basic capabilities, monitoring key performance indicators like reaction speed, memory, and inhibition.
  • Herman Miller Innovation Lab: Once initial prototypes are developed from findings, Complexity athletes will provide feedback in controlled private sessions in the Herman Miller Innovation Lab to further inform and adapt design and functionality.
  • Advanced Training Rooms: Products will then undergo stress testing in the GSPC’s advanced training rooms, which have the ability to mimic LAN competition using custom LED lighting, advanced sound engineering, adjustable ergonomic equipment, and precision climate control.

The Lab will leverage learnings to develop new products, equipment, and materials, which will ultimately be made available for both professional esports athletes and casual gamers. Additionally, The Lab will expand the scope of research to usher in future collaborations with new partners and third parties to bring more products to market on an ongoing basis.

“We Are Nations is dedicated to developing innovative products to be used by professional and social gamers alike, and we believe we’ll be able to lead the industry with the creation of The Lab,” said Patrick Mahoney, CEO, We Are Nations. “The unparalleled access to research and testing throughout the GameStop Performance Center and with Complexity athletes will allow us to take our product development a step further and help us to service gamers for a function well beyond comfort or style.”

The Lab will be integrated across Complexity’s existing infrastructure and is another step toward the organization’s vision of “Esports 3.0,” which aims to professionalize the esports industry overall. In the Herman Miller Innovation Lab, Complexity is already working with Herman Miller to conduct research around ergonomic equipment that will address the specific needs of gamers and prevent injuries. In partnership with The Sports Academy, the Cognitive Lab exists to develop, train, and improve core cognitive functions of esports athletes. Pairing We Are Nation’s expertise in product design with Complexity’s commitment to professionalizing player care, will further open doors and push boundaries for player performance.

In addition to The Lab, We Are Nations will also launch an esportswear line for Complexity players, streamers, and fans. The new product line will include jerseys, hoodies, shirts, joggers, hats, and more, and will feature various drops throughout the year, including Complexity Gaming, Complexity-Limit, individual influencer lines, and a branded capsule collection. All products will be specifically designed for both comfort and performance.

To purchase Complexity Gaming esportswear, please visit http://col.vg/shop.

###

About Complexity Gaming 

Complexity Gaming is one of North America’s longest standing and most successful esports organizations, now owned by Jerry Jones of the Dallas Cowboys and investor John Goff. The esports organization is led by Founder and CEO Jason Lake, considered by many to be one of the founding fathers of esports in North America. Complexity’s esports teams have won more than 140 championships in nearly 30 game titles over its 15+ year history. Staunchly committed to passion, professionalism, and a player-first mentality, Complexity has been continuously recognized as a global leader in modern esports. For more information on Complexity, visit http://Complexity.gg and follow the organization on Twitter, Instagram, YouTube, TikTok and Facebook.

About We Are Nations 

We Are Nations is a specialist esportswear and retail company with locations based in the United States, United Kingdom and Australia with additional distribution partners around the world. The company provides merchandise design, sales, manufacturing, and distribution services for esports teams, leagues and other endemic and non-endemic brands operating in the esports industry. For more information, please visit www.wearenations.com.

Complexity Gaming Partners With Balanced Media | Technology To Bring Purpose To Play

April 27th, 2020

Complexity Gaming Spearheads Effort for Gamers to Leverage Spare PC Power to Discover Treatments for COVID-19

FRISCO, Texas – April 27, 2020 – Complexity Gaming, one of North America’s most elite and longest-standing esports organizations, today announced a partnership with BALANCED Media|Technology (BALANCED), a crowdsourced healthcare AI company that brings purpose to play, to donate unused computer processing power to find potential treatments for the COVID-19 virus. Together, Complexity and BALANCED are challenging the gaming community to join in by simply downloading the HEWMEN¼ Cell application for free.

“One of the core pillars of Complexity is Cause, and we’re always searching for ways that we can give back to our community,” said Jason Lake, Founder and CEO at Complexity Gaming. “During these trying times, our partnership with BALANCED allows us to leverage the power of gaming and esports to help identify solutions that can potentially slow the spread of COVID-19 and ultimately help to save lives.”

By combining the efforts of the gaming community to run HEWMEN, Complexity will be able to help process more than 200,000 FDA-approved medications and compounds against models of COVID-19 to see which combinations are most effective in treating the virus. This will help to more quickly define successful combinations and reduce the development cycle, so that new treatments can get to market faster.

“Through our partnership with Complexity, we’ve come to realize that gamers are some of the most passionate and engaged individuals,” said Robert M. Atkins, CEO at BALANCED. “By having the collective online community download HEWMEN, we can help to put a stop to the spread of the COVID-19 pandemic.”

BALANCED’s HEWMEN (Human Engaged With Machines via Elastic Network) technology creates a distributed network that processes data-driven problems such as drug discovery and medical research. Through downloading the simple and secure application from the Microsoft Store, Complexity has installed and is currently running HEWMEN on all 50 PCs in the GameStop Performance Center and is lending additional support from the staff and leadership team. By doing so, Complexity has been able to assist BALANCED in uncovering solutions for COVID-19.

Complexity previously partnered with BALANCED for a medical research project as part of Complexity-Limit’s race to become the top guild in the world during World of Warcraft’s “Race to World First.” While streaming the tournament, participants logged over 900 hours playing BALANCED’s The Omega Cluster, virtually processing medical compounds for cancer medicines through their gameplay. As BALANCED pivots its resources to join the fight against COVID-19, Complexity will now leverage its community and gamers at large to support.

For more information on Complexity, please visit https://complexity.gg/.

For more information on BALANCED Media|Technology’ HEWMEN application, please visit hewmen.com.

###

About Complexity Gaming

Complexity Gaming is one of North America’s longest standing and most successful esports organizations, now owned by Jerry Jones of the Dallas Cowboys and investor John Goff. The esports organization is led by Founder and CEO Jason Lake, considered by many to be one of the founding fathers of esports in North America. Complexity’s esports teams have won more than 140 championships in nearly 30 game titles over its 15+ year history. Staunchly committed to passion, professionalism, and a player-first mentality, Complexity has been continuously recognized as a global leader in modern esports. For more information on Complexity, visit http://Complexity.gg and follow the organization on Twitter, Instagram, YouTube, TikTok and Facebook.

About Balanced Media Technology 

BALANCED Media|Technology (BALANCED), is a crowdsourced healthcare artificial intelligence (AI) company bringing purpose to play. BALANCED is focused on changing the way researchers, pharmaceutical, and medical device companies leverage machine learning (ML) to advance the diagnosis and treatment of diseases. By crowdsourcing artificial intelligence through online communities and gaming via its HEWMEN platform, BALANCED hopes to aid researchers in investigating new treatments by creating AI-enabled technologies that reduce research time and cost and increase research effectiveness. BALANCED is a 2019 Tech Titan winner and has been recognized as an industry innovator by multiple groups including the Dallas Business Journal and Dallas Innovates. Headed by founders in data science, computing, video game development and the medical/healthcare industries, the company is based in McKinney, Texas, and can be found online at https://www.balancedmediatechnology.com.

Complexity-Limit Partners with National Guard for Road to MDI

April 21st, 2020

Following ‘Race to World First’ Win, Complexity-Limit Prepares for World of Warcraft’s Mythic Dungeon International

FRISCO, Texas – April 21, 2020 – Complexity-Limit, the world’s #1 Raiding World of Warcraft guild and partner of Complexity Gaming, today announced a partnership with Army National Guard. The two organizations will team up to create engagement opportunities, unique experiences and content as part of Complexity-Limit’s participation in World of Warcraft’s Mythic Dungeon International (MDI).

“MDI is one of the most unique accolades in esports, combining the thrill of a speedrun with head-to-head competition,” said Sören Vendsahm, General Manager, Complexity Gaming. “Our partnership with Army National Guard will help us to capture that excitement in a first-of-its-kind way as Complexity-Limit fights to add MDI to their list of accomplishments.” 

From April 21 through the end of July, Army National Guard will be integrated throughout Complexity-Limit’s streams and social channels during the ‘Road to MDI,’ a first-of-its-kind stream series in conjunction with the MDI. Guard Soldiers and Complexity-Limit guild members will also compete alongside each other during live streams. The partnership aims to bring WoW fans even closer to the action. 

“Our Guard Soldiers are passionate about gaming, esports, and World of Warcraft,” said Master Sgt. Jory Stevenson, Marketing NCOIC for the National Guard Bureau. “Partnering with Complexity-Limit not only helps us reach this unique and passionate audience but also allows our Soldiers to engage in teamwork as they continue playing WoW during these uncertain times.” 

‘Road to MDI’ will give fans a glimpse into how five members of the Complexity-Limit guild– Maximum, Twisted, Atrocity, Imfiredup, and Eric — prepare to compete in the event. Fans will be able to follow along on live streams as the guild comes together to practice, train, and develop new strategies for their shot at $300,000 and the title of MDI Champions. 

The MDI returns with its global competition for its fourth year, pitting the best Mythic Dungeon teams in a race to the finish line. The first North American cup took place on April 18 followed by upcoming North America cups on May 2 and May 16. The MDI will conclude with the Finals at the end of July.

For more information on Complexity-Limit, please visit https://www.limit-guild.com.

For more information on Complexity, please visit https://complexity.gg/.

###

About Complexity-Limit

Limit, now known as Complexity-Limit, was founded in early 2015 from top raiding guilds across North America. Setting their eyes on beating other North American guilds, while also improving their own world rankings, they took their first NA #1, World 7th rank in Hellfire Citadel, tackling Mythic Archimonde and sealing their fate as a force to be reckoned with. As they’ve climbed the world ranks tier after tier, the dream of becoming the #1 raiding guild in the world was realized in February 2020. Limit won the “Race to World First” in dominating fashion by being the first team to defeat 9/12 bosses and defeating the final boss days before the next closest guild.

About Complexity Gaming

Complexity Gaming is one of North America’s longest standing and most successful esports organizations, now owned by Jerry Jones of the Dallas Cowboys and investor John Goff. The esports organization is led by Founder and CEO Jason Lake, considered by many to be one of the founding fathers of esports in North America. Complexity’s esports teams have won more than 140 championships in nearly 30 game titles over its 15+ year history. Staunchly committed to passion, professionalism, and a player-first mentality, Complexity has been continuously recognized as a global leader in modern esports. For more information on Complexity, visit http://Complexity.gg and follow the organization on Twitter, Instagram, YouTube, TikTok and Facebook. 

About Army National Guard

Army National Guard Soldiers are trained and ready to respond when needed by their communities, state and nation. In exchange for their part-time service, Guard Soldiers are provided with valuable educational benefits and as well as paid training in over 150 career fields. The Army National Guard has part-time service opportunities in every State, the District of Columbia, Guam, Puerto Rico and U.S. Virgin Islands, more than 3,000 training locations, and more than 340,000 members. For more information on the Army National Guard, visit nationalguard.com.

Mythic N’zoth Boss Guide

March 24th, 2020

N’zoth

Strategy
Phase 1
Psychus Maps
Phase 2
Secret Phase
Raw time tables
Timeline – up to end of secret phase
Timeline – Second Phase 2
Phase 2 Positioning
Healer Tips

  • Heart of Azeroth extra action button now restores only 25 sanity over 4s, but does this for ALL people within 8 yards
    • Still breaks from moving
    • Each player can only use their neck ONCE
  • Heroic’s Phase 1 does not occur. You begin the fight in what was Heroic’s Phase 2
  • Phase 1 changes
    • When a Corruptor Tentacle or Exposed Synapse dies, a Psychophage add spawns in the Vision realm
      • 2 casts
      • Devour Thoughts
        • Deals 295k Shadow and drains 10 Sanity from players within 10 yards
      • Psychic Burst
        • When these die, leaves a purple swirlie behind. After a few seconds the swirlie explodes, dealing 295k Shadow damage and drains 30 Sanity to everyone within 5 yards
    • Psychus dying still stuns N’zoth, but no longer stuns any of the Tendy adds
    • Everything hits a LOT harder. Healers pumping 100k+ each
    • Paranoia
      • Affects ALL players in the Physical realm on Mythic
      • Deals about 100k/s if you’re apart from your partner, scaling up as the duration ticks
      • Running over someone other than your partner drains 5 Sanity per second
  • Phase 2 changes
    • Damage of everything greatly increased
    • Thought Harvester’s Harvest Thoughts, in addition to the massive damage increase, now drains 300 Sanity split among everyone hit, up from 200
      • 2 Thought Harvesters spawn at a time
    • If it fails to hit at least 5 people, drains 100 from everyone
  • Phase 3 – SECRET PHASE
    • This occurs 2:35 after Phase 2 begins
    • Gateway opens in a set location
      • Clicking the gateway sends you to the Chamber of the Heart
    • Inside, you’ll kill a Voidspawn Annihilator add
      • While you’re fighting the Annihilator, Countermeasures will periodically spawn
      • These need to be clicked and disarmed. Clicking one uses your heart of Azeroth button, meaning you cannot use it again for the remainder of the encounter
      • Any that go un-clicked do massive AoE damage, reduced by distance
        • From what we can tell, the absolute minimum damage you can take from one of these within the Chamber is about 350k damage
    • The Voidspawn Annihilator does an Annihilation cast
      • This places a healing absorb on multiple players
      • Once the healing absorb has been healed off, it puts a purple circle around the person
      • Explodes after 8 seconds
      • If the purple circle explodes and hits the Countermeasures, it immediately triggers them
    • After the add dies, you click the gateway to return to Phase 2
    • From that point, you burn the boss, continuing with P2 mechanics. Kill boss before enrage
    • Hard Enrage at 13:00. There’s an Evoke Anguish cast at about 13:03 that’ll instantly kill anyone who’s hit (unless they have an immunity)

Strategy

  • We recommend bringing 2 tanks, 4 healers, and 14 DPS
    • You’ll need a minimum of 5 players with an immunity, but we strongly recommend having 10 immunities available for Phase 2.
  • This entire fight is pretty much scripted. There’s very little mechanical change from Heroic to Mythic, but everything is amped up to 11, and the set timings create rough overlaps
    • Because of just how scripted this is, we’ll be focusing mostly on timing of abilities. Phase 2/Secret Phase/Second Phase 2 will simply be timelines with information about each mechanic as it happens
  • Last note here before we get into the phases – Sanity matters significantly more than on Heroic.
    • Necks can only be used once per person
    • Because of this, and the fact several MUST be committed to the “secret” phase, Sanity is a valuable resource
    • You do NOT want to take any extra Sanity damage past what’s required
    • We have 18 Neck clicks assigned to set spots in our strategy, giving you 2 extras. Use these as needed to regenerate Sanity lost to Paranoias
  • Phase 1
    • This phase is extremely similar to Heroic
      • The adds spawn faster, the red swirlies from killing tendies now hurt WAY more and drain 15 Sanity (up from 5), and the damage of everything is tuned way up
      • Important to note, the tanks get ANNIHILATED by the Basher Tentacles
        • Healers need to keep a close eye on the tanks and make sure they don’t just go splat
    • Mindgate goes out at 1:00 and 4:00
      • Pre-assign your two Psychus groups
      • Each group should have 8 people – 1 tank, 2 heals, 5 DPS
      • DPS players need their CDs available for Psychus, as it can get very tight killing him before he hits full energy
      • As in Heroic, the first Mindgate has Deathwing, the second has Azshara and Sylvannas
        • If you’re in the second Mindgate, you want to minimize movement as much as possible. The damage taken from Azshara can be deadly
      • Note – The Anguish puddles Psychus creates don’t deal damage for about 1 second or so after it’s dropped, giving you a little wiggle roo
    • Paranoia goes out at 0:12, then about every 1:26 after that
      • You should pre-spread before the cast goes out, then prioritize SAFELY getting to your partner without ever running through any other player in the raid
    • Psychophage adds
      • Their cast is an AoE explosion. You can interrupt it, or move away from it
      • Move away from the Psychic Burst AoE on the ground when they die
      • Being hit by either deals damage plus drains Sanity, so don’t get hit
      • They have pretty low HP, so interrupt them and cleave them down
    • Add Priority
      • On Mythic, the add kill priority changes a bit. It’s Bashers > Spikes > Corruptors
        • The Bashers absolutely destroy your tanks, so they’re second priority
        • The Spike tentacles do a LOT more damage, and since they can’t be interrupted you’ll want to kill them off quickly. Do not forget about them.
        • The Corruptors can largely be countered by interrupting their casts, can mostly be killed from cleave
    • You should use Bloodlust around 2:05-2:10 into the fight
      • This is a 12:30-13:00 encounter, allowing you to use BL twice
      • First lust at 2:05ish means you’ll have it during a P1 burn phase on N’zoth, and also have it active when you get the Servant of N’zoth debuff in p2
    • Post-Psychus Burns
      • You get 30 seconds of pure burn each time. Maximizing boss damage during this is essential
      • Ideally, you’ll have the boss to 89% or lower after the first one, and 78% or lower after the second one. The lower the boss is, the better
      • You should use 2 Heart of Azeroth neck extra-action buttons during each burn phase to regenerate Sanity for the whole raid
    • Note for Healers
      • The damage intake on this fight is nutty. You’re looking at 600-700k DTPS across the raid for the entirety of Phase 1. During p1, use CDs as necessary, and just pump your minds out
      • Your tanks need your help. As mentioned above, the tanks get shit on by the Bashers, so make sure you’re tossing as much healing their way as you can
      • There’s ticking damage of 42k per person every 2s, plus the Eternal Torment dealing 88k/s for 2s periodically being cast by the boss
    • Mindgrasp requires a bit more coordination
      • Make sure to clear a path from the Neurons
      • You’ll need this path to be 3 Neurons wide, as Paranoia overlaps with this
      • Make sure you’re standing on top of your partner, and not overlapping with anyone else in the raid
      • To help make more room, you can have 2 layers of groups, one closer to whichever edge, one just outside their circles
      • Be extremely careful of your positioning for this. If you touch the goop from a Neuron, it’ll likely kill you damn near instantly. It ticks for 320k/second, and the first tick is the instant you touch it
        • If you actually live touching the goop, it also drains 10 Sanity per second
      • Tip from THD: You can Fear and Banish the Neurons when they reach their smallest size goop puddle, and it won’t re-grow for the duration of the CC
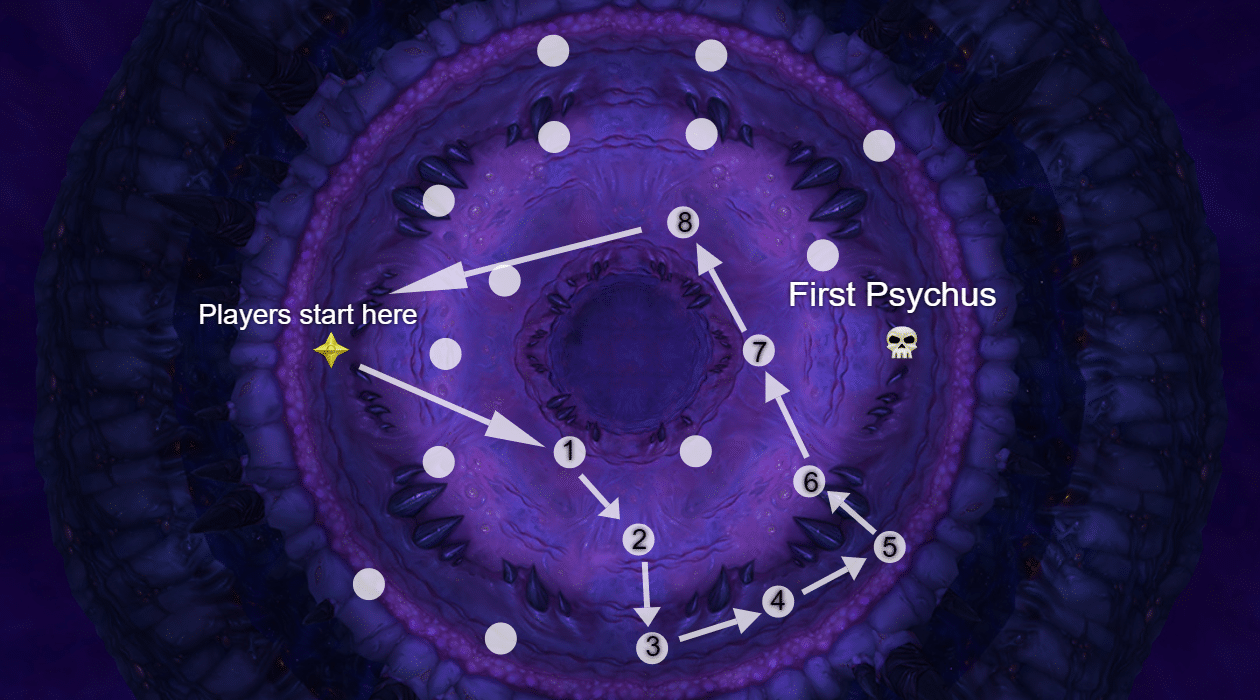
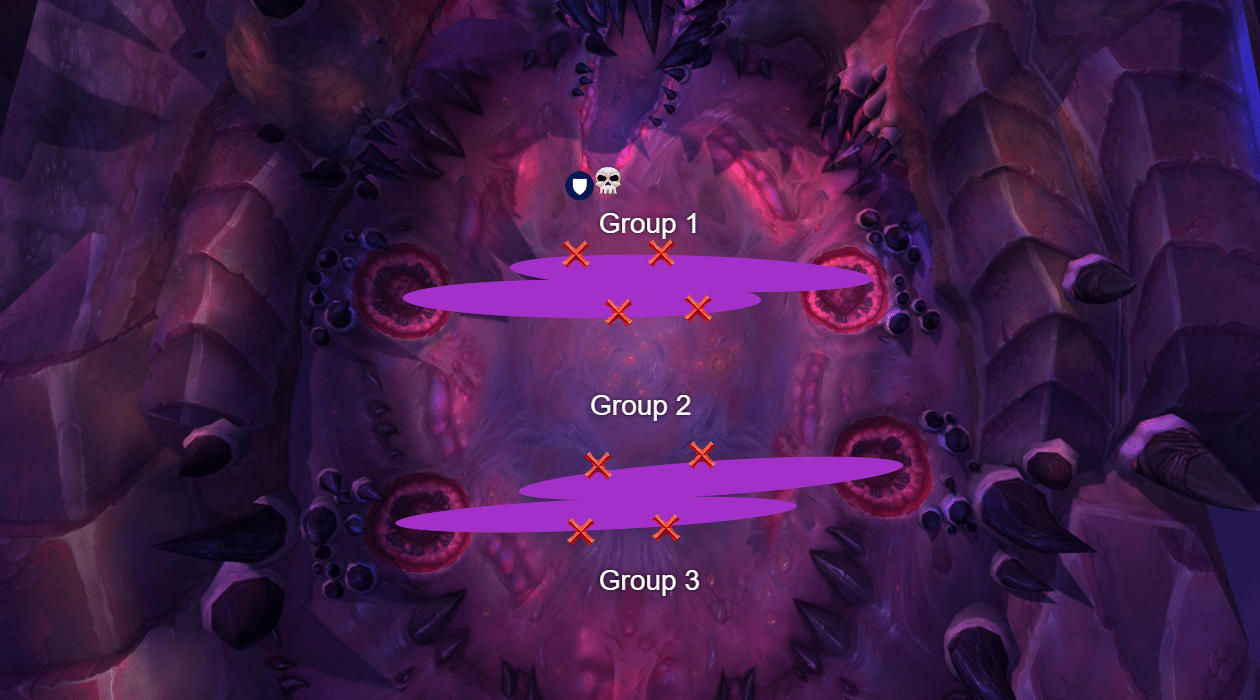
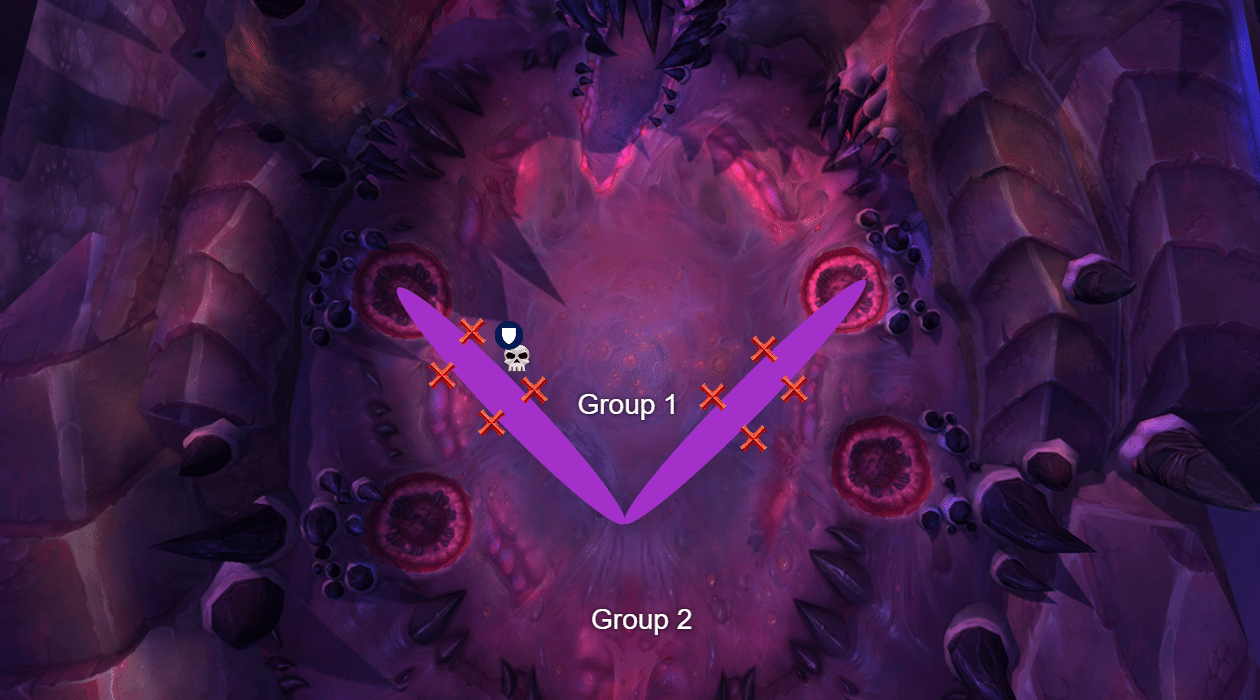
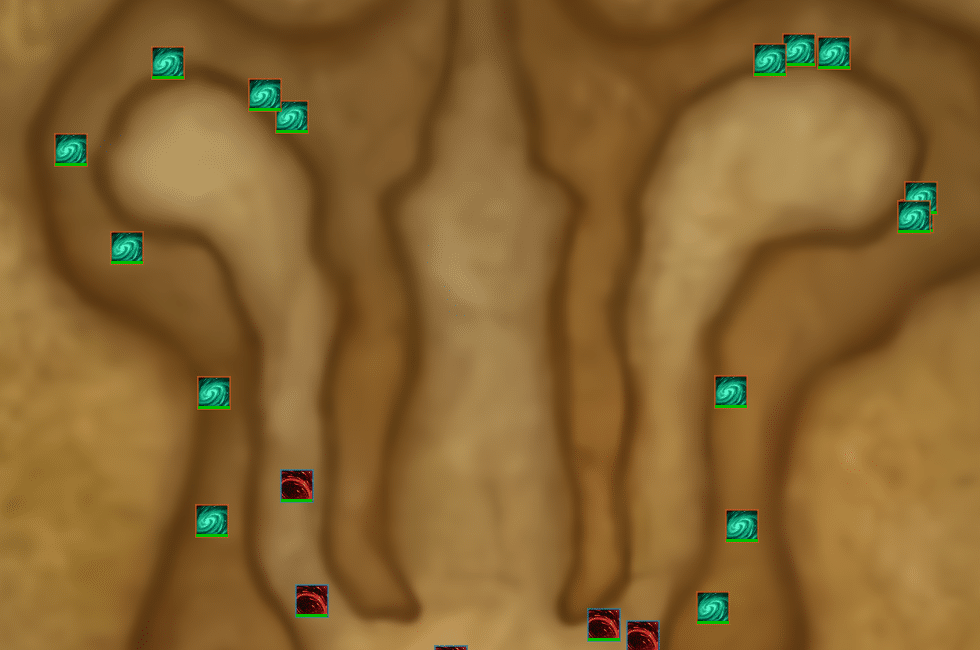
  • Psychus Maps
    • These are the paths Limit used for their kill. Please note, some of the tendy locations may be off by a hair, it’s hard to get them perfect.
    • Psychus 1

    • Psychus 2

  • Phase 2
    • From here on out, the fight is entirely scripted. We have a timeline below, after some notes for P2 and an overview of the “Secret” Phase, showing which ability occurs when, and how to handle them.
      • We’ve broken up the timeline in two parts – first P2 + Secret Phase, and second P2
      • Reason for this is that all spell timings in the second P2 are relative to when you LEAVE the Chamber of the Heart, which can be give or take a few seconds
      • We’ll also include a “raw time tables” section, which has the full time stamps (relative to the beginning of P2) for our World First N’zoth kill
    • Paranoia affects every player in the raid, EXCEPT tanks. Whoever is linked to the tanks needs to yeet over ASAP so the tank doesn’t need to.
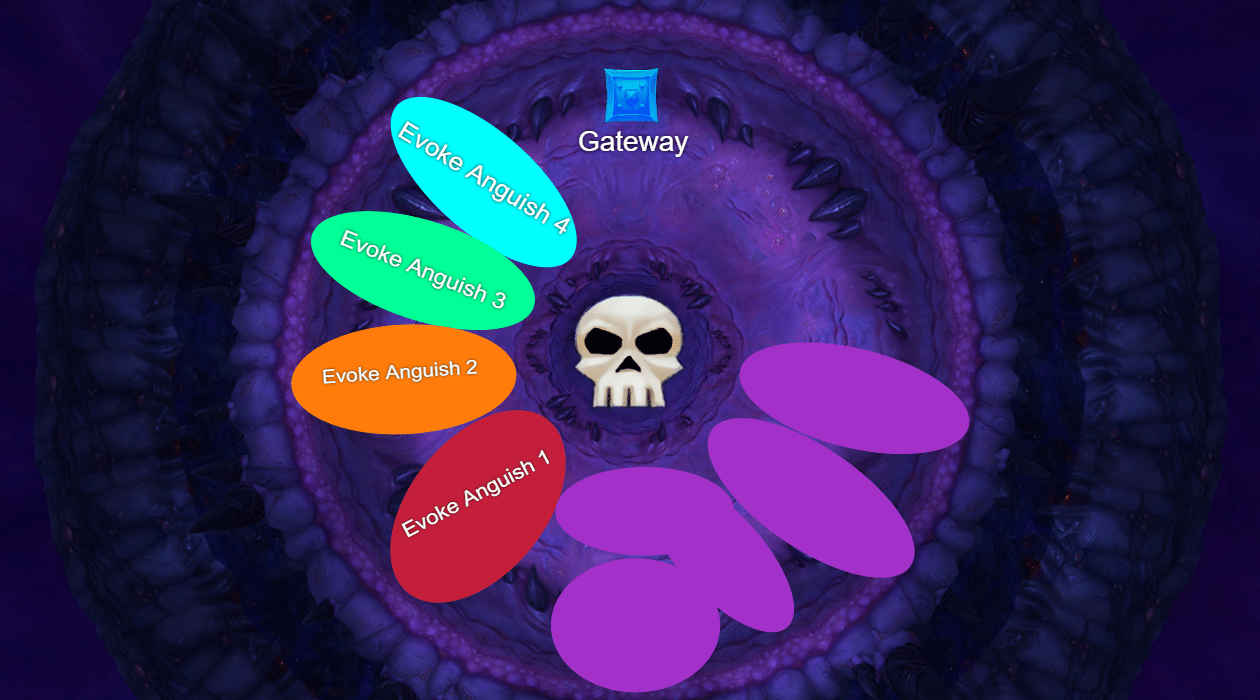
    • The Gateway for the “Secret” Phase always spawns in a set location. As such, we’ll include a map after the timeline with recommended drop locations for each individual set of Evoke Anguish puddles
    • You can NOT drop Evoke Anguish puddles on top of each other on Mythic, as there’s a 4 yard AoE circle explosion component when the puddle drops. Getting hit by someone else’s circle will probably kill you
    • Thought Harvesters always spawn on the tanks, so tanks should make sure they’re pre-positioned to where you want them
      • They cast Harvest Thoughts about 10-12s after spawning, so make damn sure you have them on top of each other. You’ll want soakers to be hit by both circles
      • Cast is 5 seconds long, all times listed below are when the cast COMPLETES (meaning deals damage)
      • This is where your immunities come in, you’ll want to use groups of 5 players with immunities to soak the casts. By using immunities, you’ll avoid both the massive damage intake and also the Sanity drain. The more sets you can immune, the better. Certain sets are more vital to have immuned, and we’ll discuss that below
      • We strongly recommend having a composition with 10 total immunities. If you are unable to field that, though, we will list which Harvest Thought casts are top priority to immune-soak.
    • We’ll show the timeline in reference to P2 beginning, based on the completion of N’zoth’s second Convergence cast.
    • AFTER the timeline, we have a small section of healer tips
  • Secret Phase
    • You’ll fight a Voidspawn Annihilator add down here, who has 2 casts as well as an environmental mechanic
    • The entire raid should be stacked closely in melee range. This both makes life easier for the healers, and helps minimize damage taken from Protocol explosions
    • Dark Matter
    • Puts a targeting swirlies on the ground, needs to be dodged
    •  Annihilate
    • Puts a purple targeting circle on two players. After 8s, the circles explode for heavy damage
    • If these circles explode on top of a Countermeasure Protocol, the Protocols instantly explode
    • Event Horizon
    • Applies a large healing absorb on the active tank
    • Simply tank swap after this is applied
    • After the absorb is healed off, this tank is targeted by Annihilate
    • Countermeasure Protocols
    • Glowing Titan interactable objects that spawn in groups
    • These explode for massive damage after a few seconds. Each set has a different amount of time, between 8-20 seconds. If you’re within the yellow targeting circle around a Protocol, the damage is lethal. Outside of the circle, it’s fall-off damage
    • You can disarm these by clicking them, which uses that player’s Heart of Azeroth neck, and makes them unable to use the extra action button to restore Sanity
    • Because of this, you should always leave up the furthest away Countermeasure
  • Raw time tables
    • Start 6:04 into the fight
    • Go into secret phase 8:48 into the fight
    • Leave secret 10:12 into the fight (4:08 after P2 begins)
    • Harvest Thoughts
      • 0:04, 1:20, 1:47, 4:18, 5:34, 6:01
      • HARVEST 0:15, 1:32, 1:59, 4:29, 5:47, 6:13
    • EVOKE ANGUISH
      • 0:20, 0:39, 1:13, 1:34, 4:34, 4:54, 5:28, 5:49, 6:31
    •  PARANOIA
      • 0:51, 1:57, 5:06, 6:12
    •  MINDGRASP
      • 1:05, 5:20
    • GATEWAY – 2:44
    • DARK MATTER – 3:11
    • ANNIHILATE – 3:29, 3:56
    • PROTOCOL EXPLODE – 3:02, 3:22, 3:42, 4:07
  • Timeline – Up to end of “Secret” Phase
    • 0:00 – Convergence ends, Phase 2 Begins
    • 0:04 – First set of Thought Harvesters spawns
      • Tanks should be standing on top of each other, so these spawn next to each other. This is true for every single set of these adds
      • In general, tanks want to keep the Thought Harvesters close to the boss, so your Fire Mages can have Ignite spread to them, as well as allowing other cleave to hit them
    • 0:15 – Harvest Thoughts cast completes
      • Everyone in the raid should group soak this cast
    • 0:20 – Evoke Anguish cast
      • Make sure you’re spread out every single time Evoke Anguish is cast
      • After this particular cast, collapse in melee range and use 2 Heart of Azeroth extra action buttons
    • 0:33 – Lazers, spinning Clockwise
    • 0:39 – Evoke Anguish cast
    • 0:51 – Paranoia cast
      • Pre-spread for this, about 5-6 yards away from other people
      • Focus on getting to your partner, and prioritize NOT running into other people
      • The damage for being apart is healable. The Sanity drain for running into other people is much more dangerous
    • 1:05 – Mindgrasp cast
      • Make sure to spread out, as the Mindgrasp hits right as Paranoia ends
      • Clear out a large area of Neurons, and make sure you’re positioned to not get dragged into one
      • You’ll want to be 2-3 pairs of connected people deep, making sure you’re as close to other groups around you as possible without being in their Paranoia circle
    • 1:13 – Evoke Anguish cast
      • Spread the hell out immediately after Mindgrasp ends
    • 1:20 – Second set of Thought Harvesters spawns
    • 1:32 – Harvest Thoughts cast completes
      • Immune this cast if you’re able to immune 2 per Phase 2
    • 1:34 – Evoke Anguish cast
    • 1:42 – Lazers, spinning counter-clockwise
    • 1:47 – Third set of Thought Harvesters spawns
    • 1:57 – Paranoia cast
      • If you’re connected to a player who’s immuning the Harvest Thoughts, use a personal defensive (not immunity though) to help survive. Do not go inside the soak circle, and do NOT run into other people
    • 1:59 – Harvest Thoughts cast completes
      • This set should be immuned. If you can only immune 1 cast per Phase 2, this is the cast to immune
      • Make sure to kill this set of adds quickly, then you can all-out burn the boss until the Gateway activates
    • 2:06 – Lazers, spinning Clockwise
    • 2:44 – Gateway becomes active
      • Slowly move towards the Gateway’s side of the room after the adds die, while nuking the boss
      • Everyone should stay closely grouped up during the burn on the boss
      • Use a Warlock’s Demonic Gateway from melee range to the Secret Phase Gateway, and click the gateway as late as possible, right before the first Eternal Torment cast goes off. Every little bit of DPS here helps
    • 3:02 – First Protocols explode
      • Click 2 Protocols to disarm
    • 3:11 – Dark Matter cast
      • Players need to watch their feet and just dodge these
    • 3:22 – Second Protocols explode
      • Disarm ALL 3 OF THESE, they’re directly in the middle of the room. There isn’t enough space to move away for fall off damage, so disarm all of them.
    • 3:29 – Annihilate cast
      • Players affected by Annihilate need to move away from the group, and be careful not to put their targeting circle on a Protocol
    • 3:42 – Third Protocols explode
      • Click 3 to disarm
    • 3:56 – Annihilate
    • 4:07 – Fourth Protocols explode
      • Click 3 to disarm
  • Timeline – Second Phase 2
    • 0:14 – Thought Harvesters spawn
    • 0:21 – Harvest Thoughts cast completes
      • Immune this one if possible. If not, the whole raid group should soak this one
    • 0:26 – Evoke Anguish cast
      • After this cast, collapse in melee range and use 2 Heart of Azeroth extra action buttons
    • 0:39 – Lazers, spinning counter-clockwise
    • 0:46 – Evoke Anguish cast
    • 0:58 – Paranoia cast
    • 1:12 – Mindgrasp cast
      • Make sure to spread out, as this Mindgrasp again hits right as Paranoia ends
      • Like before, clear out a large area of Neurons, and make sure you’re positioned to not get dragged into one
      • And again like before, you’ll want to be 2-3 pairs of connected people deep, making sure you’re as close to other groups around you as possible without being in their Paranoia circle
    • 1:20 – Evoke Anguish cast
    • 1:26 – Thought Harvesters spawn
    • 1:39 – Harvest Thoughts cast completes
      • Immune this set
    • 1:41 – Evoke Anguish cast
    • 1:48 – Lazers, spinning Clockwise
    • 1:53 – Thought Harvesters spawn
      • Lust immediately when these spawn, as soon as your Sated falls off.
    • 2:04 – Paranoia cast
    • 2:05 – Harvest Thoughts cast completes
      • Ignore this cast. Tank should move these adds towards the back of the room away from the raid, and avoid standing in the circles. By doing this, everyone in the raid will hit 0 Sanity instantly, and get the Servant of N’zoth buff, increasing damage dealt by 25%. From that moment on, you have 20 seconds to kill the boss before everyone gets mind controlled and you wipe
    • 2:13 – Lazers, spinning counter-clockwise
    • 2:23 – Evoke Anguish cast
    • KILL THE BOSS
  • Phase 2 Positioning
    • First Phase 2

    • Second Phase 2

  • Healer Tips
    • Thanks to Maeveycakes for sending in these tips
    • Phase 1 use CDs as necessary, which’ll likely be during the Eternal Torment
    • In Phase 2, you’ll want one CD for each Evoke Anguish
      • Limit’s heal comp was 2 Holy pallies, 1 Disc Priest, 1 RSham
      • They went Barrier first Evoke, SLT 2nd, Devo 3rd, other Devo 4th
      • For 3rd and 4th, they also added Rallying Cry
      • They repeated this CD rotation during the 2nd Phase 2 as well
    • The ranged-standing healers (so not holy pallies and MW) can just not stack during Harvest Thought soaking. Doing this allows you to pre-position where you’ll want to be for the upcoming Evoke Anguishes and focus on throughput instead of movement
    • During the Secret phase, just let the tank keep the absorb shield. Don’t bother padding and blasting through the absorb, conserve mana and keep the group alive

VIDEO GUIDE

Mythic Carapace Boss Guide

March 24th, 2020

Carapace

Strategy
Phase 1
Phase 2 
Phase 3
Phase 3 Timeline

  • Phase 1
    • Adaptive Membrane can now be targeted to players
      • When the Membrane breaks, it can now trigger either a Fragment of Sanity OR Shard of Sanity
        • Fragment works exactly the same as in Heroic
        • Shard of Sanity puts down a larger orb and restores 10 sanity to all players within 20 yards. Triggers once when someone runs into it
    • Growth-Covered Tentacles have new set formations they spawn in
      • First set is 4 Tendies, arranged in 2 groups of 2
      • Second set is 2 Tendies, diagonally towards the back of the room
      • Can NOT cross through Tendies, need to kill them
      • Using the Legendary Cloak ability can still fly you through the Tendies


  • Phase 2
    • Players no longer have their extra action button nor access to Wrathion to restore Sanity
    • Mycelial Cysts gain a new ability – Reactive Mass
      • 10 second cast, begins immediately when a Cyst takes damage
      • After the cast ends, the Cyst is untargetable for 20s
      • When this effect expires, the Cyst is healed to full Health and deals massive damage to anyone within 15 yards
    • Synthesis Growths
      • When these die, they now spawn 2 Nightmare Antigen, the little adds from P1
      • When all Growths are killed, Fury of N’zoth no longer engages the raid. It instead retreats and immediately starts Phase 3
  • Phase 3
    • Boss now summons lines of Mycelial Cysts, in addition to all previous P3 abilities
      • Happens at the beginning of P3, then every 2 minutes

Strategy

We recommend going in with 2 tanks, 4 healers, and 14 DPS

Adaptive Membrane

    • On Mythic, this drops 2 different size orbs. Little orbs work just like Heroic, Big Blue orbs restore 10 sanity to everyone within 20 yards
    • Which orbs you get is predictable
      • If the Membrane is on the Boss, a Synthesis Growth, or a player, it’ll generate a Big Blue orb when the Membrane breaks
      • If the Membrane is on anything else and breaks, it’ll drop some small yellow orbs, same ones as Heroic

Phase 1

    • You’ll want to pre-assign groups for the two sets of Growth-Covered Tentacles
      • The pattern of these tendies is pre-set on Mythic, as is the location of the Hemorrhages
    • For Set 1, you’ll want 3 groups, for Set 2 you’ll want 2 groups
      • Set 1 shadows appear at about 0:32, the tendies slam down at 0:39
      • Set 2 shadows appear at about 1:35, and slam down at 1:43
    • Just like in Heroic, the Tentacles themselves serve as a Line of Sight blocker. The different groups being in different areas allows the raid to simultaneously be damaging Hemorrhages on different tendies around the room
    • Set 1

      • Group 1 should be your melee players, Group 2 should be your ranged, Group 3 should consist of 2-3 ranged DPS, preferably Warlocks. Group 2 should focus on the northern Tentacle first, the one separating Group 2 from Group 1
        • Once the northern tendies are cleared, Groups 1 and 2 work on the southern tendies
        • Group 3 should be able to take out the southern-most tendie by themselves by the time the other 3 are cleared
        • Groups 1 and 2 should each have 2 healers and 1 tank
        • Group 3 needs to sustain themselves
        • At 0:43, 2 Gaze of Madness adds will spawn, killing this is a higher priority than killing the Hemorrhages
          • These will likely be in different groups, so whatever groups can reach each Gaze need to kill it
    • Set 2

      • You’ll want all melee DPS and most of your ranged DPS in Group 1. Put 2 DPS in Group 2, again preferably Warlocks. Once the four Hemorrhages Group 1 can hit die, everyone in Group 1 should use their Legendary Cloak button, flying back to Wrathion
        • Get full Sanity, then kill off the remaining Hemorrhages
        • You’ll again get spawns of 2 Gaze of Madness adds at 1:47. Gaze adds again are higher kill priority than the Hemorrhages
    • Adaptive Membrane now goes out in pairs of 2 casts
      • The first cast in the pair goes out at 0:16, then every 32 seconds
      • The second cast goes out 10 seconds after the first in the pair
      • The first cast goes on either the boss or adds, the second cast goes on 3 random players
    • Madness Bomb is cast at 0:10, then every 25s, and is applied to 3 people
      • Affected players just need to move away from the raid so they don’t explode on anyone
    • Mental Decay is applied at 0:08, then every roughly 21 seconds for the rest of the phase
      • 6 people get affected per application, and it lasts 20 seconds
      • Drains 20 sanity from the affected players immediately, and deals 41k Shadow damage per second for the duration
    • Mandible Slam is cast at 0:09 then every 16 seconds throughout the phase
      • Tanks should swap every 2 stacks
    • The sets of Gaze of Madness adds only spawn at the points listed above when the Growth-Covered Tentacles are up
    • At 50%, you’ll enter Phase 2

Phase 2

    • Like in Heroic, the beginning of P2 is the boss running through the tunnel and Wrathion blowing a hole in the wall to let you follow
      • The whole raid has their Sanity reset to 100 at the beginning of the phase
      • However, Wrathion NO LONGER helps you in p2
      • You will no longer have access to using your Legendary Cloak to port to Wrathion and restore Sanity
    • You’ll want your raid to split into 2 groups. 9 people should be assigned to go left, 11 should go right
      • Each group gets 1 tank and 2 healers
      • You’ll want classes with better 3 target stacked cleave to go to the right, especially things like Fire Mages, Havoc DHs, even Frost DK are great here
      • Classes that are better at spread damage should go left. Single-target focused specs are also good on the left
      • The left-side has 7 Growths, the Right side has 9
        • On the right, near the top of the platform, are two sets of 3 growths very close together, which is why strong cleave specs excel on this side

    • You’ll want to kill off the Synthesis Growths as you reach them, and work your way towards the back of the platforms
    • While moving through the platforms, be careful about damaging the Mycelial Cysts
      • From the moment a Cyst first takes damage, it’ll become un-targetable 10 seconds later
      • After 20 seconds, it’ll explode in a 15 yard radius, dealing heavy damage to anyone hit, and restoring the Cyst’s HP to full
      • The danger here is the AoE, as there’s not much room to move away from it
      • As such, you want to limit hitting these Cysts as much as possible, to try and prevent explosions from happening
      • This’ll put pressure on the healers though, as standing in the gunk around the Cysts deals 14k damage per second
    • During this phase, the boss continues casting Adaptive Membrane, Mental Decay and Madness Bomb
      • Membrane works just like before, but is now just cast every 10 seconds
        • Each cast alternates between being targeted at Synthesis Growths and players
        • When this is applied to Growths, DPS should focus down specific ones to make sure you actually pop the Membrane. Any padding damage on extra Growths that don’t have the Membrane killed is wasted, so don’t bother
        • You can have the RL/Officers mark specific Growths to target for each Membrane
        • When a Membrane is broken off a Growth, it’ll drop a Big Blue Sanity ball
          • Players should make sure they’re within 20 yards of the ball before someone runs over it and causes the Sanity restore to occur
          • This is your only way to gain Sanity during this phase, so coordinate using the balls properly
        • Madness Bomb is a bit harder to deal with in P2
          • Affected players need to be careful to move just far enough away nobody else gets hit by their circle
          • These players also need to be careful not to block people from getting access to the Growths currently being killed
    • The boss also casts Eternal Darkness, and just like on Heroic this deals heavy damage to everyone in the raid and drains 10 Sanity
    • Once all the Synthesis Growths have been killed, the boss immediately transitions into Phase 3

Phase 3

    • After following the boss down the tunnel to start p3, everyone’s Sanity will be reset to 100 again
    • As the boss begins P3, he’ll throw down lines of Mycelial Cysts around the platform in set locations around the room. Refer to the graphic we have a few lines below here, the Cysts are the red lines
      • 2 minutes after you enter Phase 3, he’ll put a second set of Cysts down. These are placed immediately counter-clockwise of the existing cysts, and just expand the area covered
    • Important note, Infinite Darkness is cast at the location of a group of players. This means you can fairly easily bait where it’ll be dropped, and should do so regularly
      • You can and should also use Warlock’s Gateways for certain Infinite Darkness casts to quickly move across the covered area, as well as the Mycelial Cysts
    • You’ll want to spend the majority of this phase grouped up near melee range, except for when Insanity Bombs are going out forcing you to spread
      • When the Big Blue Sanity Orbs drop from Membranes, having the raid stacked together will make sure everyone gains Sanity for each orb
    • When a PLAYER is affected by Membrane, they’ll need to intentionally take damage to break it
      • The easiest ways to do this are stepping in Infinite Darkness goop, or Mycelial Cyst gunk
      • Definitely do this, as you’ll need all the Sanity orbs you can get
    • Outside of the Cysts, and of course the Membranes being cast in the same pattern as Phase 1 and being applied to players, this phase remains the same mechanically as Heroic
      • This phase is actually scripted to a T, so we figured the most effective way to communicate the strategy was a timeline. We’ll list each ability and movement, showing timings represented both as “time since phase started” and full fight timers, based on our World First kill
      • We’ve also prepared a graphic, showing where to go for each movement, where Infinite Darknesses should be dropped, and where the original lines of Cysts are. The timeline is below the graphic, and refers back to it regularly

Phase 3 Timeline

    • 0:00 (4:38) Beginning of P3, initial cast of Cysts. Start on X
    • 0:09 (4:47) First Infinite Darkness
      • Everyone should stack tight on X to bait this. As soon as the cast completes, click a Warlock Gateway moving you towards Circle
    • 0:11 (4:49) First Adaptive Membrane, cast on the boss
    • 0:12 (4:50) Tendy Shadows appear
    • 0:18 (4:56) Tendies slam down
    • 0:21 (4:59) Second Adaptive Membrane, cast on 3 players
    • 0:28 (5:06) Insanity Bomb Applied
      • Everyone spreads for the explosions
    • 0:32 (5:10) Tendy Shadows appear
    • 0:38 (5:16) Tendies slam down
    • 0:40 (5:18) Insanity Bombs explode
      • Everyone collapse in on the boss and AoE down the adds
    • 0:52 (5:30) Tendy Shadows appear
    • 0:58 (5:36) Tendies slam down
    • 1:01 (5:39) Second Infinite Darkness cast
      • Stand on Circle to bait this one, then use movement speed abilities to get out and towards Star as fast as possible
      • Things like Stampeding Roar and Wind Rush Totem are great here
      • You’ll also want a couple Ranged DPS to hit one or two Cysts right before the Infinite Darkness is cast, to try and leave a gap in the gunk, since the gunk slows you
    • 1:05 (5:43) Third Adaptive Membrane, cast on the boss
    • 1:12 (5:50) Tendy Shadows appear
    • 1:18 (5:56) Tendies slam down
    • 1:15 (5:53) Fourth Adaptive Membrane, cast on 3 players
    • 1:32 (6:10) Tendy Shadows appear
    • 1:35 (6:13) Insanity Bomb Applied
      • Wait for the Tendies to slam, then quickly spread out
      • The tank who has the boss should move him to the next marker (Moon) BEFORE this set of Bombs explodes. Start moving as soon as the Tendies finish slamming.
      • Infinite Darkness is cast on the group, not on the tank, so to give everyone more room, move the boss early
    • 1:38 (6:16) Tendies slam down
    • 1:47 (6:25) Insanity Bombs explode
      • Stack tight on the Star marker to group up the adds, and blast them down
      • You want to be very tightly stacked on the marker, with the exception of the tank who moved the boss away
    • 1:52 (6:30) Tendy Shadows appear
    • 1:53 (6:31) Third Infinite Darkness cast
      • This Darkness is extremely dangerous, as you only have a few seconds to move across Tendy shadows after baiting.
      • To help make sure your raid makes it, we recommend using either another Stampeding Roar or Wind Rush Totem. If you don’t have access to a second ability like this, we STRONGLY recommend everyone in the raid use a Lightfoot Potion to sprint across faster
      • You’ll likely still have the little adds left over chasing your raid here, that’s fine. It’s more important to get this bait correct than worry about adds
    • 1:58 (6:36) Tendies slam down
    • 1:59 (6:37) Fifth Adaptive Membrane
      • This one’s applied to both the boss and any adds still alive
    • 2:01 (6:39) Cyst Genesis – Boss creates the second set of Cysts
      • This widens the existing gunk-covered areas
    • 2:09 (6:47) Sixth Adaptive Membrane
      • Applied to 3 players
    • 2:12 (6:50) Tendy Shadows appear
    • 2:18 (6:56) Tendies slam down
    • 2:32 (7:10) Tendy Shadows appear
    • 2:38 (7:16) Tendies slam down
    • 2:42 (7:20) Insanity Bomb applied
      • Spread for explosions
    • 2:45 (7:23) Fourth Infinite Darkness cast
      • For this cast, everyone will have the Insanity Bomb debuff on them
      • Use a Warlock Gateway for this cast, clicking the Gateway immediately when the cast completes
      • From the moment you click the Gateway, you’ll have about 6 seconds until the Insanity Bombs explode
      • As soon as you land from the Gateway, everyone needs to spread as quickly as possible so you don’t overlap Bombs
      • This is the most dangerous Infinite Darkness in the fight
    • 2:50 (7:28) USE BLOODLUST HERE
    • 2:52 (7:30) Tendy Shadows appear
    • 2:53 (7:31) Seventh Adaptive Membrane
      • On boss and the adds that spawn while this Membrane is casting
    • 2:54 (7:32) Insanity Bombs Explode
      • As soon as these explode, everyone needs to collapse back under the boss and AoE down the adds. Several adds will have the Membrane on them, make sure they die
    • 2:58 (7:36) Tendies slam down
      • As a note, these tendies will likely miss you, as they’ll be targeted where you were as you clicked gateway
    • 3:03 (7:41) Eighth Adaptive Membrane
      • Cast on 3 players
    • 3:12 (7:50) Tendy Shadows appear
    • 3:18 (7:56) Tendies slam down
    • 3:32 (8:10) Tendy Shadows appear
    • 3:37 (8:15) 5th Infinite Darkness
      • Ideally, you want to kill the boss before this Darkness is cast. If you aren’t able to, treat it the same as Darkness #1, but using movement abilities instead of a Gateway
    • 3:38 (8:16) Tendies slam down
      • These will slam before the 5th Infinite Darkness cast actually completes, so they shouldn’t actually interfere much with being able to get out for Darkness
    • 3:47 (8:25) Adaptive Membrane
      • Cast on boss
      • Break the shield, kill the boss

VIDEO GUIDE

Mythic Il’gynoth Boss Guide

March 2nd, 2020

Il’gynoth

  • Cursed Blood
    • Il’gynoth regularly puts a debuff on several players, denoted by a targeting circle
    • Circle will grow and shrink
    • When any circle expands to its maximum size, it’ll explode for moderate damage to the affected player
    • When this debuff is removed, it explodes and deals damage based on its size when removed. The larger the circle was, the higher the explosion’s damage
  • Clotted Corruption add now spawns in Phase 2 while the raid fights the Organs
    • It’ll periodically charge forward, dealing moderate damage to anyone hit and absorbing Blood of Ny’alotha adds
    • Absorbing a Blood of Ny’alotha add causes the Clotted Corruption to grow in size and increase damage dealt
    • This add must be tanked

A note on strategies here

While we don’t necessarily like this strategy, we strongly recommend you use the “no dispel” strategy pioneered and popularized by Alpha. It makes the fight significantly easier, removes a mechanic, and will allow you to get much further into the fight much more quickly. Unless Blizzard does something to alter this strategy’s effectiveness, it’ll remain the recommended strategy. We’ll list both strategies here, but for the time being, your guild will likely find the “no dispel” strategy to be easier.

UPDATE 4/25/2020 – Blizzard has made several tuning changes to this fight over the last couple of months. The most recent one reduces the maximum size of the Cursed Blood circles, but does not change the speed at which they grow. If effect, this change actually increases your raid’s damage taken in the no-dispel strategy. With that, plus the changes to the damage from the Curse being dispelled, the “proper” strategy may actually prove simpler for your guild if you’re just beginning the fight.


No-Dispel Strategy

  • General Info
    • This strategy is exactly what it sounds like, you just never dispel Cursed Blood for the entire fight
    • This effectively removes about 30% of the total raid damage output of the fight
      • Additionally, the Touch of the Corruptor (Mind Control) cannot be applied to people with Cursed Blood
      • Therefore, rather early into the fight, you’ll stop having to deal with the Mind Control mechanic as well
    • We recommend 2-3 tanks, 3-4 healers, and 14-15 DPS
      • If you run 3 tanks, at LEAST one should be a BDK, with heavy Echoing Void or Twilight Devastation
        • That player’s only purpose is to help grip the Blood adds, and deal as much damage as possible
      • If you run the “No Dispel” strat, use 3 healers
      • If you use the “Proper Dispel” strat, use 4 healers
    • Cursed Blood is cast at 0:20, then every 45 seconds
      • 8 players are afflicted with the debuff per cast
      • If using this no-dispel strat, your entire raid will have Cursed Blood by 1:50 into the fight
    • Cursed Pulse
      • This is the damage a player takes when their circle reaches full size
      • Deals about 175k damage
      • Reaches full size about every 20 seconds
    • Managing the circles
      • Remember, the Cursed Blood circles only deal damage at full size, you have a full 20 seconds between pulses
      • It’s safe to stand near people when circles are small, or shrinking
      • Just make sure players move away from each other when a circle is growing and getting close to full size again
    • “House of Cards”
      • I personally like this term in describing this strategy
      • You’re removing some mechanics and a lot of damage from the fight, but there’s a major downside
      • In essence, this is a High Risk – High Reward strategy
      • The risk is that after 1:50, when the whole raid has Cursed Blood, a single player dying will likely result in a nearly instant raid wipe
        • When a player dies, their Cursed Blood circle immediately explodes, and if the circle is at half-size or larger you’re kinda screwed
        • As soon as 1 player dies and their circle explodes, it’ll lead to a chain-reaction of other people dying, circles exploding, and the entire raid falling over within seconds
      • The reward, though, is that all it takes is one good pull where nobody messes up and the boss dies. For many guilds, this strategy can nearly halve the total number of progression pulls before a kill
      • As such, it’s vitally important that every player in the raid does everything they can to keep themselves alive
        • This includes using personal defensives, Healthstones, Health Potions, and even going as far as to make sure they’re sub-40 corruption. A single Thing from Beyond spawning at a bad time and killing that one player can instantly wipe the entire raid
  • Phase 1 – Fighting Il’gynoth
    • Phase 1 (whenever you’re fighting Il’gynoth) is very similar on Mythic to Heroic
    • Tanks should swap after soaking 2 Eye of N’zoth giant lazers
    • Managing positioning is more vital, and dropping the Corruptor’s Gaze (eyebeam lazer) puddles in the correct spot is important
      • You’ll want to keep the puddles as consolidated as possible, giving you more room to move around
      • You can essentially use up old areas near previously-killed Organs in subsequent Phase 1s
    • On the pull, everyone should be stacked in melee range of the boss, on the opposite side of him to where the first Organ you’ll fight is
      • A Warlock should set up a Gateway directly through the boss, towards the side with the first Organ that’ll be killed
      • As soon as the first Corruptor’s Gaze swirlies come out, everyone in the raid clicks the Gateway and gets flown to the other side of the boss
      • By doing this, you’ll drop all of the puddles from this first Gaze inside the boss’s frame, essentially removing it from needing to be worried about
    • As in Heroic, have the tanks positioned in set locations for each of the 4 Phase 1’s you’ll enter. Have the rest of the raid spread around, based on which Organ was last killed
      • Make sure to not be standing in someone else’s circle when it’s about to reach full size

    • In all subsequent Phase 1’s after killing the first organ, managing the Blood adds is important
      • DPS should be swapping to these and killing them
      • If you have a Blood DK, they should be using Grip on CD to bring Bloods under the boss for easy cleave
      • Players being fixated by Blood adds need to run away
      • If you’re being hit by a Blood and get several stacks of the DoT, plus your circle reaches full size, it’s likely you’ll die
      • Do absolutely anything you can to prevent these guys from reaching people
      • Keep in mind, when Blood adds die they explode and deal about 75k damage to the raid
    • If you enter a Phase 1 with a Clotted Corruption add still alive, cleave it down. We don’t recommend hard-swapping to the Clotted add over killing Il’gynoth, just keep it tanked near the boss and cleave it
      • As a note, the damage from this add’s Charge can be mitigated by BoP, so utilize this as much as possible
      • Nobody else except the target should get hit by the charge, as it deals about 250k Physical damage to anyone hit
    • We recommend using Bloodlust immediately upon killing the 3rd Organ and entering the 4th and final Phase 1
      • As in Heroic, this is an all-out burn, kill the boss before anyone in your raid dies
      • Raid should be primarily focused on pure boss damage here, as you won’t be able to fully kill off all the Bloods as they spawn
  • Phase 2 – Fighting Organs
    • Again as in Heroic, have a set order for killing Organs
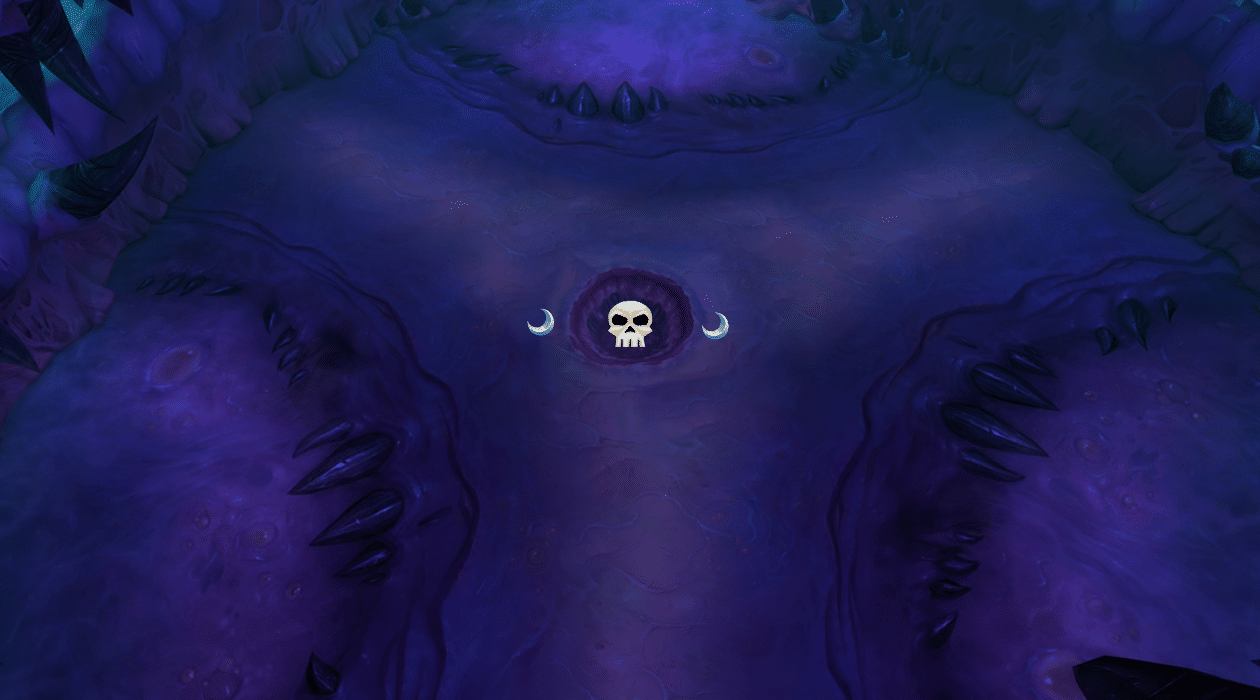
      • See graphic below, we recommend killing Skull first, X second, Star third
    • Because the raid will all have Corrupted Blood circles, positioning here gets sketchy and much more difficult
      • Healers will likely want to use CDs during this phase, as people likely will end up getting hit by circles overlapping
      • Everyone in the raid needs to do the best they can of spreading out and not being in someone else’s circle explosion
      • This is most difficult for Melee, as there’s a limited amount of room available
        • Ranged should make sure they aren’t too close to the Organ you’re killing. Do not take away a melee player’s spot
    • Your DPS should focus on killing the Organ, but also get the Clotted Corruption add as low as possible
      • When the Clotted add is sub-20% HP, it’s useful to let it charge over Blood adds, absorb them, then kill the Clotted off
      • When the Blood adds are absorbed, they don’t explode like they do when they’re killed
      • Nobody else except the target should get hit by the charge, as it deals about 250k Physical damage to anyone hit
    • Assign Ranged players to interrupt the Organs that are active, but not being killed yet
      • You do not want to let any casts go through, as any extra Blood adds spawning is always a bad thing
      • Warlocks are amazing for this, as they can just set their Felhunter pets to the far Organs and interrupt with minimal DPS loss
    • After an Organ dies, the raid should shift and reposition for the next area where Corruptor’s Gaze puddles will be dropped
  • Rinse, repeat, kill the 3 Organs, lust and burn the 4th and final Il’gynoth
    • By doing this “No Dispel” strategy, you’ll likely start getting to the 3rd Il’gynoth or even 3rd Organ relatively quickly. It’s at that point the fight becomes much more dangerous
    • Between a large number of Blood adds chasing people, the Bloods dying and exploding, and the entire raid having Corrupted Blood circles exploding on them at various times, it’s very easy to die
    • As we’d said earlier, especially later in the fight, if a single person dies it’ll likely lead to a near immediate raid wipe

“Proper” Strategy – Dispelling Cursed Blood

  • General Info
    • This is the strategy Complexity Limit used for the WF Il’gynoth kill, and are continuing to use
    • It requires more overall coordination from the raid, but there’s less individual pressure on most of the raid (except the raid leader)
    • If you’re using this strategy, every single player in the raid needs this Weakaura:
      • https://wago.io/XzVH4DElE
      • This Weakaura will put an Icon with a 9 second countdown on raid frames, indicating the size of someone’s circle
      • Dispels should happen when the circles are at their smallest, so when this countdown is at 2 or lower
      • 4/25/2020 NOTE ABOUT THIS WEAKAURA – IT IS NOT PERFECT. IF YOU TAKE DAMAGE FROM ANYBODY ELSE’S CIRCLE, THE WEAKAURA BREAKS. THERE IS NO WEAKAURA THAT FUNCTIONS PERFECTLY FOR THIS FIGHT.
    • Your raid leader should call out all dispels, based on when a player’s circle is at its smallest
      • You don’t want too many dispels going out at a single time, or the combined damage can wipe the raid
      • We recommend never doing more than 3 within a 5 second window
      • The biggest danger isn’t necessarily the raid dying to too many dispel explosions, but the other people still with Cursed Blood
        • If 3 dispels go off, and someone’s circle reaches full size at the same time, that person is likely to die
        • When that person dies, their circle will explode for raid damage and likely wipe the raid
    • It’s hard to know if this strategy will increase or decrease the time you spend on initial progression
      • Once you learn it, the fight becomes very consistent to deal with in the future
  • Phase 1
    • Largely the same overall idea as above. Positioning and dropping of the Gaze puddles remains the same, as does prioritizing annihilating Blood adds in the 2nd and 3rd Phase 1
    • Your healers should dispel Cursed Bloods as they’re called out by your raid leader. Make sure you don’t dispel more than 3 within a 5 second window, or it’s likely someone may die
    • The real difficulty here in Phase 1 with this strategy is just properly managing dispels
      • It’ll take your guild a while to understand the flow of dispels, when it’s okay to pop 3 Cursed Bloods off back to back, when they need to be more spread out, etc
      • There really isn’t a hard and fast rule for this, other than dispel when the circle is as small as possible
    • In later Phase 1s, when you have Blood adds running around, your raid leader needs to keep an eye on when they’re dying. A Blood add dying does about half the damage as a Cursed Blood dispel, so if 2-3 Bloods all die in close succession, it’ll chunk the raid down pretty hard
    • Watch the timer for the MC closely. Right before it goes out, make sure to spread out as much as possible, then CC and focus down the MC’d targets
      • Absolutely do not let them get to you
      • This is especially dangerous if a player with Cursed Blood gets MC’d by a previously MC’d player. You lose control over managing that circle for a time, and it’s extremely dangerous

  • Phase 2
    • Using the Dispel strat, P2 is actually a bit easier
      • There’s no longer a major worry about positioning, since there won’t be nearly as many circles
    • Everyone (except assigned interrupters on other Organs) should stack near melee range soon after the Organs become attackable
      • As Circles start to shrink in size, drop a major raid CD, like a Barrier or Devo Aura, then dispel circles as they reach their smallest
      • Here, you can dispel up to 4 within a 5 second window. A major raid CD plus everyone being stacked for heavier healing should be enough for everyone to survive
    • As in the “No Dispel” strat, get the Clotted Corruption as low as possible, and try to have it absorb as many Blood adds as you can when it’s at low health
  • We still recommend using Bloodlust during your 4th and final Phase 1 with this strategy. Again, this is a hard burn, you need to kill the boss before the Blood adds overwhelm you
  • And that’s really all there is to say about this strategy. Learning how many dispels you can do at a time, or in close succession, is the primary difficulty of this strategy. Most of your wipes will be along the lines of dispel AoE damage killed someone who’s circle just reached full size, causing that person’s circle to explode on the raid and wipe everyone. There’s no easy way to explain figuring that out except just keep working on it.

VIDEO GUIDE

Mythic Drest’agath Boss Guide

February 25th, 2020

Drest’agath

  • Throes of Dismemberment
    • When an add dies, it now causes all other adds of the SAME type to use their 100 energy ability immediately
  • When an add dies, it leaves behind 4 puddles of Void-Infused Ichor
  • Adds spawn more frequently throughout the encounter
  • Killing an add now generates 30 boss energy over 6 seconds
  • The Umbral Aversion effect, which prevents you from picking up another Ichor, now lasts 1:15 from the moment you get an Ichor debuff

Drest’agath herself doesn’t gain anything new on Mythic. Instead, the way her adds interact throughout the encounter is altered. Whenever any add dies, all other adds of the same type immediately cast their 100 Energy ability. As an example, if a Tentacle of Drest’agath dies, all remaining Tentacles of Drest’agath will cast their 100 Energy ability Reality Tear.

In addition to this, adds in general will spawn more frequently. This’ll alter how guilds need to handle the timing of killing adds, as just killing adds one by one and hoping for the best may prove very inefficient.

Strategy

  • Drest’agath’s Mythic-Only mechanic doesn’t really change the way the fight plays out, it just requires your raid to dodge more things on the ground.
    • The more impactful change is just how much more HP Drest’agath and her adds have.
  • This fight has a hell of a lot of things going on, and seems very complicated. In reality though, it’s fairly straightforward. Don’t overcomplicate it.
  • We recommend a comp of 2 tanks, 3 healers, and 15 DPS
    • The boss enrages at 10:00. The extra DPS player will help make sure you beat it
  • Throes of Dismemberment
    • Eyes
      • When you kill an Eye, the remaining Eyes will cast Errant Blast
      • This puts red swirlie puddles all over the floor, just move out of them
    • Tentacles
      • These cast Reality Tear
      • Purple puddle with a spike shooting up from it
      • These move in straight lines away from the Tentacle that cast it
      • Simply move out of the way of the puddles to dodge them
    • Maws
      • These cast Spine Eruption
      • Series of circles that appear around itself
      • After a few seconds, spikes shoot up from the circle, dealing heavy damage
      • Again, just don’t stand on the actual circle animation
  • What we found is that trying to manage and prevent Throes of Dismemberment by killing all same-named adds together is not an effective strategy
    • Instead, we found it much more effective to prioritize killing adds that were close to each other
    • This lets the raid stay closer, making it easier to heal as well
  • Entropic Crash is cast at 0:15, then every 45 seconds
    • This is delayed by Throes of Agony if the boss hits 100 energy
    • Throes of Agony is always the boss’s #1 priority cast. Whenever she hits 100 energy, that’ll always be cast as her NEXT ability
  • As far as actually killing the adds, you’ll want to focus on timing of them dying, to both maximize Ichor uptime and manage the Throes of Agony
    • Keep in mind that Dismemberment, the mechanic giving the boss energy, lasts 6 seconds, stacks, and REFRESHES.
    • If you kill two adds 5 seconds apart, the Dismemberment will refresh AND gain a stack, so you’ll end up giving the boss 6 seconds of 10 energy per tick, instead of the normal 5 per tick
    • Space out the actual killing of adds 7-8 seconds apart
  • Your most useful tool to effectively kill the adds is Volatile Seed
    • Your tanks should always prioritize dropping this on the higher HP add the raid is currently trying to kill
    • Getting the debuff on 2 or more adds near each other is even better, but not always something that’s possible
    • Since the adds take 60% more damage during the debuff, it’ll help you burn them much more efficiently
  • Killing Adds and Using Ichors
    • At 0:45-1:05 into the fight
      • Kill the two Eyes that you begin the fight with, and 3 more adds by this time. Have BOTH DPS groups grab Void-Infused Ichor, use Bloodlust, and blast the boss as hard as possible. Every DPS should have Ichor here, and leftovers can be taken by tanks or healers
    • From this point on, you’ll want to kill 2-3 adds every 30-40 seconds
      • DPS should be focusing on the adds that have the Volatile Seed debuff
      • Any DPS players with a 2 minute CD should wait to grab an Ichor until their CD is available
      • Players with CDs less than 2 minutes, or 3+ minutes, should just pick up an Ichor every time they are able to
        • BM hunters fit this really well, and should be included here, as BW can be up every time you’re able to grab an Ichor
    • Work your way around the room in a Clockwise fashion, killing adds as you get there
      • Again, your tanks dropping Volatile Seed on the adds you’re killing is vitally important
      • The goal is to kill 2-3 adds every 30-40 seconds, so you don’t fall behind
      • As mentioned above, don’t kill the adds too close together time wise, or else the boss will get way more energy than she should
        • Kill them 7-8 seconds apart
    • Your raid leader should keep an eye on the Entropic Crash CD
      • Ideally, you want to push a Throes of Agony right AFTER the Crash happens, and use a healer raid CD
      • You can actually get the boss to 100 energy during the Entropic Crash cast
  • Important Healer Info
    • At 6:33, you’ll have two fresh Tentacle adds, as well as the boss casting Entropic Crash. Since the Tentacles copy this ability, there’s a massive amount of damage to the raid here. Make absolutely sure you have 1-2 raid CDs for this
    • It’s likely you’ll also have Entropic Crash from the boss + 2 Tentacles at 1:01 and 7:18
      • These are generally nowhere near as dangerous. The 1:01 cast, the Tentacle adds are much further away from the boss, so the damage they deal is reduced by falloff
      • The 7:18 is the same 2 Tentacle adds as at 6:33, so it’s possible you’ll have killed one by this point. If not, use a raid CD
  • Add Spawns
    • These are give or take a few seconds. The adds don’t all just pop up at exactly the same time, it’s over the course of 2-3 seconds
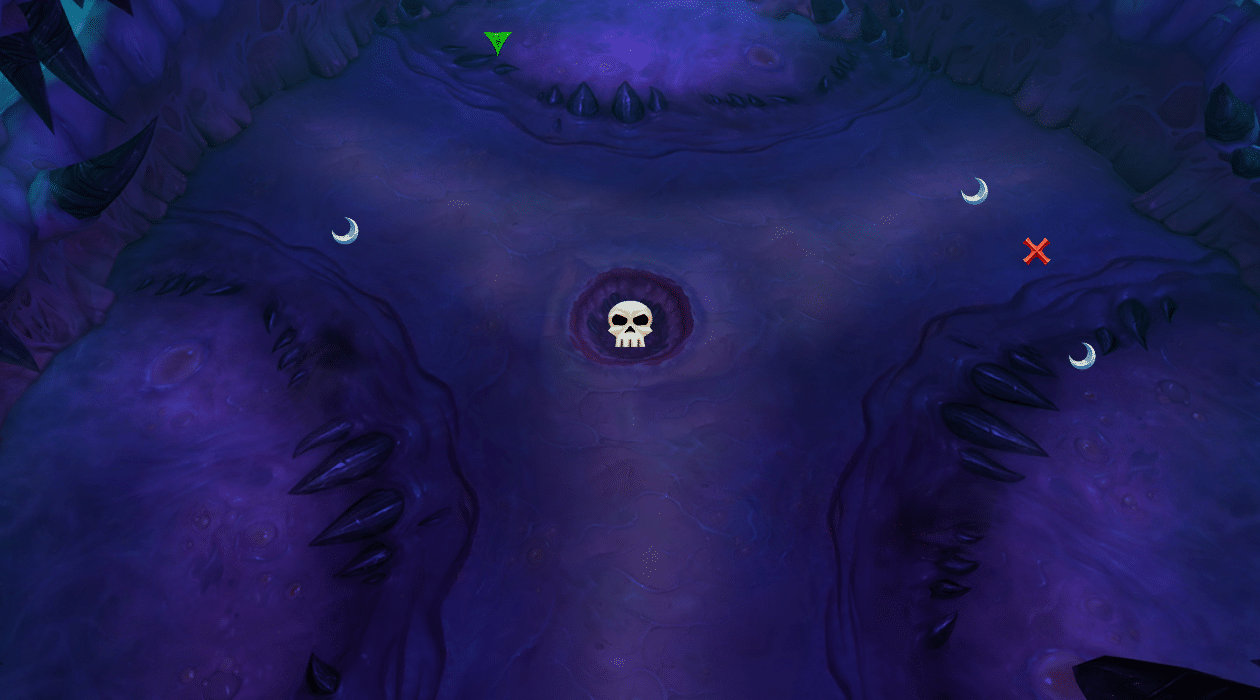
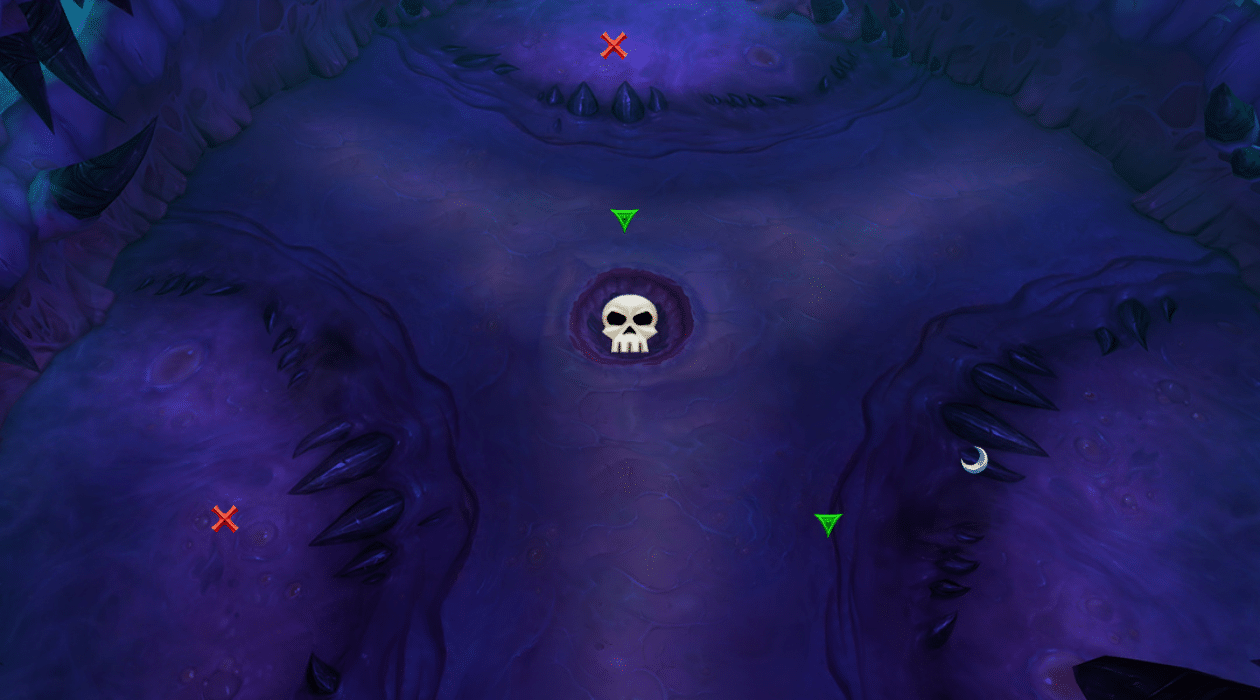
    • On the maps, X = Tentacles, Moon = Eyes, Green = Maws
      • These are locations as viewed from where the entrance to the room is

    • Wave 1 – 0:24
      • 1 Eye, 1 Maw, 3 Tentacles

    • Wave 2 – 1:55
      • 3 Maws, 1 Eye, 1 Tentacle

    • Wave 3 – 3:22
      • 3 Eyes, 1 Maw, 1 Tentacle

    • Wave 4 – 4:55
      • 1 Eye, 2 Maws, 2 Tentacles

    • Wave 5 – 6:26
      • 2 Eyes, 2 Maws, 2 Tentacles

    • Wave 6 – 8:10
      • 2 Eyes, 2 Maws, 2 Tentacles

    • Wave 7 – 9:53
      • 2 Eyes, 2 Maws

VIDEO GUIDE

Leading CS:GO teams and ESL seal historic agreement

February 18th, 2020

Louvre Agreement’ creates new framework for CS:GO ecosystem with long-term league slots for teams and revenue and profit sharing which extends to other ESL Pro Tour competitions

Cologne, Germany – A groundbreaking new agreement between leading CS:GO teams, ESL and DreamHack will govern the setup of Pro League and share of revenues and profits from ESL’s Pro Tour competitions. The teams, representing the top level of professional CS:GO, will also become majority stakeholders in the league with a long-term slot for participation. By partnering with the leading CS:GO teams, the new agreement further establishes the ESL Pro Tour as one of the most valuable properties in the global business of esports.

The new agreement – informally dubbed ‘The Louvre Agreement’ – was signed by Astralis, Complexity, Evil Geniuses, ENCE, FaZe Clan, Fnatic, G2 Esports, Mousesports, Natus Vincere, Ninjas in Pyjamas, Team Liquid, Team Vitality, 100 Thieves and ESL following a meeting in Paris in January 2020. Between them, the signatories of the agreement have won 28 ESL and DreamHack Masters-level competitions and two IntelÂź Grand Slams in the last four years and represent all of the top 10 ranked teams in the world.

The agreement establishes a deep partnership between ESL, DreamHack and the partner teams, and introduces:

● ESL Pro League being transformed into a new league with a single global division starting in its 11th season
● Teams are majority stakeholders in the league and have a key role in its strategic decision making process
● Revenue share for teams and players from ESL’s Pro Tour competitions, including ESL One Cologne powered by Intel¼ and Intel¼ Extreme Masters Katowice.

‘An Industry-defining agreement’

Anders Horsholt, co-CEO of Astralis Group said: “It has been a long-time ambition for us to be a part of and contribute to a more structured CS:GO scene, giving players, teams and tournament organizers a stronger foundation. This industry-defining agreement is hugely significant in the history of our game, and we’re proud to be part of it.”

“This agreement is a huge step forward for us on the path to sustainability in Counter-Strike. This league will provide the highest level of competitive play with the best teams in the world, which is always where Fnatic should be. ESL supported professional Counter-Strike since the very beginning and we’re excited to continue pushing CS:GO into the future together.” – Patrik “cArn” Sattermon, Chief Gaming Officer of Fnatic.

“This group brings together Counter Strike’s biggest stakeholders, united by a common vision that pushes our sport forward,” said Victor Goossens, Founder and Co-CEO, Team Liquid. “We’re all aiming for the same goal – a sustainable and long-term future that rewards talent and investment in the scene – and we are stronger together as we take this next step.”

“‘The Louvre Agreement,’ as we have grown fond of calling it, is a clear vote of confidence by the best teams in the world and their players to create the most valuable products. It will build a platform to create stability and growth, without sacrificing the ability for new teams and players to climb to the top,” said Sebastian Weishaar, Chief Product Officer ESL.

The agreement elevates signatory teams to key stakeholders in the CS:GO ecosystem and introduces revenue shares for all ESL Pro Tour competitions for the first time. It will further professionalize CS:GO esports by improving team representation, introducing standardized regulations, and revenue sharing for teams and their players.

A new and transformed league built around partner teams

The agreement will transform ESL Pro League, the world’s longest-running professional league for CS:GO, into a 24-team competition with a single global division, moving away from the previous regionalised model.

The founding teams will retain a long-term slot in the league similar to other sports, with remaining teams qualifying on the basis of their world ranking or directly through the Mountain Dew League, the ESL Pro League’s gateway competition.

Partner teams to earn share of ESL Pro Tour revenues and profits

The ESL Pro Tour comprises ESL and DreamHack CS:GO competitions, including ESL Pro League, DreamHack Masters, ESL One and the IEM. In 2019, these competitions were watched by fans for an estimated 127 million hours and boasted a combined prize pool of more than $4.5 million on top of the $1,000,000 Intel Grand Slam.

The agreement will mean partner teams earn a share of revenues from all competitions in the ESL Pro Tour – including marque tournaments such as IEM Katowice and ESL One Cologne. It will bring structure to the current CS:GO esports ecosystem, establishing the basis on which teams compete in ESL’s competitions.

The agreement also covers member invitations to ESL Pro Tour tournaments, competition standards, player influence, team obligations at tournaments and sets up core guidelines for future joint business endeavors.

More information on the agreement can be found at the official ESL Pro Tour website.

###

ESL is the world’s largest esports company. Founded in 2000, ESL has been shaping the industry across the most popular video games with numerous online and offline esports competitions. The company operates high profile, branded international leagues and tournaments under the ESL Pro Tour including ESL One, Intel¼ Extreme Masters, ESL Pro League, and other premier stadium-size tournaments, to more clearly define the path from zero to hero. ESL also produces the ESL National Championships, grassroots amateur cups, and matchmaking systems, creating a world where everybody can be somebody. With offices all over the world, ESL is leading esports innovation on a global scale through the combination of global ESL competitions, amateur leagues, publisher activations, and more. ESL is a part of MTG, the leading international digital entertainment group. about.eslgaming.com

Pro League – Pro League is the world’s largest professional league for Counter-Strike: Global Offensive, featuring the best teams from Europe, North America, South America and the Asia-Pacific region. Broadcasted on various platforms and staged in major venues across the globe, Pro League hosts the most widely-watched CS:GO competitions. Pro League was established in 2015 and had a total prize pool of $1.5 million US dollars for 2019.

Mythic Ra-den Boss Guide

February 13th, 2020

Ra-den

  • New 3rd orb – Essence of Nightmare
    • When it hits Ra-den, causes Unleashed Nightmare
      • Missiles cast at every player’s feet, dealing 295k damage within a 5 yard radius
    • Unstable Nightmare
      • Debuff with 5 stacks, lasts 6s
      • After 6s, explodes for 343k Shadow damage to everyone within 15 yards, then jumps to the closest player
        • After it jumps, the 6 second duration followed by the explosion repeats
        • Each jump uses 1 stack
        • 5 people total will be affected by this
        • Causes Instability Exposure, like all other Unstable abilities
    • Night Terror add
      • Casts Dread Inferno
        • Giant fire tornado, follows a random person
        • Deals 122k/s to anyone hit
  • Since there’s 3 orbs each time now, there will be 2 orbs empowering Ra-den each time
    • You need to alternate which orb you kill each time
  • Vita changes
    • The Vita add’s chain lightning now INCREASES damage each jump, requiring the raid to to spread out >5 yards
  • Void changes
    • Void collapse now splits 2.9 million Shadow damage, which is effectively 150k per person, assuming everyone alive
  • Phase 2
    • Decaying Strike DoT is now 100% of the tank’s current health when applied per 2 seconds, up from 75%
    • Ra-den also gains a new ability – Corrupted Existence
      • This places a debuff on 3 targets for 15s
      • The debuff instantly deals a massive amount of Shadow damage, and also increases the max HP of the affected players
      • If at any point a player with this debuff reaches full HP, they instantly die

Strategy

We recommend going in with 2 tanks, 3 healers, and 15 DPS. This fight is a fairly tight DPS check as of the time of writing, and we expect that to continue for a few more weeks. This fight will take you a lot of pulls, and is probably the first boss that’ll be a bit of a wall for your raid.

Phase 1

  • This phase is significantly more difficult on Mythic. The addition of the 3rd Orb complicates things greatly.
    • You want to ensure you push into Phase 2 before the 4th set of orbs reaches the boss
    • Use Bloodlust on pull to help ensure this happens
  • UPDATE 4/25/2020
    • It’s now possible with current gear and corruption levels to push Ra-den into Phase 2 allowing only 2 sets or Orbs to reach him. We recommend using Bloodlust on pull, and pumping damage into Ra-den to achieve this. When the 3rd set of Orbs spawns, your tanks should kite the boss away giving your DPS enough time to push into 40%
  • Tanks should swap after each Nullifying Strike
  • Make sure when a Nightmare Orb is about to hit the boss, you spread out. If you’re standing within 4 yards of someone else when the missiles hit you, you’ll both likely die. That’s just not ideal.
  • You’ll want to pre-assign two groups of 5 players to handle the Unstable abilities
    • Each group should also have 2 assigned backups
    • Group 1 will always handle Unstable Vita. If there’s no Unstable Vita, this group will handle Unstable Void
    • Group 2 will always handle Unstable Nightmare. If there’s no Nightmare, this group will handle Unstable Void
    • Utilize the positioning graphic below

    • Tank the boss on Skull, with the group stacked on X
    • Players with Unstable Nightmare will run to either Diamond or Triangle. The next assigned person for Nightmare to jump to will run to either Moon or Blue (obviously, run to the one on the same side as the person with Unstable Nightmare)
      • Once Nightmare jumps from Diamond to Moon, the person who now has the debuff runs to Diamond, and the next person in the order runs to Moon
      • Rinse and repeat
    • Players with Unstable Vita will use Star and Circle. The FIRST application of Unstable Vita should run to Star. Have it jump back and forth from Star, to Circle, and back again, just like Heroic.
    • Players handling Unstable Void just need to go soak, like on Heroic.
    • You can either just pre-assign a set order, or use the same weakaura the guild did on the WF Ra-den kill:
      • https://wago.io/0pFsUA824
      • If you use this Weakaura, please read the instructions and understand exactly how it works
      • If you use this, it’ll assign which group is doing Vita, Void, or Nightmare itself. You’ll just need 2 teams assigned with your backups.
  • We recommend killing the orbs in the following order: Nightmare > Void > Vita
    • UPDATE 4/25/2020 – If you’re aiming to push before the 3rd orbs reach the boss, we recommend killing Vita first, then Void.
    • When the orbs spawn, DPS need to swap immediately. They have a very large health pool, and it’ll be tight killing them
    • You can also have your tanks move Ra-den as necessary
    • The most difficult orb to kill in time is the Nightmare Orb. When you’re killing this orb, we recommend that your tank drags Ra-den up the stairs by the entrance of the room, giving you as much time as possible. See below:

    • As soon as the Nightmare Orb dies, the boss needs to be moved back to his original positioning. Move quickly, you don’t want to be in the way of the Unstable Vita jumps
  • As far as the adds are concerned, the Void and Vita adds are much more dangerous on Mythic. The Nightmare add is by far the least lethal
    • Kill Priority is always Void > Vita > Nightmare. Yes, we know there’s only ever 2 adds, but this priority holds true regardless of which set you’re on
    • Void Add
      • When Void Collapse is cast, make sure it’s dropped directly on the group. The only exception is if the player targeted has an immunity, in which case they should move out of the group and use said immunity.
    • Vita Add
      • The Chain Lightning now jumps, and increases in damage
      • When these adds are up, loosely spread so the Chain Lightning doesn’t jump through every player and just wipe the raid.
      • Additionally, since this is a targeted cast, the player being targeted can try to move out of the group. It’s a relatively short cast, but every bit helps.
    • Nightmare Add
      • These guys periodically spawn 2 fire tornados that follow people. The tornados really don’t hit that terribly hard. They should just be kited around by the targeted players, away from the rest of the raid
      • Killing these adds is definitely lower priority than either other type. It’s OK to leave them up until right before the next set of orbs spawns. If one does happen to still be alive when orbs spawn, shift your entire focus to killing the orbs, then finish off the Nightmare add.
    • Add Overlaps
      • Void + Vita
        • This is the most difficult overlap to deal with, which is why we recommend doing this set first. Learn it early, then get it out of the way.
        • UPDATE 4/25/2020 You’ll now want to skip this set altogether
        • Your healers will need to commit 1-2 raid CDs during this overlap
        • The raid should loosely spread until Void Collapse is cast. Once the cast finishes, the raid should spread out again
          • Make sure not to get in the way of the Unstable Vita in the back of the room
        • Focus down the Void add ASAP. Do NOT let a second Void Collapse be cast
      • Void + Nightmare
        • Fairly straightforward
        • Everyone can be stacked in melee range
        • Players targeted by the tornados need to run out of the group and kite the tornado around
      • Vita + Nightmare
        • Kill the Vita add first
        • Loosely spread to prevent Chain Lightning from jumping too many times and killing people
        • Players targeted by the tornados need to run out of the group and kite the tornado around
  • Phase 2
    • During P2, everyone should be stacked in melee range to help the healers more efficiently keep everyone alive
    • The primary player affected by Charged Bonds needs to yeet the hell out of the group ASAP. Other players chained to them can help by moving in the opposite direction
      • To make this easier, we recommend always having the primary target of Charged Bonds move to the right-hand side. Other chained players should move left.
    • Everyone needs to move ASAP for Void Eruption. Getting hit is very likely to result in a death
    • Tanks and healers need to focus on managing Decaying Strike properly
      • Pre-assign which tank will take the Decaying Strike. We’ll refer to this person as Tank 2
        • We recommend this be your tank with better self-healing. BDK, VDH, even Protadin
      • Tank 1 will hold the boss the majority of P2. Tank 2 will only taunt for Decaying Strike, then Tank 1 will taunt back immediately after the Strike is applied
      • Tank 2 should be no higher than 50-60% HP when the Decaying Strike goes out. Lower is ideal.
        • To help facilitate this, healers should stop healing Tank 2 about 4s before the Decaying Strike goes out
        • Tank 2 should also use a macro to remove any HoT effects during this 4s window
        • Tank 2 can also let themselves be hit by a Void Eruption if the timing works out
      • Immediately after the Decaying Strike goes out, Tank 1 needs to taunt the boss back, and Tank 2 goes into self-healing mode. Do everything you can to help the healers keep you alive
    • The healers also need to keep an eye on the players with Corrupted Existence
      • Let these affected players float around 60% hp
      • These players should move about 8-10 yards out of the group, to help reduce how much passive healing they receive
      • IF YOU ARE A DEMON HUNTER and you get affected by Corrupted Existence, your life is in grave danger. Your leech can be a major problem, especially if you’re in Meta and have the Soul Rending talent.
        • You should NOT use the Dribbling Inkpod trinket on this fight if you’re a DH. We had a DH’s Inkpod crit while they had Corrupted Existence and were in Meta. The 20% leech heal from the Inkpod crit healed him to full and instantly killed him. Great meme, bad for prog.
    • Kill this big boy before your raid just slowly falls over from the damage

VIDEO GUIDE