N’zoth
Strategy
Phase 1
Psychus Maps
Phase 2
Secret Phase
Raw time tables
Timeline – up to end of secret phase
Timeline – Second Phase 2
Phase 2 Positioning
Healer Tips
- Heart of Azeroth extra action button now restores only 25 sanity over 4s, but does this for ALL people within 8 yards
- Still breaks from moving
- Each player can only use their neck ONCE
- Heroic’s Phase 1 does not occur. You begin the fight in what was Heroic’s Phase 2
- Phase 1 changes
- When a Corruptor Tentacle or Exposed Synapse dies, a Psychophage add spawns in the Vision realm
- 2 casts
- Devour Thoughts
- Deals 295k Shadow and drains 10 Sanity from players within 10 yards
- Psychic Burst
- When these die, leaves a purple swirlie behind. After a few seconds the swirlie explodes, dealing 295k Shadow damage and drains 30 Sanity to everyone within 5 yards
- Psychus dying still stuns N’zoth, but no longer stuns any of the Tendy adds
- Everything hits a LOT harder. Healers pumping 100k+ each
- Paranoia
- Affects ALL players in the Physical realm on Mythic
- Deals about 100k/s if you’re apart from your partner, scaling up as the duration ticks
- Running over someone other than your partner drains 5 Sanity per second
- When a Corruptor Tentacle or Exposed Synapse dies, a Psychophage add spawns in the Vision realm
- Phase 2 changes
- Damage of everything greatly increased
- Thought Harvester’s Harvest Thoughts, in addition to the massive damage increase, now drains 300 Sanity split among everyone hit, up from 200
- 2 Thought Harvesters spawn at a time
- If it fails to hit at least 5 people, drains 100 from everyone
- Phase 3 – SECRET PHASE
- This occurs 2:35 after Phase 2 begins
- Gateway opens in a set location
- Clicking the gateway sends you to the Chamber of the Heart
- Inside, you’ll kill a Voidspawn Annihilator add
- While you’re fighting the Annihilator, Countermeasures will periodically spawn
- These need to be clicked and disarmed. Clicking one uses your heart of Azeroth button, meaning you cannot use it again for the remainder of the encounter
- Any that go un-clicked do massive AoE damage, reduced by distance
- From what we can tell, the absolute minimum damage you can take from one of these within the Chamber is about 350k damage
- The Voidspawn Annihilator does an Annihilation cast
- This places a healing absorb on multiple players
- Once the healing absorb has been healed off, it puts a purple circle around the person
- Explodes after 8 seconds
- If the purple circle explodes and hits the Countermeasures, it immediately triggers them
- After the add dies, you click the gateway to return to Phase 2
- From that point, you burn the boss, continuing with P2 mechanics. Kill boss before enrage
- Hard Enrage at 13:00. There’s an Evoke Anguish cast at about 13:03 that’ll instantly kill anyone who’s hit (unless they have an immunity)
Strategy
- We recommend bringing 2 tanks, 4 healers, and 14 DPS
- You’ll need a minimum of 5 players with an immunity, but we strongly recommend having 10 immunities available for Phase 2.
- This entire fight is pretty much scripted. There’s very little mechanical change from Heroic to Mythic, but everything is amped up to 11, and the set timings create rough overlaps
- Because of just how scripted this is, we’ll be focusing mostly on timing of abilities. Phase 2/Secret Phase/Second Phase 2 will simply be timelines with information about each mechanic as it happens
- Last note here before we get into the phases – Sanity matters significantly more than on Heroic.
- Necks can only be used once per person
- Because of this, and the fact several MUST be committed to the “secret” phase, Sanity is a valuable resource
- You do NOT want to take any extra Sanity damage past what’s required
- We have 18 Neck clicks assigned to set spots in our strategy, giving you 2 extras. Use these as needed to regenerate Sanity lost to Paranoias
- Phase 1
- This phase is extremely similar to Heroic
- The adds spawn faster, the red swirlies from killing tendies now hurt WAY more and drain 15 Sanity (up from 5), and the damage of everything is tuned way up
- Important to note, the tanks get ANNIHILATED by the Basher Tentacles
- Healers need to keep a close eye on the tanks and make sure they don’t just go splat
- Mindgate goes out at 1:00 and 4:00
- Pre-assign your two Psychus groups
- Each group should have 8 people – 1 tank, 2 heals, 5 DPS
- DPS players need their CDs available for Psychus, as it can get very tight killing him before he hits full energy
- As in Heroic, the first Mindgate has Deathwing, the second has Azshara and Sylvannas
- If you’re in the second Mindgate, you want to minimize movement as much as possible. The damage taken from Azshara can be deadly
- Note – The Anguish puddles Psychus creates don’t deal damage for about 1 second or so after it’s dropped, giving you a little wiggle roo
- Paranoia goes out at 0:12, then about every 1:26 after that
- You should pre-spread before the cast goes out, then prioritize SAFELY getting to your partner without ever running through any other player in the raid
- Psychophage adds
- Their cast is an AoE explosion. You can interrupt it, or move away from it
- Move away from the Psychic Burst AoE on the ground when they die
- Being hit by either deals damage plus drains Sanity, so don’t get hit
- They have pretty low HP, so interrupt them and cleave them down
- Add Priority
- On Mythic, the add kill priority changes a bit. It’s Bashers > Spikes > Corruptors
- The Bashers absolutely destroy your tanks, so they’re second priority
- The Spike tentacles do a LOT more damage, and since they can’t be interrupted you’ll want to kill them off quickly. Do not forget about them.
- The Corruptors can largely be countered by interrupting their casts, can mostly be killed from cleave
- On Mythic, the add kill priority changes a bit. It’s Bashers > Spikes > Corruptors
- You should use Bloodlust around 2:05-2:10 into the fight
- This is a 12:30-13:00 encounter, allowing you to use BL twice
- First lust at 2:05ish means you’ll have it during a P1 burn phase on N’zoth, and also have it active when you get the Servant of N’zoth debuff in p2
- Post-Psychus Burns
- You get 30 seconds of pure burn each time. Maximizing boss damage during this is essential
- Ideally, you’ll have the boss to 89% or lower after the first one, and 78% or lower after the second one. The lower the boss is, the better
- You should use 2 Heart of Azeroth neck extra-action buttons during each burn phase to regenerate Sanity for the whole raid
- Note for Healers
- The damage intake on this fight is nutty. You’re looking at 600-700k DTPS across the raid for the entirety of Phase 1. During p1, use CDs as necessary, and just pump your minds out
- Your tanks need your help. As mentioned above, the tanks get shit on by the Bashers, so make sure you’re tossing as much healing their way as you can
- There’s ticking damage of 42k per person every 2s, plus the Eternal Torment dealing 88k/s for 2s periodically being cast by the boss
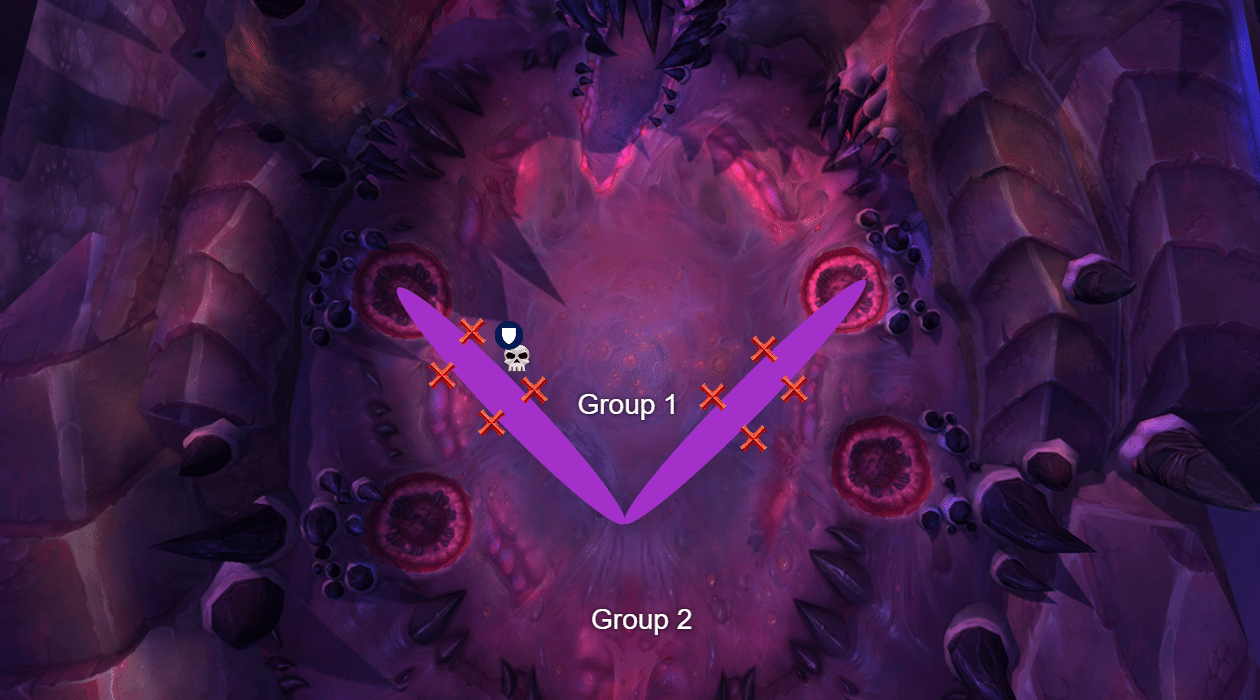
- Mindgrasp requires a bit more coordination
- Make sure to clear a path from the Neurons
- You’ll need this path to be 3 Neurons wide, as Paranoia overlaps with this
- Make sure you’re standing on top of your partner, and not overlapping with anyone else in the raid
- To help make more room, you can have 2 layers of groups, one closer to whichever edge, one just outside their circles
- Be extremely careful of your positioning for this. If you touch the goop from a Neuron, it’ll likely kill you damn near instantly. It ticks for 320k/second, and the first tick is the instant you touch it
- If you actually live touching the goop, it also drains 10 Sanity per second
- Tip from THD: You can Fear and Banish the Neurons when they reach their smallest size goop puddle, and it won’t re-grow for the duration of the CC
- This phase is extremely similar to Heroic
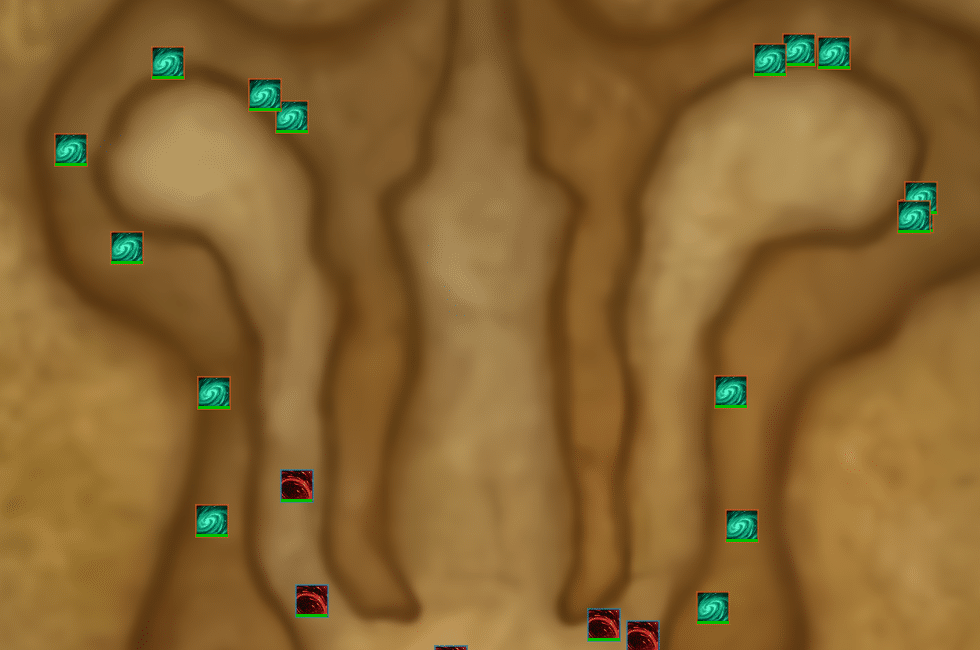
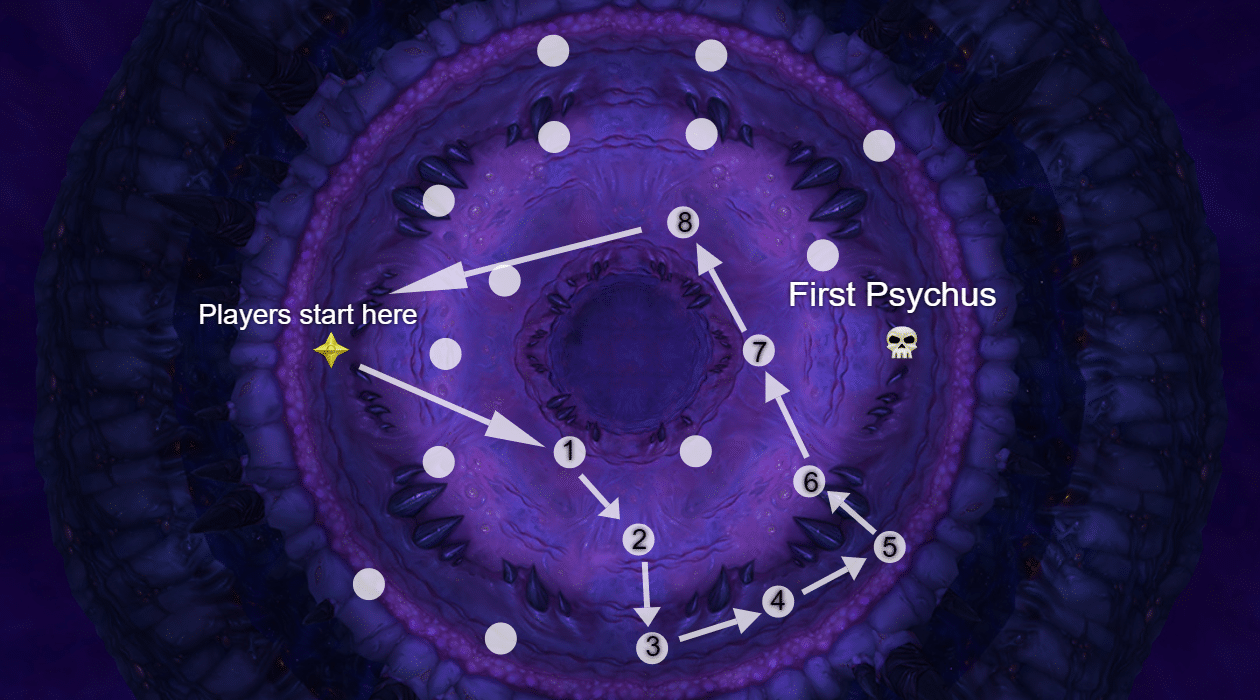
- Psychus Maps
- These are the paths Limit used for their kill. Please note, some of the tendy locations may be off by a hair, it’s hard to get them perfect.
- Psychus 1
-
- Psychus 2

- Phase 2
- From here on out, the fight is entirely scripted. We have a timeline below, after some notes for P2 and an overview of the “Secret” Phase, showing which ability occurs when, and how to handle them.
- We’ve broken up the timeline in two parts – first P2 + Secret Phase, and second P2
- Reason for this is that all spell timings in the second P2 are relative to when you LEAVE the Chamber of the Heart, which can be give or take a few seconds
- We’ll also include a “raw time tables” section, which has the full time stamps (relative to the beginning of P2) for our World First N’zoth kill
- Paranoia affects every player in the raid, EXCEPT tanks. Whoever is linked to the tanks needs to yeet over ASAP so the tank doesn’t need to.
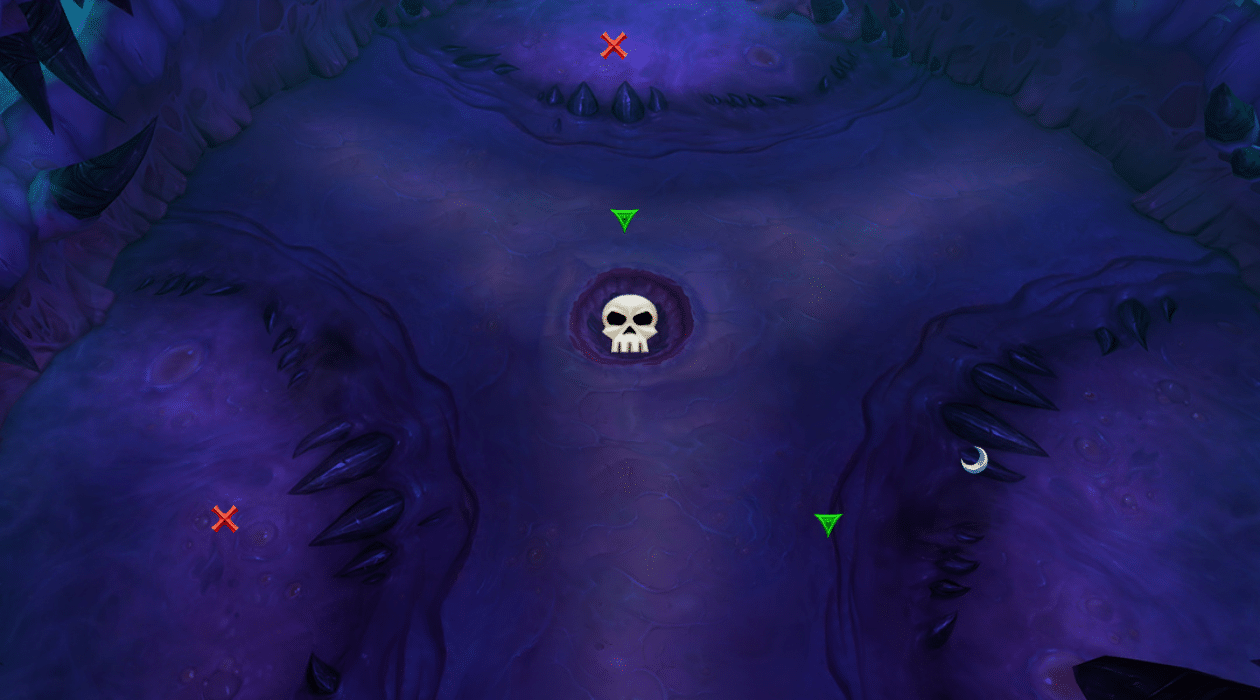
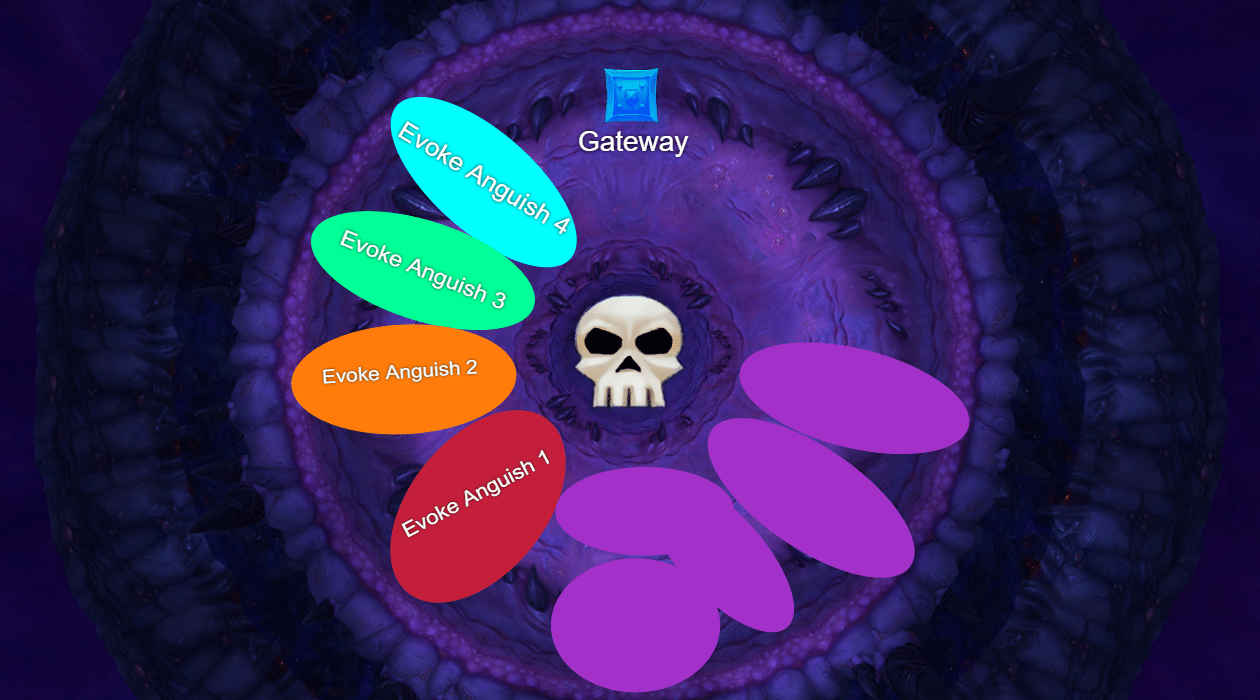
- The Gateway for the “Secret” Phase always spawns in a set location. As such, we’ll include a map after the timeline with recommended drop locations for each individual set of Evoke Anguish puddles
- You can NOT drop Evoke Anguish puddles on top of each other on Mythic, as there’s a 4 yard AoE circle explosion component when the puddle drops. Getting hit by someone else’s circle will probably kill you
- Thought Harvesters always spawn on the tanks, so tanks should make sure they’re pre-positioned to where you want them
- They cast Harvest Thoughts about 10-12s after spawning, so make damn sure you have them on top of each other. You’ll want soakers to be hit by both circles
- Cast is 5 seconds long, all times listed below are when the cast COMPLETES (meaning deals damage)
- This is where your immunities come in, you’ll want to use groups of 5 players with immunities to soak the casts. By using immunities, you’ll avoid both the massive damage intake and also the Sanity drain. The more sets you can immune, the better. Certain sets are more vital to have immuned, and we’ll discuss that below
- We strongly recommend having a composition with 10 total immunities. If you are unable to field that, though, we will list which Harvest Thought casts are top priority to immune-soak.
- We’ll show the timeline in reference to P2 beginning, based on the completion of N’zoth’s second Convergence cast.
- AFTER the timeline, we have a small section of healer tips
- From here on out, the fight is entirely scripted. We have a timeline below, after some notes for P2 and an overview of the “Secret” Phase, showing which ability occurs when, and how to handle them.
- Secret Phase
- You’ll fight a Voidspawn Annihilator add down here, who has 2 casts as well as an environmental mechanic
- The entire raid should be stacked closely in melee range. This both makes life easier for the healers, and helps minimize damage taken from Protocol explosions
- Dark Matter
- Puts a targeting swirlies on the ground, needs to be dodged
- Annihilate
- Puts a purple targeting circle on two players. After 8s, the circles explode for heavy damage
- If these circles explode on top of a Countermeasure Protocol, the Protocols instantly explode
- Event Horizon
- Applies a large healing absorb on the active tank
- Simply tank swap after this is applied
- After the absorb is healed off, this tank is targeted by Annihilate
- Countermeasure Protocols
- Glowing Titan interactable objects that spawn in groups
- These explode for massive damage after a few seconds. Each set has a different amount of time, between 8-20 seconds. If you’re within the yellow targeting circle around a Protocol, the damage is lethal. Outside of the circle, it’s fall-off damage
- You can disarm these by clicking them, which uses that player’s Heart of Azeroth neck, and makes them unable to use the extra action button to restore Sanity
- Because of this, you should always leave up the furthest away Countermeasure
- Raw time tables
- Start 6:04 into the fight
- Go into secret phase 8:48 into the fight
- Leave secret 10:12 into the fight (4:08 after P2 begins)
- Harvest Thoughts
- 0:04, 1:20, 1:47, 4:18, 5:34, 6:01
- HARVEST 0:15, 1:32, 1:59, 4:29, 5:47, 6:13
- EVOKE ANGUISH
- 0:20, 0:39, 1:13, 1:34, 4:34, 4:54, 5:28, 5:49, 6:31
- PARANOIA
- 0:51, 1:57, 5:06, 6:12
- MINDGRASP
- 1:05, 5:20
- GATEWAY – 2:44
- DARK MATTER – 3:11
- ANNIHILATE – 3:29, 3:56
- PROTOCOL EXPLODE – 3:02, 3:22, 3:42, 4:07
- Timeline – Up to end of “Secret” Phase
- 0:00 – Convergence ends, Phase 2 Begins
- 0:04 – First set of Thought Harvesters spawns
- Tanks should be standing on top of each other, so these spawn next to each other. This is true for every single set of these adds
- In general, tanks want to keep the Thought Harvesters close to the boss, so your Fire Mages can have Ignite spread to them, as well as allowing other cleave to hit them
- 0:15 – Harvest Thoughts cast completes
- Everyone in the raid should group soak this cast
- 0:20 – Evoke Anguish cast
- Make sure you’re spread out every single time Evoke Anguish is cast
- After this particular cast, collapse in melee range and use 2 Heart of Azeroth extra action buttons
- 0:33 – Lazers, spinning Clockwise
- 0:39 – Evoke Anguish cast
- 0:51 – Paranoia cast
- Pre-spread for this, about 5-6 yards away from other people
- Focus on getting to your partner, and prioritize NOT running into other people
- The damage for being apart is healable. The Sanity drain for running into other people is much more dangerous
- 1:05 – Mindgrasp cast
- Make sure to spread out, as the Mindgrasp hits right as Paranoia ends
- Clear out a large area of Neurons, and make sure you’re positioned to not get dragged into one
- You’ll want to be 2-3 pairs of connected people deep, making sure you’re as close to other groups around you as possible without being in their Paranoia circle
- 1:13 – Evoke Anguish cast
- Spread the hell out immediately after Mindgrasp ends
- 1:20 – Second set of Thought Harvesters spawns
- 1:32 – Harvest Thoughts cast completes
- Immune this cast if you’re able to immune 2 per Phase 2
- 1:34 – Evoke Anguish cast
- 1:42 – Lazers, spinning counter-clockwise
- 1:47 – Third set of Thought Harvesters spawns
- 1:57 – Paranoia cast
- If you’re connected to a player who’s immuning the Harvest Thoughts, use a personal defensive (not immunity though) to help survive. Do not go inside the soak circle, and do NOT run into other people
- 1:59 – Harvest Thoughts cast completes
- This set should be immuned. If you can only immune 1 cast per Phase 2, this is the cast to immune
- Make sure to kill this set of adds quickly, then you can all-out burn the boss until the Gateway activates
- 2:06 – Lazers, spinning Clockwise
- 2:44 – Gateway becomes active
- Slowly move towards the Gateway’s side of the room after the adds die, while nuking the boss
- Everyone should stay closely grouped up during the burn on the boss
- Use a Warlock’s Demonic Gateway from melee range to the Secret Phase Gateway, and click the gateway as late as possible, right before the first Eternal Torment cast goes off. Every little bit of DPS here helps
- 3:02 – First Protocols explode
- Click 2 Protocols to disarm
- 3:11 – Dark Matter cast
- Players need to watch their feet and just dodge these
- 3:22 – Second Protocols explode
- Disarm ALL 3 OF THESE, they’re directly in the middle of the room. There isn’t enough space to move away for fall off damage, so disarm all of them.
- 3:29 – Annihilate cast
- Players affected by Annihilate need to move away from the group, and be careful not to put their targeting circle on a Protocol
- 3:42 – Third Protocols explode
- Click 3 to disarm
- 3:56 – Annihilate
- 4:07 – Fourth Protocols explode
- Click 3 to disarm
- Timeline – Second Phase 2
- 0:14 – Thought Harvesters spawn
- 0:21 – Harvest Thoughts cast completes
- Immune this one if possible. If not, the whole raid group should soak this one
- 0:26 – Evoke Anguish cast
- After this cast, collapse in melee range and use 2 Heart of Azeroth extra action buttons
- 0:39 – Lazers, spinning counter-clockwise
- 0:46 – Evoke Anguish cast
- 0:58 – Paranoia cast
- 1:12 – Mindgrasp cast
- Make sure to spread out, as this Mindgrasp again hits right as Paranoia ends
- Like before, clear out a large area of Neurons, and make sure you’re positioned to not get dragged into one
- And again like before, you’ll want to be 2-3 pairs of connected people deep, making sure you’re as close to other groups around you as possible without being in their Paranoia circle
- 1:20 – Evoke Anguish cast
- 1:26 – Thought Harvesters spawn
- 1:39 – Harvest Thoughts cast completes
- Immune this set
- 1:41 – Evoke Anguish cast
- 1:48 – Lazers, spinning Clockwise
- 1:53 – Thought Harvesters spawn
- Lust immediately when these spawn, as soon as your Sated falls off.
- 2:04 – Paranoia cast
- 2:05 – Harvest Thoughts cast completes
- Ignore this cast. Tank should move these adds towards the back of the room away from the raid, and avoid standing in the circles. By doing this, everyone in the raid will hit 0 Sanity instantly, and get the Servant of N’zoth buff, increasing damage dealt by 25%. From that moment on, you have 20 seconds to kill the boss before everyone gets mind controlled and you wipe
- 2:13 – Lazers, spinning counter-clockwise
- 2:23 – Evoke Anguish cast
- KILL THE BOSS
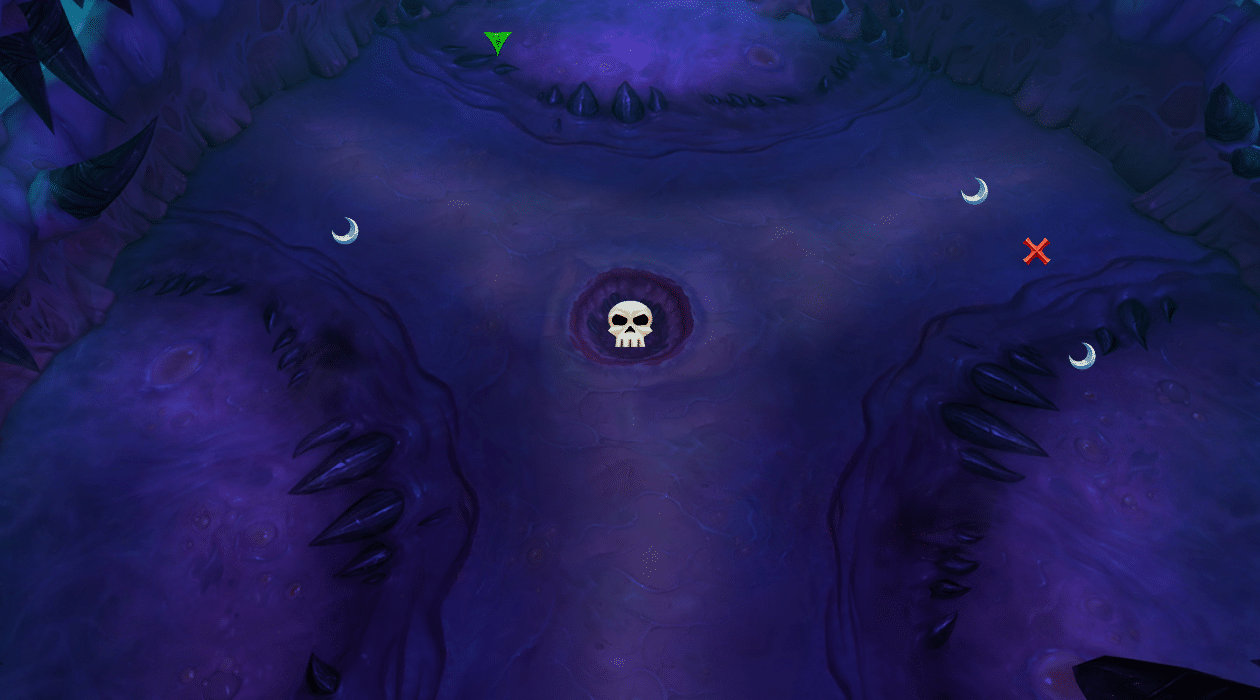
- Phase 2 Positioning
- First Phase 2

-
- Second Phase 2
- Healer Tips
- Thanks to Maeveycakes for sending in these tips
- Phase 1 use CDs as necessary, which’ll likely be during the Eternal Torment
- In Phase 2, you’ll want one CD for each Evoke Anguish
- Limit’s heal comp was 2 Holy pallies, 1 Disc Priest, 1 RSham
- They went Barrier first Evoke, SLT 2nd, Devo 3rd, other Devo 4th
- For 3rd and 4th, they also added Rallying Cry
- They repeated this CD rotation during the 2nd Phase 2 as well
- The ranged-standing healers (so not holy pallies and MW) can just not stack during Harvest Thought soaking. Doing this allows you to pre-position where you’ll want to be for the upcoming Evoke Anguishes and focus on throughput instead of movement
- During the Secret phase, just let the tank keep the absorb shield. Don’t bother padding and blasting through the absorb, conserve mana and keep the group alive