Mythic introduces a new overarching encounter mechanic – Hungry
Shad’har gains a stack of Hungry every 4 seconds
If he reaches 10 stacks, he’ll begin dealing 250% increased damage
Living Miasma
This now roots the person they fixate to
After the Miasma reaches its target and explodes, it’ll leave a “tasty morsel” on the ground
If this Morsel is fed to Shadhar, it’ll reduce his Hungry stacks
After a player picks up a Morsel and feeds it to Shad’har, they’re afflicted with a moderate DoT effect
They also cannot pick up another Morsel for 3 minutes
Strategy
You can fight this boss with either 4 or 5 healers. 4 will get you out of P2 faster, making that phase safer. 5 healers will keep you more stable throughout the fight, and will most likely be the best option for most guilds.
Living Miasma
Miasmas spawn every 16 seconds
The player fixated by Living Miasma is affected with a 99% slow. This can easily be countered
Warlock’s Burning Rush, DK’s passive, Ghost Wolf, and any other ability that gives a class a “minimum” movement speed immediately counters the 99% slow
Other slow-prevention abilities also work. Hunters using Disengage with the Posthaste talent is a good example
Most notably, though, is Blessing of Freedom. This fully counters the 99% slow. If you have 2 paladins in your raid, you’ll have a BoF available for every single Living Miasma spawn
After having a movement-freeing ability cast, the player fixated by the Living Miasma should run to the furthest point away from the raid possible
The raid should also shift away from the direction the fixated player is running
Get the raid as far away from the Miasma explosion as possible
Dealing with Hungry
Shad’har gains 1 stack every 4 seconds
You’ll want to feed him after every 2nd Living Miasma. Aim for 8-9 stacks of Hungry as your target to feed Shad’har a Morsel
You do NOT want to feed Shad’har every single Morsel as soon as they’re available
The player who fed Shad’har gets a 3 minute DoT. Because there’s a large amount of damage going off during the fight in general, you want to minimize the number of these debuffs
The tank swap mechanic should be handled the same as you did on Heroic
Healers still need to focus in on the players with the 4 stack of Debilitating Spit
Phase 1
Dodge the breath
Dodge the swirlies
Phase 2
Bloodlust this phase
There’s a stacking DoT that goes out during this phase, so the healing requirement gets nutty
Healers should use heal CDs throughout this phase, just keep everyone alive
The breath is NOT dodgeable in this phase. The raid should be spread out around the room to minimize the number of people hit per cast of the breath
The two portals for “Soccer” no longer spawn on opposite ends of the room every time, potentially forcing the kicking team to go further around the room
Voidwoken debuff gains extra effects
Imminent doom, the debuff from kicking, has a 12-second duration. This is up from 6 seconds on Heroic
If a player reaches 3 stacks of Imminent Doom, they die. This is decreased from dying at 5 stacks on Heroic
When a player kicks the orb, an Awakened Terror will spawn
These have a very low health pool, and chain cast Terror Wave
This does AoE damage to the raid and fears for 3s
However, this cast is interruptible
Obelisks now come in two sizes, with the new size being about double the normal Obelisk
A single “fail” at soccer now results in an instant raid wipe. This happens if the orb hits a wall, an Obelisk, or the circle around Azshara
Because of the larger sized Obelisks that now spawn, plus needing to potentially go further around the room, soccer is much more dangerous and much more lethal
Strategy
For this encounter, we recommend 2 tanks, 4 healers, and 14 DPS. We also recommend using Bloodlust on pull.
We’re going to be completely up front about this – you will wipe a lot on this boss. Almost every single person in the raid WILL be the singular reason for a wipe, multiple times. There’s no two ways about that. Keep your heads cool, don’t flame your guildies, and get through it together. The boss itself is not difficult, but you will wipe a LOT to the mythic soccer mechanics.
Here are two public Weakauras that may aid you. The first is a kick guider, the second is an interrupt rotation WA for the adds. These worked decently well at the time of writing.
Firstly, the non-soccer related mechanics have minimal changes, essentially just increased damage. The entirety of the difficulty and wipes to this fight is related to soccer. As such, that’s what the guide will focus on.
When it comes to handling the soccer mechanics, there’s two portions to focus on – the actual 5 assigned teams of 3 playing soccer, and the assigned 3 teams of 3-4 people for interrupts. For your kicking teams, make sure you assign which one of the Void Ritual soak orbs each person is supposed to soak.
For the interrupts – every single time a kick occurs on the ball, an Awakened Terror add spawns. As we’ll talk about below, we recommend ensuring you only ever do 3 kicks per soccer round, so there’ll always be 3 adds. YOU WILL NEED AN INTERRUPT ROTATION, as they chaincast a raid-wide fear. A missed interrupt likely results in a raid wipe. Each of these needs an assigned interrupt rotation with 4 people in the rotation for each add. Use an interrupt WA, either the one linked above or a different one, to assign and track who should be doing which interrupts. This is a primary mechanic and will require attention to detail.
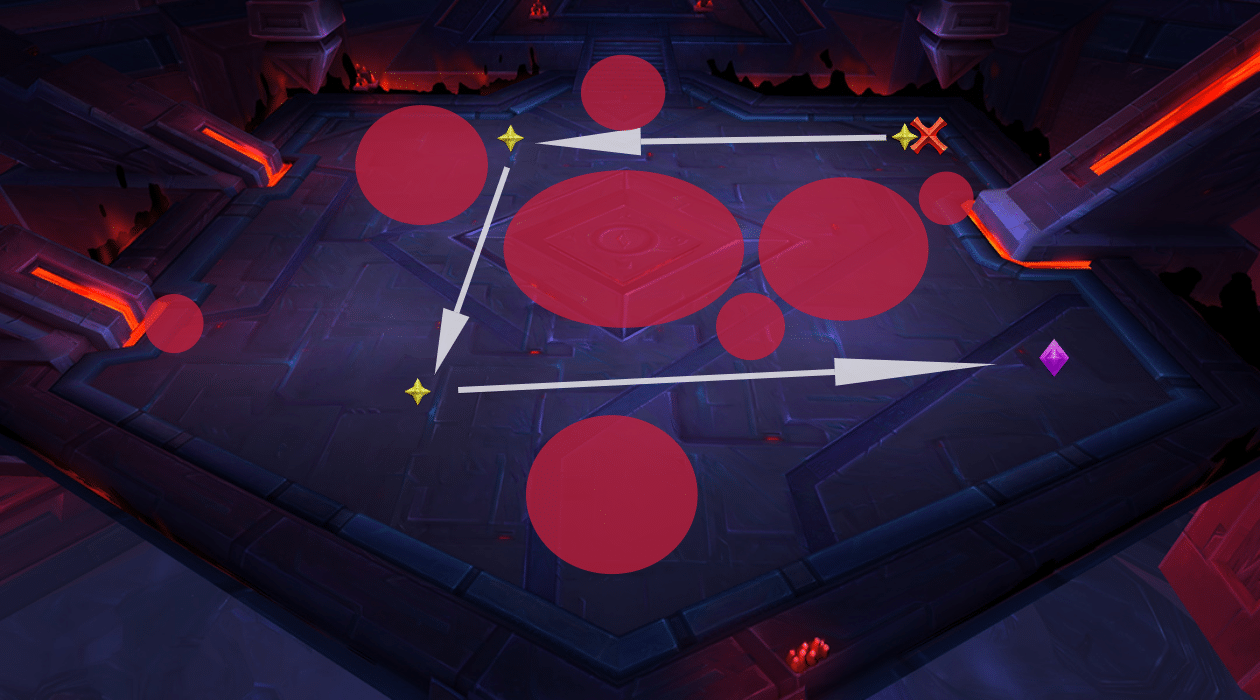
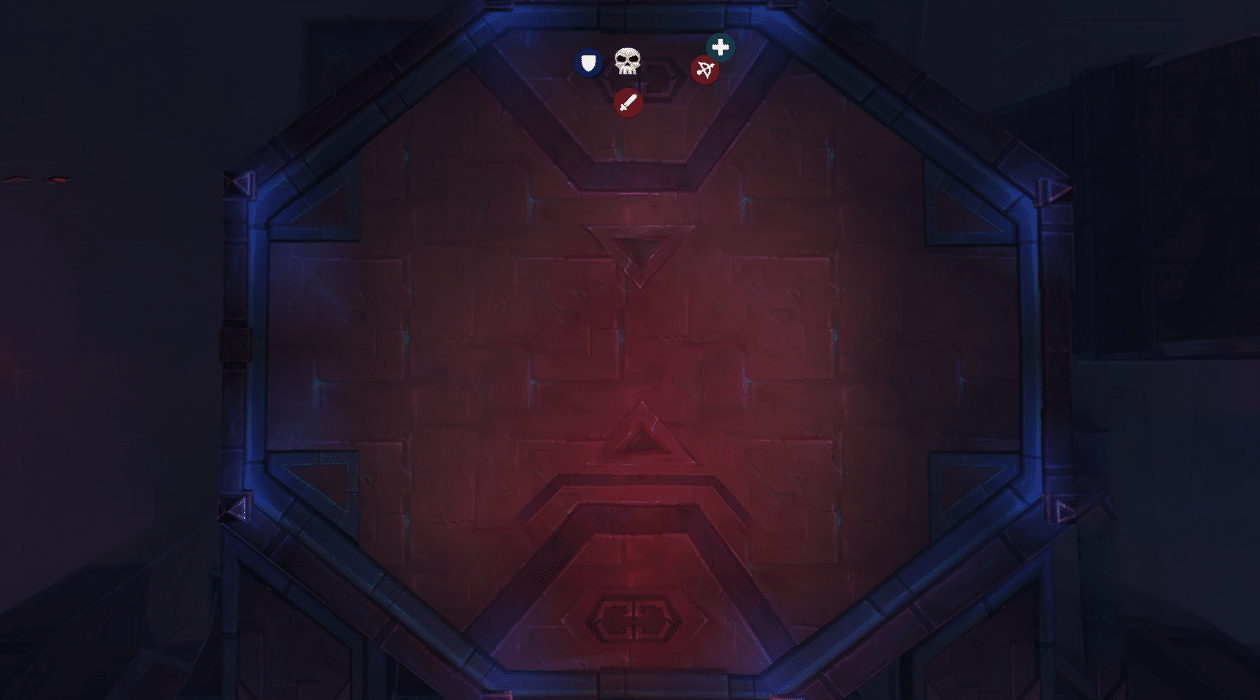
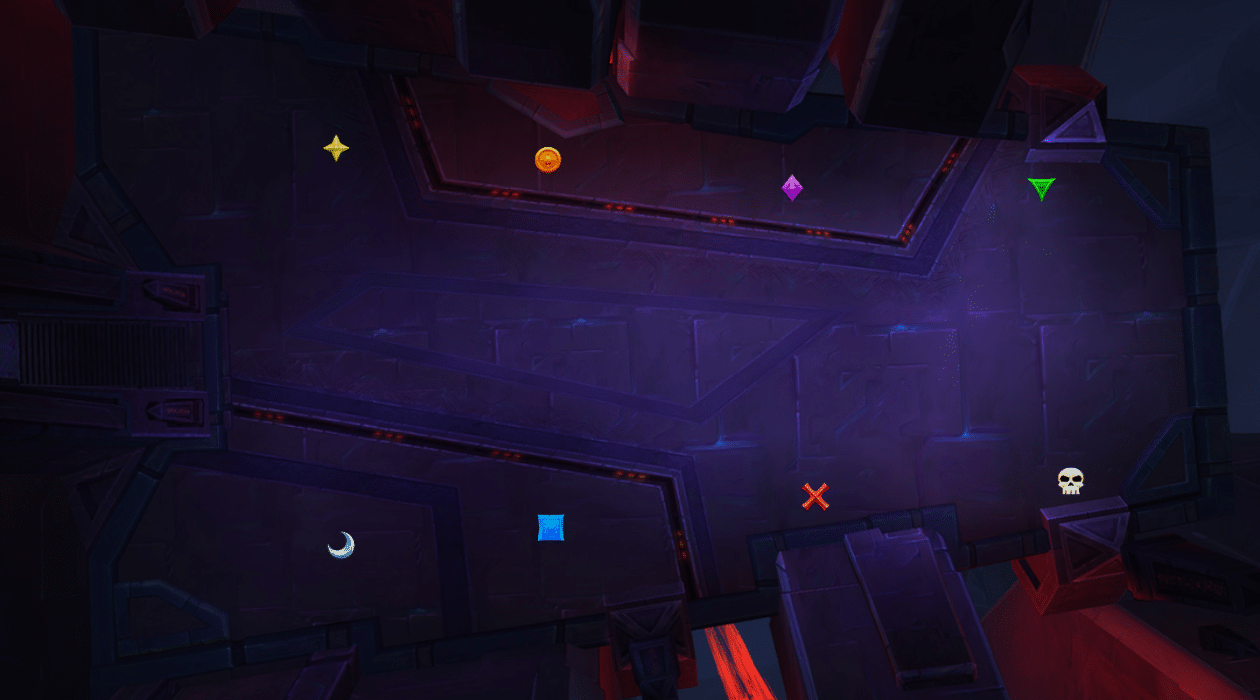
For soccer: the idea is straightforward. Each soccer phase, you need to kick the ball exactly 3 times. No more, no less. The execution is difficult. There are 3 map layouts of Obelisks, and they will be in exactly the same order every pull. These then repeat. Set 1 = Map 1, Set 2 = Map 2, Set 3 = Map 3, Set 4 = Map 1, Set 5 = Map #2. The only thing that can change is which portal the ball itself will spawn at. We’ve included diagrams of the maps below. PLEASE NOTE – WE ARE NOT SKILLED ARTISTS. THESE ARE ESTIMATIONS, AND MAY NOT BE COMPLETELY EXACT. THE LOCATIONS ARE MEANT TO SHOW YOU WHERE YOU NEED TO BE, BUT THE ACTUAL EXACT LOCATIONS MAY BE SLIGHTLY OFF. The X and Diamond represent where the portals are. For illustration purposes, we’ll show Diamond as being the starting point for the ball. You WILL experience the X location being the ball sometimes.
Map 1:
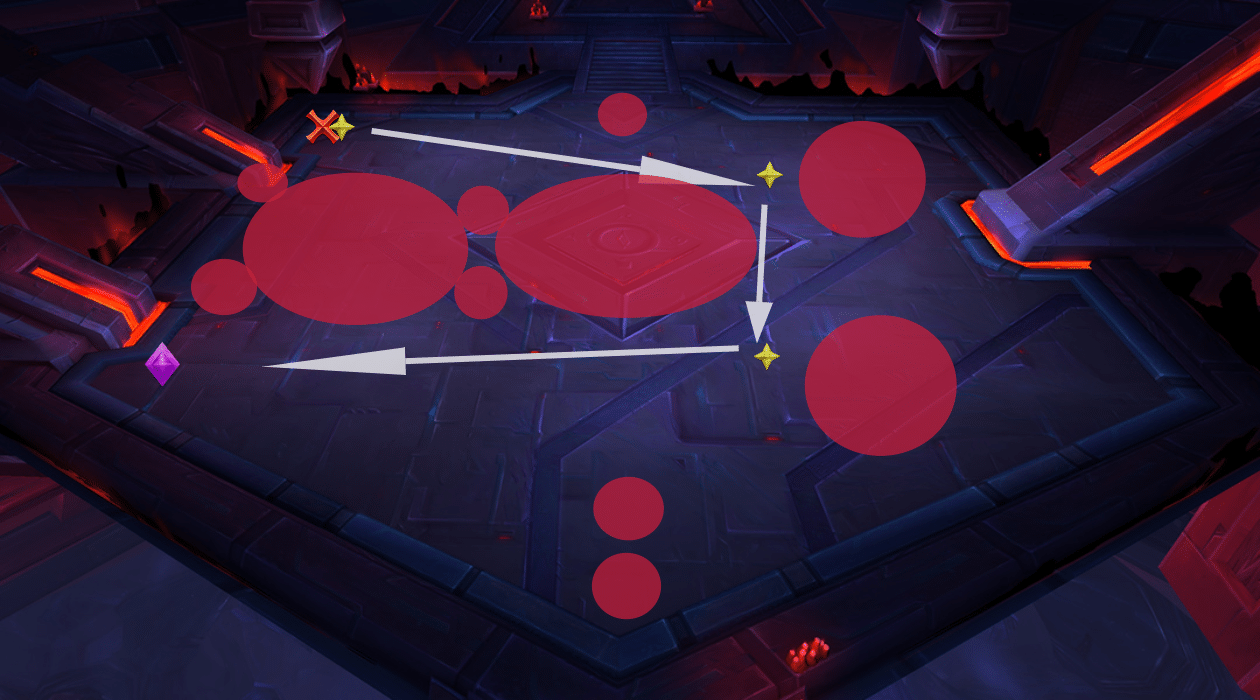
Map 2:
Map 3:
As far as the rest of the raid is concerned, in general you want to have the boss near where the ball starts every time. The tanks should be moving the boss to follow the ball, stopping where the adds are. When the add you’re on top of dies, move to the next one. Continue moving throughout the room to follow these adds until the 3 of them are dead. While that’s going on, obviously the assigned interrupt teams need to ensure they never miss an interrupt on an add.
Don’t die to torment, blow up the boss. Once teams 1 and 2 have gotten their kicks down solidly, swap them with teams 4 and 5. These teams will share the same maps, so moving teams 4 and 5 up lets them practice earlier on. This will make your wipe progression seem odd, going from sub 40% wipes to 75% wipes, but it’s absolutely worth doing. Other than that, there isn’t much to say. As a side note, if one of your tanks has a viably geared Protection Paladin, you should consider bringing it in for this fight. Avenger’s Shield may be the single best ability in the game for dealing with add interrupts.
Again, this will be a tedious progression. Keep your raid calm, don’t flame each other. Every kicker will need to try and practice several times.
Welcome to our TL;DR Cheat Sheet! This is meant to give you basic information on the key aspects of each fight, and is over-simplified. We strongly recommend that after you finish reading this, you visit the page for each boss to get more in-depth information on how the abilities work and a detailed strategy.
One phase encounter against a giant tentacle and her smaller tentacle adds
Drest’agath Abilities
Heals 11 mil every 5s
Puts big purple circle on the tank. Taunt swap when this happens
Tank with the circle needs to run to an add and explode on the add
Move away from boss when she does Entropic Crash
If you get purple swirlie, move away from people
Dodge Void Glare lazer beam
At 100 energy, does a large AoE on the raid
Adds
3 types, Tentacles, Eyes, Maws
Eyes do mind flay, interrupt it. Kill these last.
Tentacles drop Smoke Bomb. Melee get inside smoke & kill it
1-2 healers need to go in smoke to heal
Maw does a heal absorb to anyone near. Ranged nuke this
When adds die, they drop purple goop. Run over goop to get Void Infused Ichor
When you have Ichor, any damage you deal to the boss can NOT be regenerated by her passive healing. Raid should all grab ichor at same time and use CDs
Rotate through killing adds & boss 3-4 times and kill her
Orbs spawn, one void one lightning. Kill one, let other hit boss
Alternate which type of orb you kill
Boss explodes for AoE damage when orb hits him
An add spawns based on which orb
Lightning orb makes a lightning add casting Chain Lightning
Void orb makes Void add casting a big soak circle. Targeted player make sure you’re with the group to split damage with everyone
Also does an Unstable ability based on which orb hit
Lightning orb makes a jumping lightning bolt. Affected player runs to one of the markers behind raid. Someone else runs to other marker for bolt to jump to. Keep repeating until bolt stops jumping
Void orb makes small soak circles. Soak these
Different people need to soak or be hit by bolt every time
Tanks swap at 2 stacks of the debuff he does
Phase 2
Burn phase, lust here
Heavy AoE to everyone for rest of fight
Dodge purple swirlies
If you get Chained, run away from people you’re connected with
Healers should rotate raid CDs after lust ends
Keep tanks around half health this phase, so the DoT from Decaying Strike doesn’t wreck them
Wrathion is a 2 phase fight. Phase 1 is the primary phase where you fight Wrathion himself, Phase 2 he melts away, and you need to deal with some gripping pillars.
Phase 1
Searing Breath
Frontal cone ability, deals 285k Fire damage to anyone in front of the boss.
Applies Searing Armor
DoT, deals 21k Fire damage per second for 20 seconds. Also increases damage taken by Searing Breath by 80%. This effect stacks.
Incineration
Occurs at 0:33, 1:33, 2:22 in each Phase 1, give or take 2 seconds in either direction
DoT placed on a small number of random players
Deals 53k Fire damage every 2s for 8s
After 8s, explodes for 322k Fire damage to everyone in the raid. This amount is decreased the further away you are from the explosion point
Gale Blast
AoE ability, deals 322k Fire damage to everyone within 30 yards and knocks them back
Deals 160k damage to all players further than 30 yards away
After the initial AoE, shoots fire balls at random target locations. Fire balls deal 267k Fire damage to anyone within 5 yards of impact point
Occurs at 1:00, 2:30, 5:00, 6:30
Burning Cataclysm
Wrathion teleports to a random location, and spits fire. Deals 35k Fire damage per second for 8s to the entire raid
Also spits out Scorching Blisters
Location of these is indicated by orange swirlies on the ground
After a couple seconds, the swirlies become pools of fire which expand outward over 10 seconds
Standing in the fire pool deals 120k Fire damage per second
After 10 seconds, the fire pools explode, dealing 430k Fire damage to anyone standing in a pool at that time
These cover most of the available encounter area
Occurs at 1:10, 2:42, 5:12, 6:42
This always follows a Gale Blast, roughly 10s after the explosion
Molten Eruption
Occurs right after a Burning Cataclysm
Throws a hail of fireballs around the area. Being hit deals 120k Fire damage and knocks you back. 3 yard range from impact.
Leaves Molten Pools wherever these Eruptions landed
Tail Swipe
Conal attack from the tail. Deals 285k Physical damage and knocks back anyone hit.
Phase 2
Wrathion casts Smoke and Mirrors, starting P2
Crackling Shard
All Molten Pools become Crackling Shards, basically pillars. When a Shard is destroyed, deals 53k Fire damage to anyone within 10 yards
Any Shards not destroyed turn into Lava Pools at the end of Phase 2
Lava Pools deal 120k Fire damage per second to anyone standing in them, and Lava Pools persist the remainder of the encounter
Additionally, each Lava Pool causes a raid-wide DoT of 1400 Fire damage per second for the remainder of the encounter, which stacks
Crackling Shards have a health pool and can be attacked and destroyed.
Scales of Wrathion
3 Scales fall from the sky, denoted by a red soak circle
Each must be soaked by 1 player
Any not soaked deal 250k Fire to everyone in the raid
The player who soaks is affected by Burning Madness, a 10 second debuff with 10 stacks.
While you have this debuff, running through a Crackling Shard pillar destroys it. Each pillar you destroy uses up 1 stack, and adds 1 second of duration
PLEASE NOTE – this is how the Journal is written. On PTR Testing, in heroic you DID NOT get additional duration for running over a pillar. Unknown for sure if this is a bug or intentional.
On testing, there were 32 Crackling Shards to destroy per Phase 2
Ashwalker Assassin
3 adds spawn stealthed. While stealthed, they apply a 10 second stun called Noxious Choke to their target, and also attack with Dark Ambush, dealing 285k Shadow damage
When the Assassins have their stealth broken by any means, they become attackable and tankable, and stop casting Noxious Choke and Dark Ambush
Phase 2 lasts 1 minute.
Strategy
Phase 1 – Fight times 0:00-3:05, 4:05-7:07
Lust on pull
Tank the boss near where he starts, facing sideways. Either side is fine, your choice. Raid should stand in the safe area where they will not be hit by either the Searing Breath or the Tail Swipe. See positioning graphic in the last section.
Tanks should swap either every stack, or every 2 stacks. Whatever you’re comfortable with and won’t die to. It makes no difference either way, so don’t risk trying to be a hero with too many stacks and killing yourself.
Players with Incineration need to move away from the raid, spread out from each other. Rest of the raid should be stacked in tight for healing/CDs
You will probably want to use a raid healing CD for the explosion here every time, as it’s a large burst of damage.
Because of the way timings for this are spaced out, as long as your comp has at least 3 healers you can use a healing CD each time
For Gale Blast, your raid (except your active tank and any melee DPS who can immune the damage) should stack 35 yards from the boss to take the reduced damage. This would put you near the center of the encounter area.
The added benefit here is that it makes every spot easily reachable for the upcoming Burning Cataclysm
Each Phase 1 will have Burning Cataclysm occur twice
As Burning Cataclysm starts, your raid leader/officers need to identify where a safe spot will be based on where the orange swirlies are located. You can almost always find safe spots on the exact opposite end of the platform from where Wrathion is, or just off to the side of that opposite end.
Finding the safe spot may take a pull or two to get used to, but you got this.
You do not need to use raid healing CDs during this. Just get to a safe spot and you’ll be okay
After Burning Cataclysm ends, during your run back to the boss, Molten Eruption will occur. Try to avoid being hit by the explosions denoted by the targeting circles.
After the first Burning Cataclysm of a Phase 1 cycle, by the time you reach the boss you’ll have an Incineration go out. Use a raid healing CD for that.
After you’ve completed a second Burning Cataclysm during a Phase 1 cycle, you enter Phase 2
Phase 2 – Fight times 3:05-4:05, 7:07-8:07
Have three players assigned to soak Scales of Wrathion. These should be players with Sprint, and preferably people who also can use an immunity to keep themselves alive while breaking the Crackling Shards
As soon as these players receive the debuff, they should hit their sprint and get going to break as many of the Shards as possible.
Any Crackling Shards not destroyed need to be DPS’d down and killed
Hunters should turn on Track Hidden for this phase, and use Flare to help find the Assassins
Players being attacked by the Assassins while they’re stealthed need heavy spot healing
Use AoE near the targeted players to break the Assassins out of stealth
Once they’re out of stealth, tanks should pick up Assassins, and the raid nukes them down
Players should try to stay 10 yards away from shards as they’re about to be broken if possible. Don’t stress too terribly hard about being near 1-2 Shards as they break, but any more than that can become overwhelming damage
After 1 minute, the phase ends. Any Shards not destroyed by this point become Lava Pools, which is bad. Try to not let this happen.
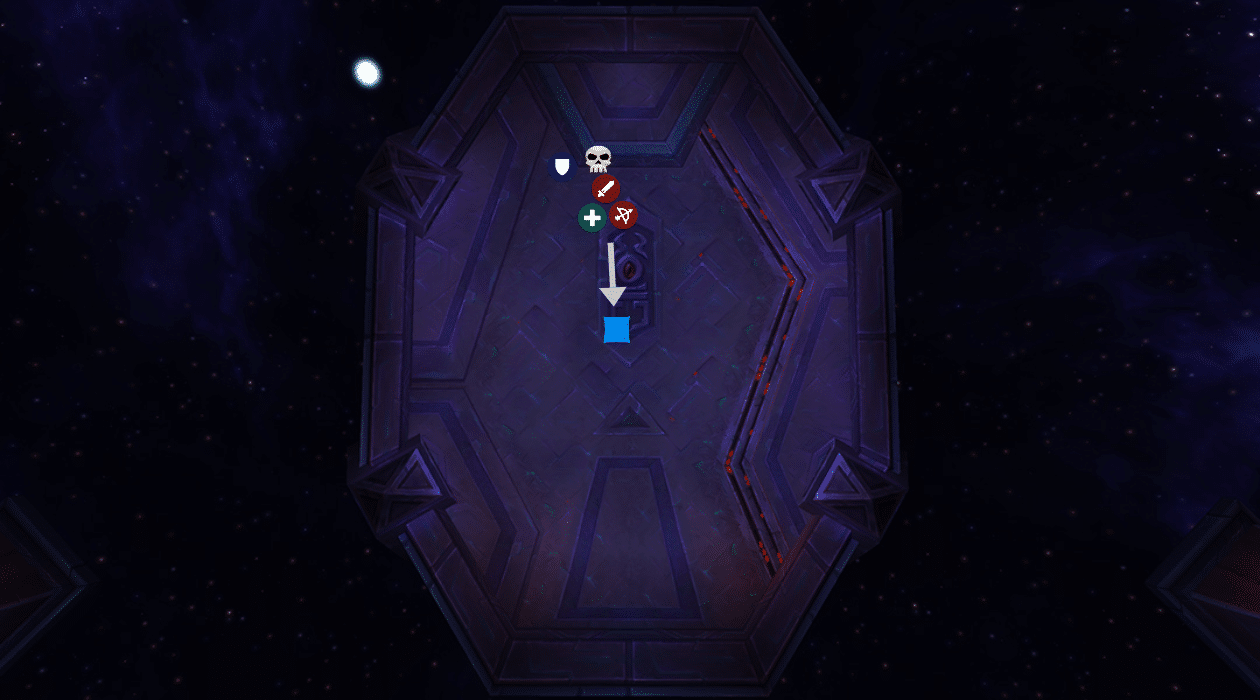
Positioning
Normal Positioning for Phase 1
Move when you have Incineration. Here’s showing how the 3 affected people can all move.
Gale Blast, stack away from the boss, on Blue.
Run to the far edge for Burning Cataclysm. Mostly everyone will be on Blue, run from Blue to the far edge.
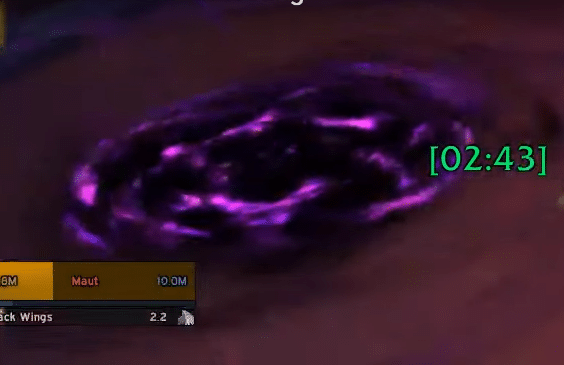
Maut is an encounter which alternates between two phases. During Phase 1, he gathers mana, during Phase 2 he begins a cast using all his mana. This cast ends when his mana reaches 0, and you re-enter Phase 1.
Dark offering = 2% Maut mana
Adds lose 2% mana per 2 seconds within the circles, so 100 seconds in circle = ded
Adds spawn every 35-40 seconds
Maut naturally gains about .66% mana per second, or 1.5 seconds per 1% mana.
Maut gains 1% mana per person hit by devour magic
Boss has exactly 2x HP vs mana
Adds have 10% boss’s mana
Killing add is 5% of boss HP
Phase 1
Shadow Claws
Deals 268k Physical damage to the current tank, and applies the Shadow Wound Debuff
Deals 36k Shadow damage every 2 seconds for 24 seconds. Stacks.
Devour Magic
Marks 4 players with a purple targeting circle
After 6s, the circle explodes dealing 53k Shadow damage to everyone hit
Each person hit also generates 1% mana for Maut
Leaves a Devoured Abyss wherever the explosions happened
9 yard radius purple circle of bad
Standing inside silences you, prevents incoming healing, deals 42k Shadow damage every 2 seconds, and drains your mana
While inside, you’re also immune to all other forms of magic damage
These explode when P2 starts, dealing 268k damage to anyone standing in them
Stygian Annihilation
AoE, deals 1.7 million Shadow damage to the entire raid
Consuming Shadows
Periodically puts a 3 second DoT on the raid that deals Shadow damage every 3s. This DoT deals more damage as Maut’s mana increases
Black Wings
Frontal cone ability, deals 142k Physical damage and knocks back anyone hit
Targeted at a random melee
Dark Manifestation
Large purple swirly pool of bad spawns, lasts 6 seconds. After 6s, it explodes dealing 267k Shadow damage to anyone inside
Has a relatively weak sucking effect, dragging players towards the bad circle
After the explosion, a Dark Manifestation add spawns where the explosion occurred.
Adds take damage to their mana instead of HP. At 0 mana they die.
Periodically cast Dark Offering. If the cast completes, the add loses 20% mana and the boss gains 2% of his max mana.
If the add gets within 20 yards of Maut, he’ll eat it, consuming all the adds mana and adding it to his own. The max amount of mana an add can give Maut is 10% of Maut’s mana pool.
Phase 2
When Maut reaches 100% mana, he casts Obsidian Skin, followed by Obsidian Shatter. He also destroys all of the Devoured Abyss circles on the ground, dealing 268k Shadow Damageto anyone inside them.
Obsidian Skin
All damage dealt to Maut is instead dealt to his mana pool
You take 100% of the damage you deal to Maut as Arcane damage
Making Maut reach 0 mana immediately ends Phase 2 and stops his cast of Obsidian Shatter
Obsidian Shatter
60 second cast. Upon completion, deals 1 million Shadow damage to the raid. You wipe. Don’t let this happen.
Consumed Magic
Every 6 seconds during Phase 2, Maut consumed 10% of his mana pool, and gains 1% increased magic damage dealt. Stacks.
Forbidden Ritual
Mana orbs spawn one at a time from the altars at the edge of the room.
When an orb spawns, it drains Maut of 10% mana
If they reach Maut, they restore 20% of his mana
These can be soaked by players. Soaking deals AoE damage to the raid. The further the orb has traveled, the more damage it deals. Soaking an orb gives you the Forbidden Mana debuff
After 6 seconds, you explode with mana. All players within a 20 yard range of the explosion gain 150% increased mana regen and 50% increased healing done for 8 seconds
Drain Essence
Purple swirly on 2 players, deals 35k Shadow damage and burns 4k mana per second for 8 second. While the debuff persists, Maut gains 1% mana per second
DIspellable
When dispelled, deals 71k Shadow damage and burns 10k mana from players within 8 yards
Strategy
During testing, two strategies worked well to defeat this boss on Heroic. Option 1 makes Phase 2 longer in exchange for longer Phase 1s. This increased the strain on healers in Phase 2, and also allows the boss to accumulate more stacks of Consumed Magic, increasing the overall damage of the fight. Option 2 is basically a zerg strat, and required a higher DPS output. Both will be explained below. We’ll first talk about the fight as a whole, then break out the differences, as it all boils down to how you handle the adds.
Phase 1
Lust on pull
Tanks should start the boss either where he is, or just off to the left. Raid should stand behind the boss, loosely spread
Tanks swap every 2 stacks, preferably when there’s only 1 add alive
Tanks should slowly move the boss around the room to make sure the raid doesn’t run out of room from puddles
The rest of the raid should be loosely spread behind the boss, leaving space to the right-hand side (closest to the outer edge)
Players affected by Devour Magic will move to this open area on the right side to drop their puddles
When Stygian Annihilation goes out, everyone needs to step into a purple puddle, as it makes you immune to the damage
Melee need to move to the side of the boss right before Black Wings occurs to bait it
You want this going harmlessly to one side or the other, not through the raid
As soon as Maut starts casting, melee need to quickly move and get back with the rest of the raid
Consuming Shadows just needs to be healed through, no big deal
Phase 2 – Boss hits 100% Mana
Boss runs to the middle of the room, and simultaneously makes all the purple circles explode and begins casting Obsidian Shatter
Whole raid should stack together in melee range of the boss to help the healers be more efficient
Tanks should focus on soaking the Mana Orbs. After soaking, yeet yourself back on top of the raid stack point to apply the mana buff to your healers
Players affected by Drain Essence need to move 8 yards away to be dispelled, then move back after being dispelled
You’ll want to use 2 healing cooldowns each time you’re in this phase. Spread them out however works best for your raid, but this is a high intensity healing phase so CDs will be necessary to keep the raid stable
Once the boss’s mana hits 0, you go back to Phase 1. If you don’t do this before his cast ends, you lose gg
Add strategy Option 1 – slow and steady
Have the tank not currently on the boss pick up the add when it spawns, and drag it near a purple circle
When it begins casting Dark Offering, drag it into the purple circle. After the cast ends, bring it back out. This prevents the cast from actually finishing, and stops the mana from going into the boss
DoT up the adds, but don’t prioritize damage
Tanks swap whenever a new add spawns. When taunting the boss, bring your add with you and let him suck it. Do this for add #1 and add #2. Don’t let add #3 get sucked.
By doing this, you’ll have Phase 1 last around 2 minutes,give or take, assuming you did well with Devour Magic.
Once you enter P2, just kill the last add from cleave damage, focus DPS on boss
Add strategy Option 2 – Zerg
Have the tank not currently on the boss pick up the add when it spawns. Immediately drag it under the boss he can eat it.
All DPS just keep nuking the boss
Repeat for Add 2
Repeat for Add 3, although he’ll spawn when the boss is close to 100% mana, so make sure you get it eaten
Idea here is to maximize effective DPS on the boss with minimal downtime. By doing this, your Phase 1s will last between 1:35 and 1:45, so quite a bit less time than doing it slow and steady. It’s simpler overall, but not by much, and adds a little more risk of not killing the boss during the 2nd Phase 1
During PTR testing, the Zerg strategy seemed easier than the “Slow and Steady” strategy. However, we recommend using the “Slow and Steady” strategy, as it’s more forgiving and still pretty simple. It’s also much more likely the way Blizzard envisioned the fight, and more like what you’ll be doing for Mythic.
Positioning
Basic positioning during Phase 1. You’ll need to move the boss slowly as the Devour Magic puddles block too much space.
Phase 2 positioning. If you have Drain Essence, move away from the raid, somewhere like to X.
Skitra is an encounter that alternates between a primary phase and intermission phase based on boss HP. Phase 1 is where the encounter primarily happens. Phase 2 occurs at 80%, 60%, 40%, and 20% HP on Skitra. Phase 2 ends as soon as you defeat the add.
Primary Phase
Shadow Shock
Cast every 2 seconds, deals 71k Shadow damage to the active tank plus 2 random players
Also applies a debuff causing affected players to take 15% increased Shadow damage for 5 seconds
Stacks
Shred Psyche
Occurs 0:12 into each Phase 1, then every 34 seconds
Debuff on a random player that lasts 5 seconds
An add spawns at the location the player was at when the debuff falls off
Add has a 5 second cast when it spawns, deals 430k Shadow damage to everyone
Damage falls off based on distance. You only need to be 8-10 yards away from the add to be fine
After the initial AoE, the add will pulse for 14k Shadow damage every 1.5 seconds until it dies
Images of Absolution
Occurs 30 seconds into each Phase 1, then 1:25 later (if still in a Phase 1)
Same mechanic as Coven of Shivarra had in Antorus
Line of adds spawns at the side of the room, and slowly walk across the entire encounter area.
Deals 142k Shadow damage per second if they touch you
Immune to all damage for 30 seconds
CAN be CC’d, must be CC’d.
Intermission Phase – 80%, 60%, 40%, 20%
Skitra assigns half of the raid the Clouded Mind debuff, other half with Twisted Mind
Each half of the raid can see 4 Illusions of Prophet Skitra in random locations across the room
Only one is the real boss. The boss will be the only illusion which is located in the same place for both halves of the raid
Need to coordinate this on Discord
Mindquake
If an incorrect Illusion of Skitra is killed, the raid takes 375k Shadow damage. Don’t do this.
Dark Ritual
Stacking debuff on the whole raid. Increases Shadow damage taken by 2%
New stack every 5 seconds while in Phase 2
This does NOT reset after an intermission ends, but instead carries through all fight
Illusionary Bolt
Every raider takes 35k Shadow damage every 2 seconds while in Phase 2 (Increased by the stacking debuff)
Strategy
As a note, testing for this boss on heroic was super wonky with the AoE damages. They’ve made drastic changes in tuning for the Shred Psyche add, as it was overtuned on PTR. As such, the primary healing difficulty for the fight has been moved (according to the Dungeon Journal at least) and this strategy reflects this.
Also, the boss’s health pool was simply stupid on PTR. 19 man scaling was 274 million HP, not including transitions and adds. For reference, Wrathion had 151M with 21 people. Hopefully this has been scaled down quite a bit.
Primary Phase
Place your 8 raid markers around the room before you pull the boss, 4 on each side
You’ll use these to coordinate Phase 2
Tank the boss near the middle of the room, facing away from the raid
Tanks swap at 7-8 stacks of Shadow Shock
Rest of raid should be stacked directly behind the boss in melee range
We recommend lusting either on pull, or when the first add spawns 30s into the fight.
Players affected by Shred Psyche need to move to the side of the boss, 8 yards away from the cluster of everyone else
Don’t move too far past 8 yards
When add spawns, wait for its 5s cast to finish
Once it finishes, tank should move the boss onto the add
Nuke the add
When Images of Absolution spawn, have an assigned player CC one specific Image. Banish is the best, but Freezing Trap, Blind, Entangling Roots, etc, anything works
Raid stands in that spot from the CC’d add
After 30 seconds, the Images are no longer immune to damage and need to be tickled for 1 HP to die
Intermission
Coordinate over Discord (or whatever other voice chat you use) to determine which Illusion is the real Skitra. Have one assigned person from one debuff group call out the colors their 4 adds are at
Have one person from the opposite debuff group say YES or NO to whether that group has an add in the same place.
Example: Raid Leader in Clouded Mind says: “SKULL”
Person in Twisted Mind replies YES or NO
Keep going until you get a yes
Then kill that add
OR use the Weakaura posted above
If you elect to use the Weakaura, have one person from each debuff put a DoT effect on all 4 Illusions you see. The Weakaura will put a green circle on the correct Skitra
It’s possible Blizzard can implement a hotfix to this to prevent it from working. As of the most recent testing, it worked just fine on PTR. Recommend trying it first.
Raid should stack near the correct Illusion as you kill it to help the healers increase efficiency, as this is a heavy damage phase
You’ll want to use healing CDs here
Kill the correct Illusion as fast as possible, and you go back to Phase 1
Rinse and repeat, GGs
Positioning
Put up raid markers before you pull the boss, like below.
Tank the boss near the middle of the room
The person affected by Shred Psyche needs to move to the side of the group, somewhere around X below:
AFTER the add finishes its initial cast, the tank pulls the boss on top of it and everyone follows:
This is a single-phase encounter with several standard fight mechanics. Oh, and soccer. Yes I said soccer, I’m American. You need to play soccer to defeat this boss. You’ll also see the Sea Witch you killed last raid being tortured in the middle of the room, so that’s kind of cool after 200-300 wipes to her. We’ll break out the soccer mechanic by itself, as there’s a lot of pieces to it.
Xanesh Abilities
Abyssal Strike
Big smack on the tank, deals 285k Shadow damage. Also applies a 1 minute debuff causing you to take 25% increased damage from subsequent Abyssal Stikes, stacks
Soul Flay
Creates a red glowing Soul copy of several players, denoted with a red targeting circle underneath. After 10s, the Souls explode and deal 578k Shadow damage to the affected players. You can only see YOUR Soul, and only take damage from YOUR Soul. Move outside the targeting circle to avoid insta-death
Ritual Obelisk
Xanesh creates several Obelisks at random locations around the room. Standing in the swirlie around an Obelisk deals 71k SHadow damage every 1.5s and slows you by 50%
6-8 Obelisks spawn each time this ability occurs, with the previous ones despawning
Azshara Being Tortured
Torment
AoE ability, deals 286k Shadow damage if you stand in it
Covers most of the room, radiating out from Azshara, with multiple safe zone cones
Cast 3 times in a row, can get dicey trying to dodge all 3. Speed buffs are helpful
Anguish
The raid takes a static 21k Shadow damage every 2s for the entire fight. That’s it, that’s the mechanic. Blizzard thought healers would get bored.
Soccer!
Void Ritual
Begins at 0:52, 2:12, 3:32, 4:52, 6:13, give or take about 2 seconds
Xanesh creates 3 orange soak circles simultaneously in a triangle around herself. Each must be soaked by 1 person
If all 3 circles do not get soaked, the whole raid takes 1 million damage. RIP
After soaking, you get a 40s debuff called Voidwoken
You deal 99% less damage, get to play soccer
After you finish soccer, you gain a debuff called Void-Touched, take 13k Shadow damage every 1s and cannot participate in soccer again for 3 minutes (Duration from PTR, not listed in Journal)
Here’s a screenshot showing Obelisks and the soak circles for Void Ritual
Void Orb
After Void Ritual completes, two void portals spawn on opposite ends of the room. One will have a very visible extra glowing effect
The glowing portal is where the Void Orb (soccer ball) spawns
Anyone without Voidwoken who hits the orb takes 143k Shadow damage and are knocked back
If the ball hits an Obelisk, Azshara, or an outer wall of the platform, it explodes and triggers Dark Collapse
214k Shadow damage to the whole raid
Buffs boss with Dark Ascension, increases damage taken by subsequent Dark Collapses by 500% for the rest of the fight
Also causes Xanesh to attack 50% faster for 30 seconds
Strategy
Lust on pull
Tanks taunt every 1-2 stacks of Abyssal Strike
Move away from your Soul Flay when affected by it. Try to get 8 yards outside the red targeting circle
You may want to use raid CDs for these. On PTR, roughly 40% of the raid was targeted each time, so this is a large burst of damage on a large chunk of the raid
Don’t stand under Obelisks
Watch your feet during Torment. The 3 casts happen relatively quickly in succession and can be tight to dodge, so use movement abilities as needed
Voidwoken Players Job
The only players who can interact with the Void Orb without being knocked back are the 3 Voidwoken players
When you come in contact with the Orb while Voidwoken, it bounces off you in the direction YOUR CHARACTER is facing
Your job is to kick the ball into the opposite portal, without letting it hit an Obelisk, Azshara, or a wall
While come in contact with the ball, you gain 1 stack of Imminent Doom, lasts 6 seconds
If you reach 5 stacks, you die, so don’t do that
So basically, ball spawns on one end of the room, the other portal (goal) spawns on the other side
Your job is to play soccer with your 2 best friends, avoid the defenders (Obelisks, Azshara), keep the ball in bounds (don’t touch wall), and score a goal (portal)
When the ball hits the portal, it disappears harmlessly and you win. Now start nuking the boss again
Dark Ascension basically allows for 1 mistake in soccer during the fight, but a 2nd one causes a wipe
Most of this fight just comes down to soccer. It’ll take multiple pulls for people to get used to it, and some people will be better at it than others
Let everyone try during your first few pulls. Once you’ve identified your stronger soccer players, assign them to do this
We recommend putting area markers in the corners of the room, and having your soccer players communicate where they’re kicking the ball using the markers. This’ll help reduce confusion and keep your team on the same page
On PTR, it seemed like the portals, while always on exact opposite sides of the room, spawned in corners in a random order
We found it easiest to try and only ever kick the ball at right angles, parallel to the edges of the room, and staying near the edges of the room. This reduced the chances of hitting an Obelisk or a non-Voidwoken player, and all but eliminated any change of hitting Azshara
Score goals, don’t stand in bad things, nuke boss, ggs
Positioning
You’ll want to tank the boss near where the circle around Azshara is. See the below screenshot.
Single-phase encounter with two bosses that you fight simultaneously. They do not share a health pool. They alternate control over “The Hivemind,” changing how some mechanics need to be handled. Oh, there’s also a lot of bugs in this fight, a massive amount of bugs. We’ll discuss the Hivemind mechanics separately. All mechanics listed specifically under the individual bosses occur regardless of who’s controlling the Hivemind.
The Hivemind
Tek’ris control 0:00-1:11, 2:24-3:30, 4:44-5:51, 7:04-8:10
When the bosses are more than 20 yards away, they and all adds take 99% reduced damage
All adds gain 1% damage dealt and 1% movement speed every second they’re alive, stacking
Ka’zir control – 1:11-2:24, 3:30-4:44, 5:51-7:04, 8:10-9:24
When the bosses are closer than 20 yards, they and all adds take 99% reduced damage
When adds are below 20% HP, they heal for 3% health per second
When control of the Hivemind swaps, Devouring Frenzy occurs
Deals 10k Nature damage to the raid every 0.5 seconds for 12 seconds
Damage dealt increased by 15% each swap
Tek’ris
Nullification Blast
Frontal cone ability with a targeting reticle on the ground. Dodgeable
Deals 117k Shadow damage to anyone hit, and applies Nullification debuff
53k Shadow damage every 2s for 6s, and reduces healing received by 100%
Roll in a straight line in whatever direction they start in
Being hit deals 178k Nature damage and applies Corrosion
Corrosion deals 21k Nature every 2s and increases damage taken by 25% for 8s
Mind-Numbing Nova
Applies Mind-Numbing Toxin to the raid for 8s
Deals 36k nature damage every 2s and reduces Haste by 50%
This is interruptible.
Dark Reconstitution
When either boss reaches 1% HP, they become immune to damage and cast Dark Reconstitution, 12 second cast
If the cast completes, heals 50% of their max HP
If the second boss reaches 1% HP while the other is casting, they both die
Bug adds
Aqir Drone
Spawn at 0:35, 1:51, 3:40, 5:15, 6:32
Fixates on random targets
Leave puddles of acid when they die called Acidic Blood
Puddles deal 78k Nature damage every 1.5s when standing in it
Puddles despawn when the next set of Drones spawns
Aqir Darter
Spawn at 2:04, 2:42, 4:17, 6:45
Psionic Resonance
Deals 28k Shadow damage to the raid, then flies to a new spot in the room
Both types of adds spawn in groups.
Drones can be slowed and gripped
Strategy
On heroic, this boss is pretty straightforward. Dodge bad, kill priority adds.
Lust on pull
During Tek’ris’s Hivemind, tank the bosses together. During Ka’zir’s, tank them 22-25 yards apart
There is no tank swap mechanic on this fight
You start on Tek’ris’s Hivemind
Dodge the bowling ball bugs, don’t stand in the little green Acidic Blood puddles, and don’t get hit by Nullification Blast.
It’s dodgeable even by the tank it’s targeted at
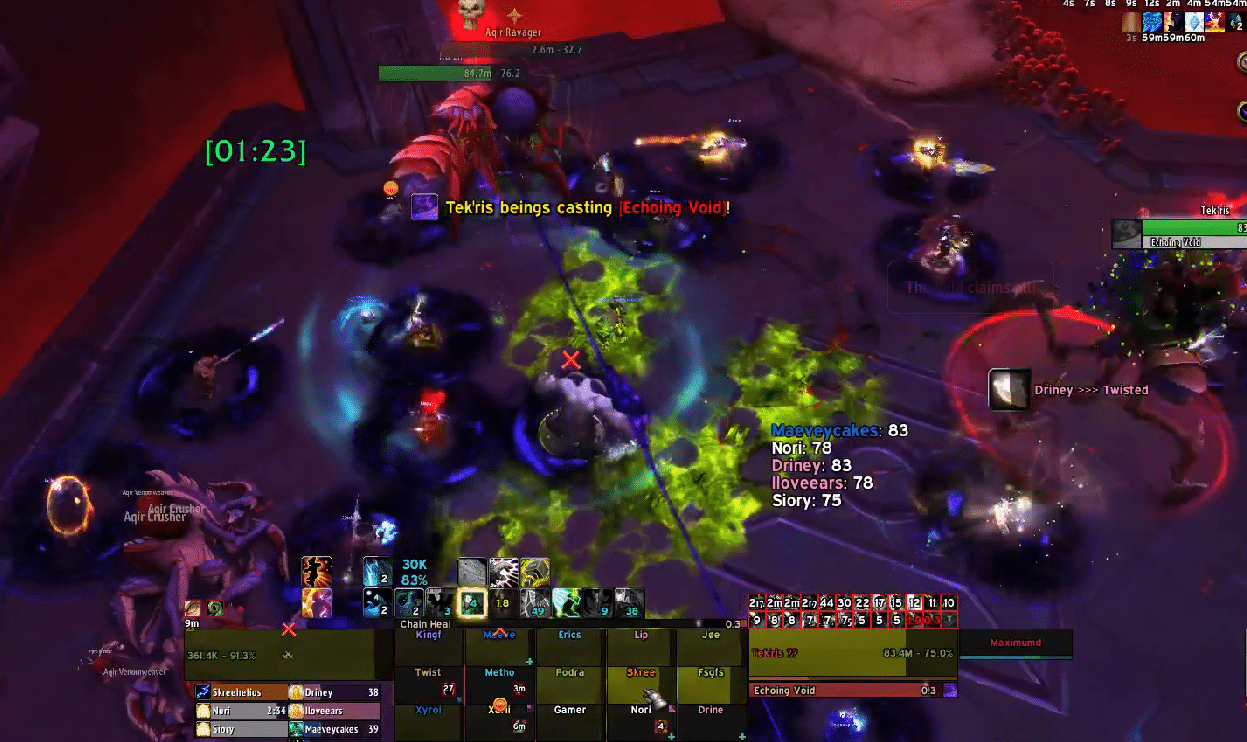
Make sure to be spread 4-6 yards from everyone else during Echoing Void, so you don’t take the extra portion of damage
Use grips, knockbacks, etc to keep the Drones stacked on a boss to make cleave more effective
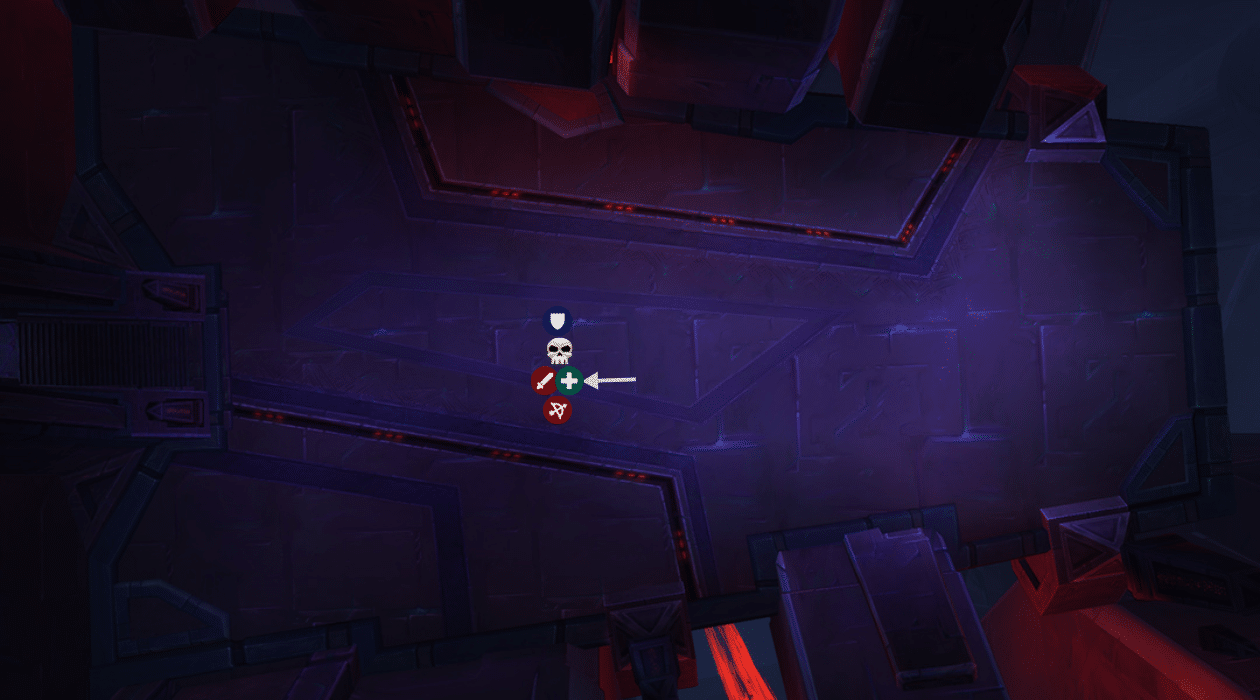
Hardswap the Ravager add, as they can get out of hand with damage on the tank fairly quickly. This is especially important during Tek’ris control
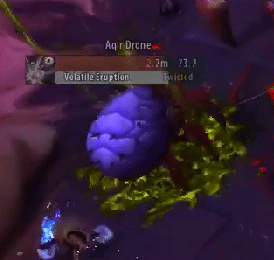
Also hardswap the Drone casting Volatile Eruption. It grows to about 3x the normal size and sticks out like a sore thumb. Killing it gives your healers a nice break
Interrupt the Mind-Numbing Nova
Use a raid healing CD for as many of the Echoing Voids as you can
Prioritize the ones at 1:20 and 6:00. These have overlaps with the Acidic Aqir bowling ball adds AND the Hivemind swap AoE effect. The combination of the raid-wide damage plus people getting hit by the bowling ball adds can be lethal
At 2:45 and 7:25, you have overlaps of Echoing Voids and the Bowling Ball adds, but without the Hivemind swap AoE. You will probably want CDs here too, but not as critical.
This fight isn’t really strategy-difficult. Rather, it’s personal responsibility difficult. It’s very easy to kill yourself on this fight during the bowling ball bugs, especially when paired with anything else going on.
Most of your wipes will simply be people learning and understanding how to effectively deal with the bowling ball bug mechanic. Once people figure it out, the boss falls fairly easily
Positioning
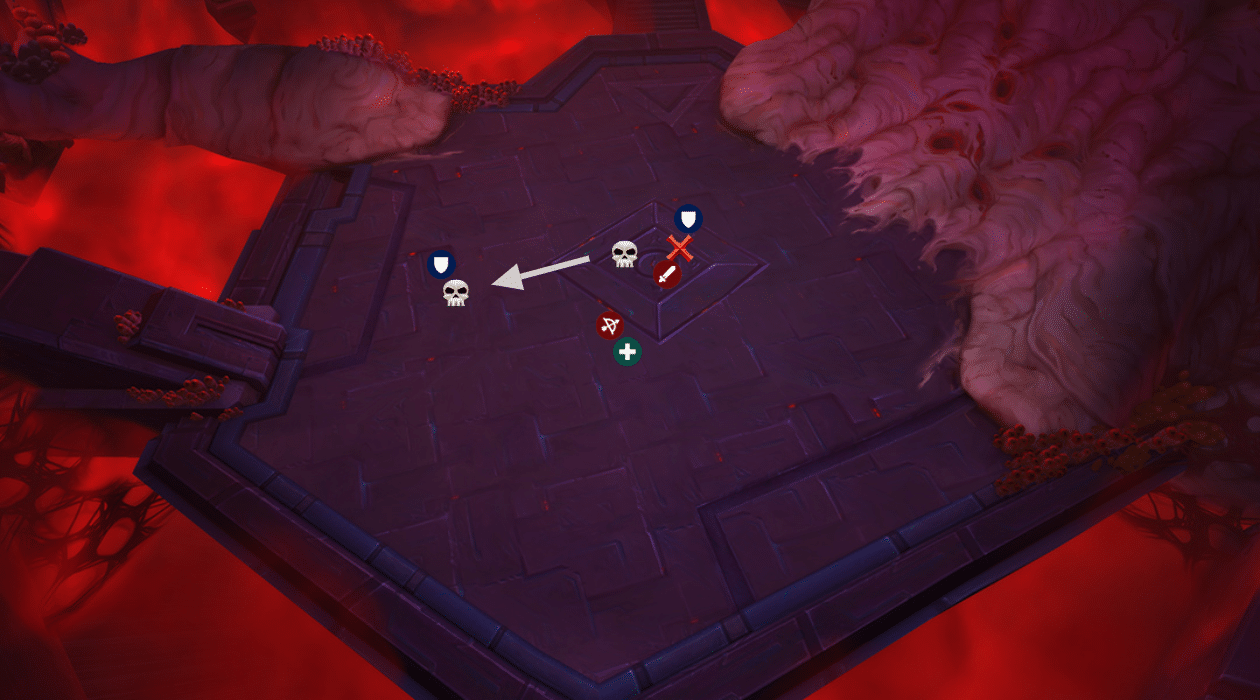
When Tak’ris is controlling the Hivemind, stack the bosses:
When Ka’zir controls the Hivemind, spread them 20 yards away:
Shad’har is a very not good boy doggo fight with 3 phases. He has several abilities which remain the same through each phase, and two abilities that morph based on the current phase
Shad’har All-Phase Abilities
Crush & Dissolve
Each ability has a 3 second cast, and Shad’har casts 3 total abilities per combo
Random order
Crush
Deals 625k Physical to the tank, increases Physical damage taken by 50%, and increases damage taken from DIssolve by 400%. Lasts 20 seconds. Stacks
Dissolve
Deals 35k Nature damage, plus applies a DoT dealing 53k Nature damage per second for 15s. Stacks
Debilitating Spit
Applies a stacked debuff to a random target. Starts at 4 stacks. Deals 21.4k Nature damage per second for 5 seconds, per stack. After 5s, jumps to 2 targets, each gets 2 stacks, still lasts 5s on them. After it expires from the 2 targets, jumps for 4 targets for 1 stack each, lasts 5s on the 4 targets. Then disappears. So,, first target takes 82k/s for 5s. Second 2 targets take 43k/s for 5s. Last 4 targets take 21k/s for 5s.
Living Miasma
Spawns 2 little slime adds that fixate on random players
When they reach their targets, they explode for 268k Shadow damage to the raid, reduced by distance
Phase 1 – 100%-66%
Umbral Mantle
Every 20s, Shad’har explodes. Deals 53k Shadow damage every 2.5s to the raid. Lasts 5s
Separately, every few seconds swirlies appear around the room
After a few seconds, the swirlies get hit by Umbral Eruption. Deals 178k Shadow damage to anyone that gets hit in a swirlie
Happens more frequently as the phase progresses
Umbral Breath
Frontal cone breath, deals 214k Shadow + fears anyone hit for 10s
Occurs more frequently as the phase progresses
Dodgeable
Phase 2 – 66%-33%
Everything Umbral morphs into Entropic
Entropic Mantle
Deals 10k Shadow damage to the raid as the phase begins
Then deals 3,500 Shadow to the raid every 2s for 25s. Stacks.
Entropic Buildup
Several void orbs spawn around the room. After 15s, they explode and deal 45k Shadow to the raid, each
These can be soaked to reduce the size of their explosion
Soaking deals 7k Shadow per 2 seconds
The longer you’re in this phase, the more void orbs spawn
Entropic Breath
Frontal cone, deals 143k Shadow to anyone hit, and reduces their healing taken by 50% for 6s
Cast more frequently the lower Shad’har’s HP gets
Dodgeable
Phase 3 – 33%-GGS
Everything Entropic morphs to Noxious
Noxious Mantle
Deals 53k Nature to everyone every 3s the rest of the fight
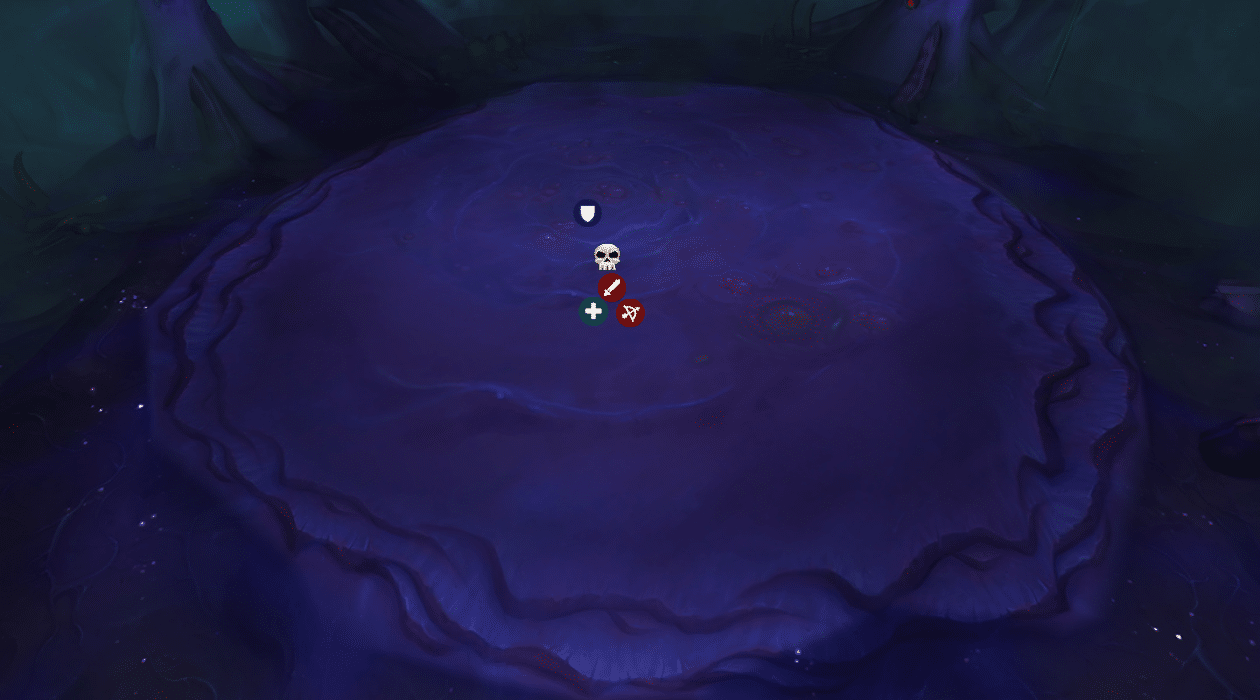
Bubbling Overflow
Creates pool on the ground which grows bigger over time
Standing in the pools deals 10% of your max HP per second
Damage doubles every second you stay in the puddle
See the start of Bubbling Overflow in the screenshot below:
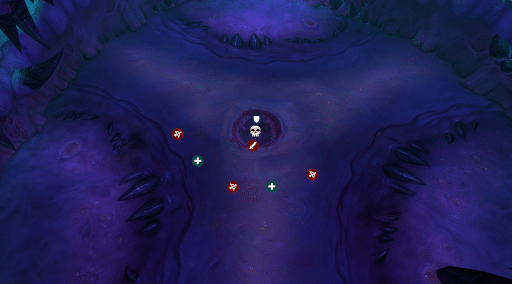
Here’s what the room looks later in the phase, almost completely covered in green goop:
Bubbling Breath
Frontal cone, deals 214k nature to anyone hit
Also applies a DoT, deals 35k Nature every second for 10s
Occurs more frequently as Shad’har’s HP is reduced
Dodgeable
Frenzy
At 30%, boss enrages and deals 25% increased damage from all abilities
Strategy
Tank the boss near the middle of the room
That’ll make it easier to dodge the various frontal cone abilities
See section below for Tanking info
If you’re targeted by the initial application of Debilitating Spit with 4 stacks, use a defensive CD/healthstone/health pot
If targeted by Living Miasma, just move away from the raid to reduce the AoE damage
Always dodge the frontal cone breath abilities. Umbral Breath, Entropic Breath, Bubbling Breath are all dodgeable. Don’t let yourself get hit
In Phase 1, dodge the purple swirlies on the ground
In Phase 2, all ranged DPS should help soak the Entropic Buildup void orbs. More soaking is not a bad thing
As the phase progresses, more and more soaking will be required. Please help soak so your raid doesn’t explode
Phase 3 is a hard burn phase. Healers will want to save their raid CDs for sub 30%, and rotate them from there
Bloodlust when the boss dips below 30%
Healers may want to time using CDs for Living Miasma explosions. With the reduced space in P3 as the fight goes on, it’ll be harder to properly drag the slime away before it explodes, so expect the damage actually taken per explosion to go up
When you enter Phase 3, the Bubbling Overflow puddle will spawn at the center of the room and slowly grow larger. Eventually it CAN grow large enough to cover the entire room. This is a soft enrage. Do not stand in the puddle
As the puddle grows, tanks will need to inch the boss closer to the edges of the room. Try to have the boss close to the edge of the puddle
The puddle makes dodging Bubbling Breath much more difficult over time. Ranged/healers should move closer to the boss, making dodging the Breath require less movement
You’ll also periodically have green swirlies spawning throwing more Bubbling Overflow. These are targeted at random player locations. Try to bait these either in the existing puddle, or towards the opposite direction of where the raid is planning on moving to as the puddles grow
Don’t trap yourself and kill the raid
Nuke hard, use all CDs, don’t get hit by breath, and hope you beat the soft enrage of running out of room
If you get the first application of Debilitating Split in Phase 3, pop any/all defensives you have to keep yourself alive. That DoT plus the standard P3 DoT will cause 466k total damage over a 5 second time period, assuming 2 ticks of the basic P3 DoT.
If you don’t have any personals left, call for a healer external.
Tank Info
Crush and Dissolve are cast in a random order sequence, with 3 abilities total per combo
Each tank should be assigned one ability they’re responsible for taking. Tank 1 is assigned to all Crushes, Tank 2 is assigned to all Dissolves
Taunt swap as needed to make sure you stick to this assignment
NEVER take a Dissolve if you have the Crush debuff
If the boss uses Crush twice during the combo, Tank 1 needs to make sure they use a personal CD to survive
Positioning
Normal positioning for P1 and P2:
If you get Living Miasma, move away from the raid:
In Phase 3, you’ll need to move the boss towards the edge as the green goop grows:
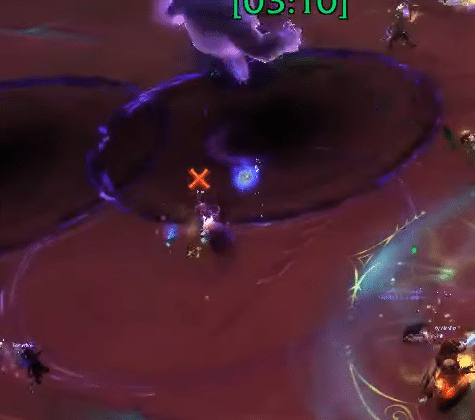
Big tentacle gal trying to win over N’zoth’s heart. Technically a one-phase encounter, but alternating between killing off smaller tentacles and burn phases on the boss.
Drest’agath
Aberrant Regeneration
Heals self for 11.2 million health every 5 seconds
Cannot heal damage which was inflicted by players with Void Infused Ichor
Throes of Agony
When boss hits 100 Agony (energy), flails and deals 39k Nature damage to the raid every 2s for 10s
Void Grip
Grabs a target, pulls them to the boss, stuns them for 5s
Only occurs when nobody is within melee range of the boss
Volatile Seed
Occurs at 0:05, then every roughly 17 seconds
Puts a 10s DoT on the current tank
Deals 107k Shadow every 2s for the 10s
When it ends, explodes in a Volatile Detonation
Deals 143k Shadow damage to all players AND tentacle adds within 13 yards
Players hit take 60% increased damage for 15s
Tentacles hit (other than the actual boss) take 60% increased damage for 15s
Entropic Crash
Occurs at 0:15, then every 45 seconds
Large AoE, deals 533k Shadow to the whole raid, reduced based on distance
Also causes all tentacle adds to cast the same ability
Mutterings of Insanity
Occurs at 0:30, then every 50 seconds
Denoted by a large void swirlie
Slows a random target until they’re immobile over 5 seconds
Targets 1 additional player for each Maw of Drest’agath add alive
After 5s, explodes for 160k Shadow damage to everyone within 12 yards
Also stuns anyone hit
Void Glare
Occurs at 0:45, then every 45 seconds
Giant void beam from the boss’s face, deals 71k Shadow damage every 0.5 seconds to anyone hit
Also cast by all active Eye of Drest’agath adds
Adds
Dismemberment
Whenever an add dies, Drest’agath gains 5 Agony every second for 5 seconds
Void Infused Ichor
When tentacle adds die, they leave behind small void puddles
These puddles last for 25 seconds before disappearing
Touching a puddle makes it disappear and debuffs you for 30 seconds
While you have this debuff, the damage you deal to the boss cannot be healed back by her passive healing
When you pick up Ichor, you get Umbral Aversion, a 1 minute debuff preventing you from picking up Ichor again
Eye of Drest’agath
Mind Flay
Deals 28k Shadow damage every 1 second and slows the target for 5 seconds
Errant Blast
Cast when the boss hits 100 Agony
Causes gunk to fall from the ceiling every 3s for 9s
If hit by the gunk, deals 143k Shadow damage
Gunk spots are denoted by red swirlies
Tentacle of Drest’agath
Crushing Slam
Slams the ground and deals 143k Shadow damage in a circle around it
Cast non-stop by this mob, except if Reality Tear occurs
Void Miasma
Creates a cloud around itself. Standing in the cloud deals 53k Shadow damage every 3s
Creates a small moving void zone on the ground every 3s for 9s
Deals 143k Shadow damage to anyone it touches
Maw of Drest’agath
Mutterings of Betrayal
Applies a 71k healing absorb debuff to all players within 10 yards
Stacks
If you reach 4 stacks, you become Hostile to the raid
Acid Splash
Spits acid at a random player, dealing 107k Nature damage to the player and anyone within 4 yards
Spine Eruption
Cast when the boss hits 100 Agony
Releases random sized rings of spines, deals 160k Physical damage every 3s for 9s
Positioning
Since Drest’agath is stationary, your tank should just face her away, and everyone should be spread around the room. Move to the adds you need to kill as they spawn.
Strategy
You start out fighting Drest’agath and two Eyes of Drest’agath
Tanks need to be on Drest’agath the entire fight. The adds don’t require a tank
Tanks will swap when Volatile Seed is applied
When you get seed, move to the adds, preferably a Tentacle if possible
Players afflicted with Mutterings of Insanity need to move towards the edge of the room
Everyone else needs to make sure they aren’t in the giant swirlie
Damage should be focused on the adds, as anything you do to the boss will just be healed up
Healers should use a raid CD every time the boss casts Throes of Agony
Make sure to get out of the purple graphic for Entropic Crash
Make sure to dodge Void Glare, both from the boss AND any Eye adds which are alive
The tank afflicted with Volatile Seed should try and have it explode on as many of the adds as possible
In general, you want melee DPS to nuke the Tentacle, and ranged DPS to nuke the Maw
You’ll need 1-2 healers to be within the cloud for the Tentacle to keep the melee DPS alive
Once the Tentacle or Maw dies, those DPS players then move to any remaining Eyes
About 25 seconds into the fight, you’ll have 3 adds spawn. One Eye, one Tentacle, one Maw
Try to hold off killing the initial 2 Eyes you start with. You want to kill the 2 Eyes and 1-2 of the newly spawned adds around the same time
Each add you kill drops 5 puddles of Ichor, and they last 25 seconds
Once you kill enough adds that every DPS player can get an Ichor , everyone should run over a puddle to get their Ichor debuff
Follow this up with Bloodlust, and a hard nuke phase on the boss
Ignore any remaining adds until the Ichor debuffs drop, then swap and kill them
From that point on, kill adds as they spawn. Make sure all Ichor puddles get soaked.
Prioritize letting DPS who have their cooldowns available to soak puddles
Soaking puddles, and then letting people with Ichor nuke the boss, is priority
Whenever you don’t have Ichor, work on killing off add