Ra-den
- New 3rd orb – Essence of Nightmare
- When it hits Ra-den, causes Unleashed Nightmare
- Missiles cast at every player’s feet, dealing 295k damage within a 5 yard radius
- When it hits Ra-den, causes Unleashed Nightmare
-
- Unstable Nightmare
- Debuff with 5 stacks, lasts 6s
- After 6s, explodes for 343k Shadow damage to everyone within 15 yards, then jumps to the closest player
- After it jumps, the 6 second duration followed by the explosion repeats
- Each jump uses 1 stack
- 5 people total will be affected by this
- Causes Instability Exposure, like all other Unstable abilities
- Unstable Nightmare
-
- Night Terror add
- Casts Dread Inferno
- Giant fire tornado, follows a random person
- Deals 122k/s to anyone hit
- Casts Dread Inferno
- Night Terror add
- Since there’s 3 orbs each time now, there will be 2 orbs empowering Ra-den each time
- You need to alternate which orb you kill each time
- Vita changes
- The Vita add’s chain lightning now INCREASES damage each jump, requiring the raid to to spread out >5 yards
- Void changes
- Void collapse now splits 2.9 million Shadow damage, which is effectively 150k per person, assuming everyone alive
- Phase 2
- Decaying Strike DoT is now 100% of the tank’s current health when applied per 2 seconds, up from 75%
- Ra-den also gains a new ability – Corrupted Existence
- This places a debuff on 3 targets for 15s
- The debuff instantly deals a massive amount of Shadow damage, and also increases the max HP of the affected players
- If at any point a player with this debuff reaches full HP, they instantly die
Strategy
We recommend going in with 2 tanks, 3 healers, and 15 DPS. This fight is a fairly tight DPS check as of the time of writing, and we expect that to continue for a few more weeks. This fight will take you a lot of pulls, and is probably the first boss that’ll be a bit of a wall for your raid.
Phase 1
- This phase is significantly more difficult on Mythic. The addition of the 3rd Orb complicates things greatly.
- You want to ensure you push into Phase 2 before the 4th set of orbs reaches the boss
- Use Bloodlust on pull to help ensure this happens
- UPDATE 4/25/2020
- It’s now possible with current gear and corruption levels to push Ra-den into Phase 2 allowing only 2 sets or Orbs to reach him. We recommend using Bloodlust on pull, and pumping damage into Ra-den to achieve this. When the 3rd set of Orbs spawns, your tanks should kite the boss away giving your DPS enough time to push into 40%
- Tanks should swap after each Nullifying Strike
- Make sure when a Nightmare Orb is about to hit the boss, you spread out. If you’re standing within 4 yards of someone else when the missiles hit you, you’ll both likely die. That’s just not ideal.
- You’ll want to pre-assign two groups of 5 players to handle the Unstable abilities
- Each group should also have 2 assigned backups
- Group 1 will always handle Unstable Vita. If there’s no Unstable Vita, this group will handle Unstable Void
- Group 2 will always handle Unstable Nightmare. If there’s no Nightmare, this group will handle Unstable Void
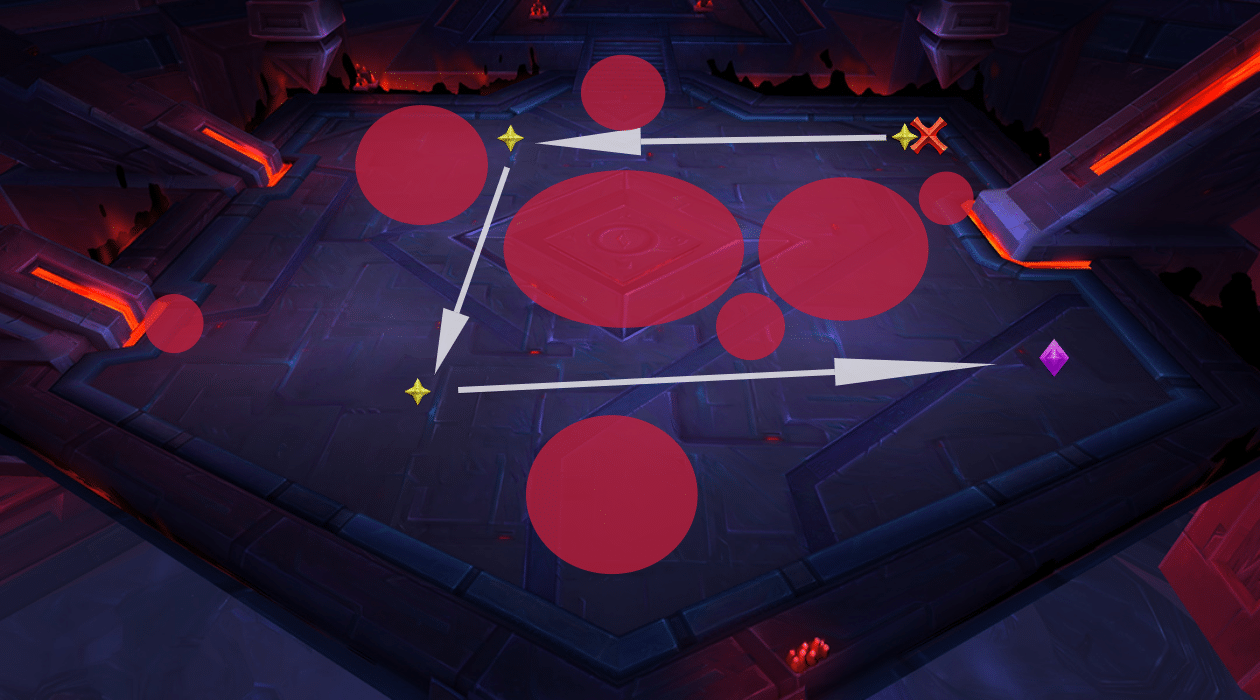
- Utilize the positioning graphic below

-
- Tank the boss on Skull, with the group stacked on X
- Players with Unstable Nightmare will run to either Diamond or Triangle. The next assigned person for Nightmare to jump to will run to either Moon or Blue (obviously, run to the one on the same side as the person with Unstable Nightmare)
- Once Nightmare jumps from Diamond to Moon, the person who now has the debuff runs to Diamond, and the next person in the order runs to Moon
- Rinse and repeat
- Players with Unstable Vita will use Star and Circle. The FIRST application of Unstable Vita should run to Star. Have it jump back and forth from Star, to Circle, and back again, just like Heroic.
- Players handling Unstable Void just need to go soak, like on Heroic.
- You can either just pre-assign a set order, or use the same weakaura the guild did on the WF Ra-den kill:
- https://wago.io/0pFsUA824
- If you use this Weakaura, please read the instructions and understand exactly how it works
- If you use this, it’ll assign which group is doing Vita, Void, or Nightmare itself. You’ll just need 2 teams assigned with your backups.
- We recommend killing the orbs in the following order: Nightmare > Void > Vita
- UPDATE 4/25/2020 – If you’re aiming to push before the 3rd orbs reach the boss, we recommend killing Vita first, then Void.
- When the orbs spawn, DPS need to swap immediately. They have a very large health pool, and it’ll be tight killing them
- You can also have your tanks move Ra-den as necessary
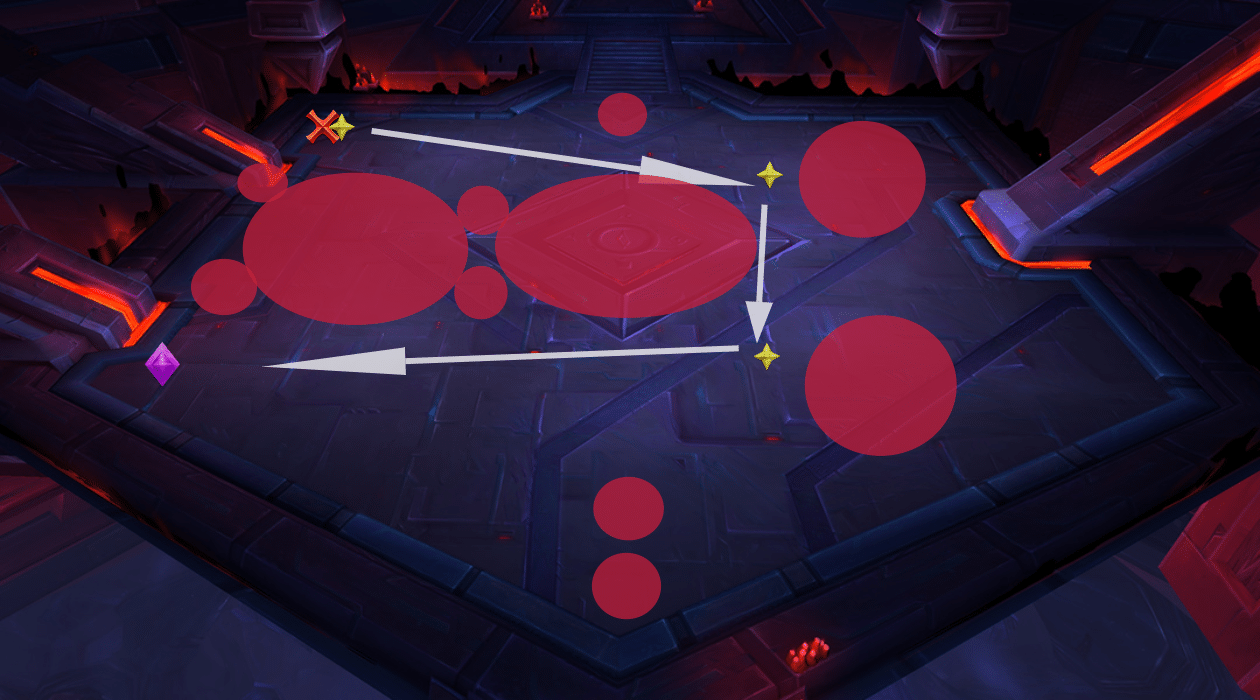
- The most difficult orb to kill in time is the Nightmare Orb. When you’re killing this orb, we recommend that your tank drags Ra-den up the stairs by the entrance of the room, giving you as much time as possible. See below:

-
- As soon as the Nightmare Orb dies, the boss needs to be moved back to his original positioning. Move quickly, you don’t want to be in the way of the Unstable Vita jumps
- As far as the adds are concerned, the Void and Vita adds are much more dangerous on Mythic. The Nightmare add is by far the least lethal
- Kill Priority is always Void > Vita > Nightmare. Yes, we know there’s only ever 2 adds, but this priority holds true regardless of which set you’re on
- Void Add
- When Void Collapse is cast, make sure it’s dropped directly on the group. The only exception is if the player targeted has an immunity, in which case they should move out of the group and use said immunity.
- Vita Add
- The Chain Lightning now jumps, and increases in damage
- When these adds are up, loosely spread so the Chain Lightning doesn’t jump through every player and just wipe the raid.
- Additionally, since this is a targeted cast, the player being targeted can try to move out of the group. It’s a relatively short cast, but every bit helps.
- Nightmare Add
- These guys periodically spawn 2 fire tornados that follow people. The tornados really don’t hit that terribly hard. They should just be kited around by the targeted players, away from the rest of the raid
- Killing these adds is definitely lower priority than either other type. It’s OK to leave them up until right before the next set of orbs spawns. If one does happen to still be alive when orbs spawn, shift your entire focus to killing the orbs, then finish off the Nightmare add.
- Add Overlaps
- Void + Vita
- This is the most difficult overlap to deal with, which is why we recommend doing this set first. Learn it early, then get it out of the way.
- UPDATE 4/25/2020 You’ll now want to skip this set altogether
- Your healers will need to commit 1-2 raid CDs during this overlap
- The raid should loosely spread until Void Collapse is cast. Once the cast finishes, the raid should spread out again
- Make sure not to get in the way of the Unstable Vita in the back of the room
- Focus down the Void add ASAP. Do NOT let a second Void Collapse be cast
- Void + Nightmare
- Fairly straightforward
- Everyone can be stacked in melee range
- Players targeted by the tornados need to run out of the group and kite the tornado around
- Vita + Nightmare
- Kill the Vita add first
- Loosely spread to prevent Chain Lightning from jumping too many times and killing people
- Players targeted by the tornados need to run out of the group and kite the tornado around
- Void + Vita
- Phase 2
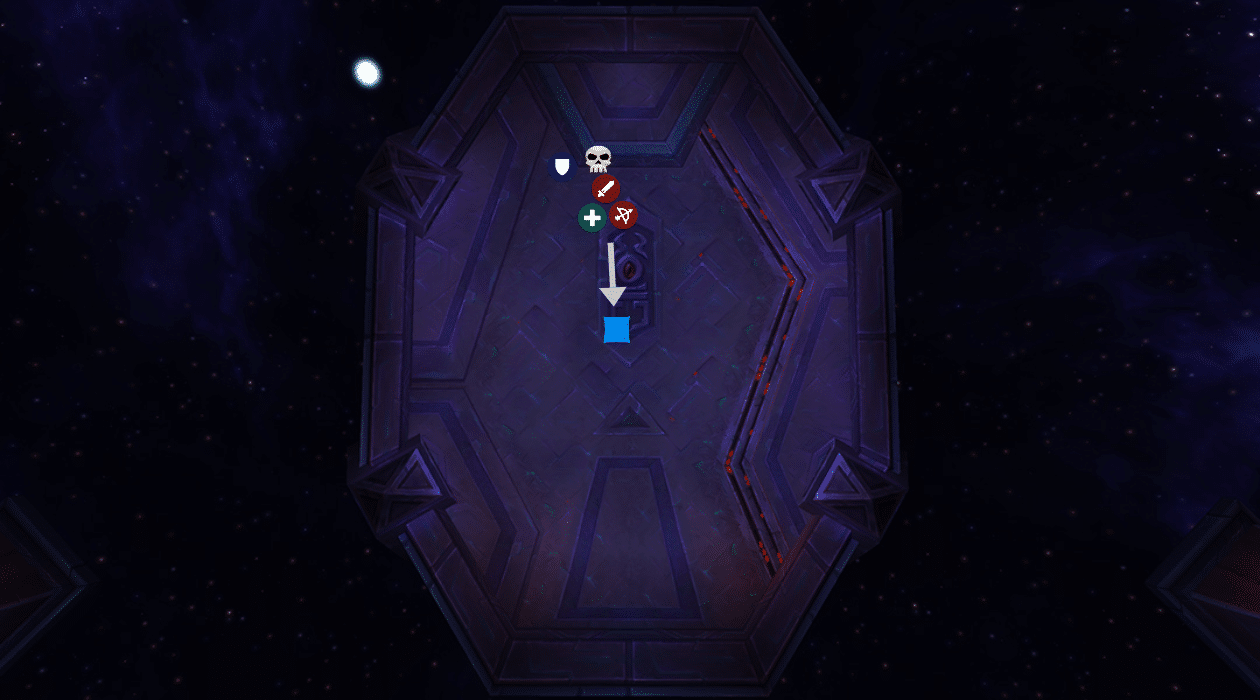
- During P2, everyone should be stacked in melee range to help the healers more efficiently keep everyone alive
- The primary player affected by Charged Bonds needs to yeet the hell out of the group ASAP. Other players chained to them can help by moving in the opposite direction
- To make this easier, we recommend always having the primary target of Charged Bonds move to the right-hand side. Other chained players should move left.
- Everyone needs to move ASAP for Void Eruption. Getting hit is very likely to result in a death
- Tanks and healers need to focus on managing Decaying Strike properly
- Pre-assign which tank will take the Decaying Strike. We’ll refer to this person as Tank 2
- We recommend this be your tank with better self-healing. BDK, VDH, even Protadin
- Tank 1 will hold the boss the majority of P2. Tank 2 will only taunt for Decaying Strike, then Tank 1 will taunt back immediately after the Strike is applied
- Tank 2 should be no higher than 50-60% HP when the Decaying Strike goes out. Lower is ideal.
- To help facilitate this, healers should stop healing Tank 2 about 4s before the Decaying Strike goes out
- Tank 2 should also use a macro to remove any HoT effects during this 4s window
- Tank 2 can also let themselves be hit by a Void Eruption if the timing works out
- Immediately after the Decaying Strike goes out, Tank 1 needs to taunt the boss back, and Tank 2 goes into self-healing mode. Do everything you can to help the healers keep you alive
- Pre-assign which tank will take the Decaying Strike. We’ll refer to this person as Tank 2
- The healers also need to keep an eye on the players with Corrupted Existence
- Let these affected players float around 60% hp
- These players should move about 8-10 yards out of the group, to help reduce how much passive healing they receive
- IF YOU ARE A DEMON HUNTER and you get affected by Corrupted Existence, your life is in grave danger. Your leech can be a major problem, especially if you’re in Meta and have the Soul Rending talent.
- You should NOT use the Dribbling Inkpod trinket on this fight if you’re a DH. We had a DH’s Inkpod crit while they had Corrupted Existence and were in Meta. The 20% leech heal from the Inkpod crit healed him to full and instantly killed him. Great meme, bad for prog.
- Kill this big boy before your raid just slowly falls over from the damage